Unpack the Machine Crate
CAUTION! Sharp Objects Hazard: Before opening the shipping crate, you must put on work gloves and safety eyewear that meets ANSI Z87+. If you don't, the shipping crate and steel straps could cut you, causing serious injury.
-
Put on work gloves and eye protection.
-
Cut and remove the steel straps on the shipping crate with snips.
-
Disassemble the shipping crate with a hammer and pry bar. Start with removing the top, followed by the four sides.
-
Remove and discard the plastic wrap from the machine.
-
Inspect the item(s):
-
Photograph any damage that may have occurred during shipping.
-
-
Verify the received goods against the packing list.
If there is any damage or shortages, you must contact Tormach within 30 days of receipt. Create a support ticket with Tormach Technical Support at tormach.com/how-to-submit-a-support-ticket for guidance on how to proceed. -
Cut and remove the shipping straps securing the tool bag and Emergency Stop box to the pallet.
The tool bag contains the following items:
-
770MX Cable Kit
-
BT30 gripper installation tool
-
Double open-end wrenches: 13 mm/16 mm, 18 mm/21 mm
-
Electrical cabinet key
-
Hex wrench set: 3 mm, 4 mm, 5 mm, 6 mm, 8 mm, and 10 mm
-
Hook wrench (for spring stack)
-
Phillips screwdriver
NOTE: There are two spare fuses included with the machine (5A, 5 × 20 mm, glass slow-blow), which are taped to the inside of the electrical cabinet.
-
Remove all packing materials from the spindle head.
Install the Y-Axis Motor
NOTICE! The axis motor wires can't support the weight of the motor. To avoid property damage, carefully move the motors.
-
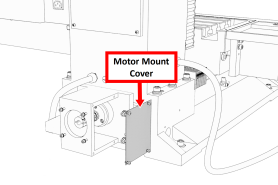
Remove the screws securing the motor mount cover with a 3 mm hex wrench. Set the screws and cover aside.
-
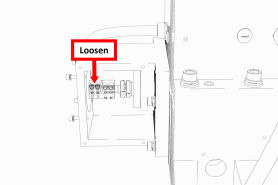
Loosen the two motor shaft coupling screws with a 3 mm hex wrench.
-
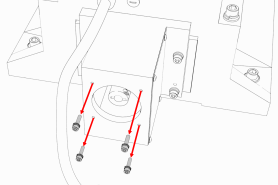
Remove the four M5 cap head screws, lock washers, and washers from the motor mount with a 4 mm hex wrench. Set all aside.
-
Remove any paint bleed from the face and bore of the motor mount with a mild abrasive.
-
Remove the Y-axis motor from the pallet and/or the machine, and discard the shipping materials.
-
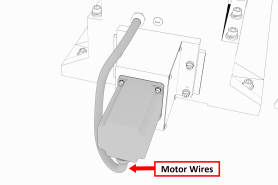
Mount the Y-axis motor onto the Y-axis motor mount with the four M5 cap head screws, lock washers, and washers that you removed in Step 3. Verify that the motor's wires face the floor, and that the motor and motor mount faces are flush.
-
Securely tighten all four M5 cap head screws.
-
Position the coupling so that it's centered between the motor shaft and machined end of the ball screw, and then tighten the cap screws on the coupling.
-
Replace the motor mount cover that you removed in Step 1.
Lift and Move the Machine
For safety and security, use the Lifting Bar Kit (PN 31446) to lift the machine from above.
NOTE: It's possible to lift the machine from below with two steel bars — one in either 7/8-in. (22 mm) diameter hole on the machine base. The bars must be made of steel, at least 32 in. (813 mm) long, and must not be hollow. You must make sure that the machine is properly secured before lifting so that it does not roll or shift in the process. For maximum safety and security, we strongly recommend that you lift the machine from above, as outlined in this section.
-
Move the machine's pallet and stand as close as possible to the desired location with a pallet jack. The machine stand must be positioned behind the machine.
-
Remove any excess shipping grease on the machine with a mild degreaser (like WD40® or similar).
-
To allow room to position the engine hoist, you must first trim the pallet: cut the machine's pallet along the sides of the machine's base casting with a reciprocating saw (or similar).
-
Remove the nuts from the four studs that hold the machine to the pallet with a 19 mm wrench. Discard the nuts.
WARNING! Transportation and Lift Hazard: Before moving the machine, you must confirm that all persons are clear of the area below the machine. Qualified professionals must transport, lift, and move the machine. Moving parts can entangle, pinch, or cut you, causing death or serious injury.
Lift the machine from above. Complete the following steps in the order listed:
Required Tools
This procedure requires the following tools. Collect them before you begin.
-
Adjustable wrench
-
Clean cloth
-
Engine hoist
Before You Begin
-
Inspect the lifting chain for any broken links, and all other parts to make sure that there are no breaks or imperfections. If you find any broken links or imperfections, we can help. Create a support ticket with Tormach Technical Support at tormach.com/how-to-submit-a-support-ticket for guidance on how to proceed.
-
Use a clean rag to remove any shipping grease from all components in the Lifting Bar Kit and from the surface of the machine table.
Assemble the Lifting Bar Kit
-
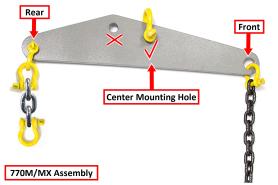
Find and identify the correct Lifting Bar Kit mounting holes specific to your machine:
-
On each end of the Lifting Bar Kit are the front and rear mounting holes: the front connects the lifting chain to the machine table, and the rear connects to the machine column itself.
-
In the center of the Lifting Bar Kit are two mounting holes: one for each mill model.
-
-
Put one 3/8-in. forged lifting clevis and the lifting chain into the front mounting hole.
-
Depending on your machine, the center hole that you use varies. Put the 1/2-in. forged lifting clevis in the appropriate center mounting hole that you identified in Step 1.
-
Depending on your machine, the procedure for the rear mounting hole varies:
-
770M/MX Put two connected 3/8-in. forged lifting clevises, one three-link chain, and one 3/8-inch forged lifting clevis into the rear mounting hole.
-
Connect the Machine for Lifting
-
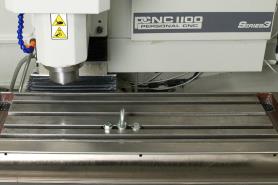
Move three M12 T-nuts into the front T-slot on the machine table and arrange them in the center as shown in the following image.
-
Put the M12 lifting eye in the center M12 T-nut.
-
Securely tighten the M12 lifting eye with an adjustable wrench.
-
Put one M12 × 25 mm hex bolt and one M12 flat washer into the each of the remaining M12 T-nuts.
-
Securely tighten the two M12 × 25 mm hex bolts and two M12 flat washers with an adjustable wrench.
-
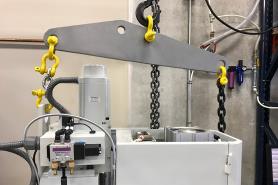
Connect the loose end of the lifting chain to the M12 lifting eye.
-
Connect the hook from your engine hoist to the center 1/2-in. forged lifting clevis on the lifting bar.
-
Depending on your machine, the procedure for connecting the lifting bar varies:
-
770M/MX Connect the lifting bar's rear 3/8-in. forged lifting clevis to the lifting bracket on the rear of the machine column.
Lift the Machine
-
Without yet lifting the machine, raise the engine hoist to remove any slack in the lifting chain.
-
Verify that the connections on the M12 hex bolts and the M12 lifting eye are securely tightened with an adjustable wrench.
WARNING! Tip Hazard: Before lifting the machine, you must verify that it's properly leveled. If the machine isn't level while it's lifted, the load on the engine hoist can unexpectedly slide, causing death or serious injury. -
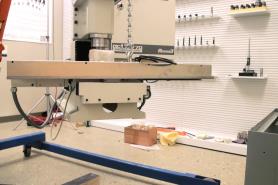
Slowly and steadily lift the machine to examine the alignment. The machine must lift flat and stay parallel with the floor, as shown in the following image.
-
If necessary, lower the machine and adjust the position of the M12 T-nuts.
-
Continue to lift the machine until it reaches the height at which it can clear the machine stand.
-
Position the machine above the machine stand.
-
Slowly and steadily lower the machine on to the mounting pads on the machine stand, as shown in the following image.
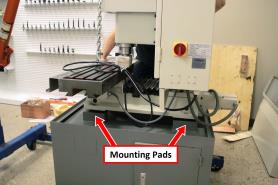
WARNING! Crush Hazard: While lowering the machine onto the machine stand, you must keep your hands away from all moving parts. Moving parts can entangle, pinch, or cut you, causing death or serious injury.
-
Secure the machine to the machine stand with a 10 mm hex wrench, four M12 × 50 mm socket head cap screws, and four M12 washers.
-
Once the machine is completely supported by the machine stand, remove all components of the Lifting Bar Kit.
Looking for more information?
This is a section of the 770MX operator's manual. To view the whole manual, go to Tormach document UM10587.
If you have additional questions, we can help. Create a support ticket with Tormach Technical Support at tormach.com/how-to-submit-a-support-ticket for guidance on how to proceed.
