Enclosure Switch Kit - PCNC 1100
Purpose:
This document details installation and use of the Enclosure Door Switch Kit on either a PCNC 770® or PCNC 1100® mill.
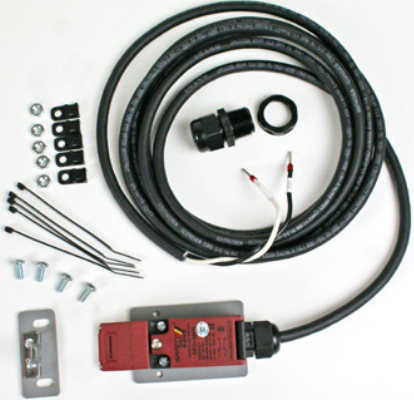
Qty. | Enclosure Door Switch Kit | PN |
1 | Door Switch w/ Plate (attached to 10’ of 2-conductor Wire) | – |
1 | Key w/ Plate | – |
5 | Mounting Tab | 31460 |
6 | Cable Tie | 31719 |
5 | 10-32 Hex Nuts | 34101 |
4 | 10-32 x 7/16” Screw | 32071 |
1 | Cord Grip | 31376 |
1 | Cord Grip Nut | 31867 |
2 | Wire Label (not shown) | – |
1 | Wire Cap | 38543 |
NOTE: If any of these items are missing, contact Tormach Customer Service at (608) 849-8381 for a replacement.
Installation
Power off the mill according to the Power Off/On Procedure detailed below.
 WARNING! Electrical Shock Hazard: Be sure to power off machine before making any electrical modifications. Failure to do so may result in serious injury or death.
Power Off/On Procedure
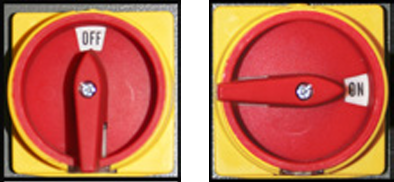
Power Off |
|
| |
3.Turn Main Disconnect Off |
Power On | 1.Turn Main Disconnect On |
| |
| |
|
Use two 10-32 x 7/16” Screws to mount the Key w/ Plate to the left enclosure door at the location shown in Figure 1.
Holes are pre-drilled and tapped.
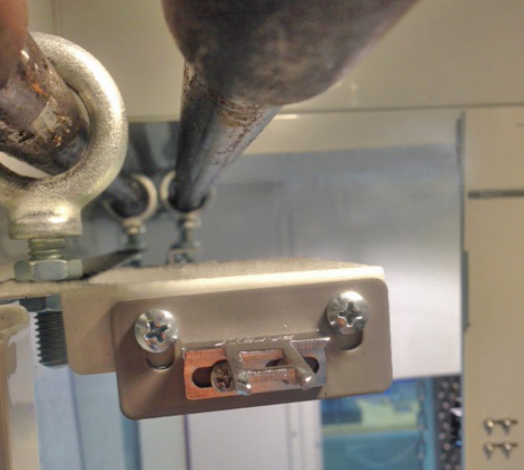
Figure 1
Use two 10-32 x 7/16” Screws to mount the Door Switch w/ Plate to the right enclosure door at the location shown in Figure 2.
Holes are pre-drilled and tapped.
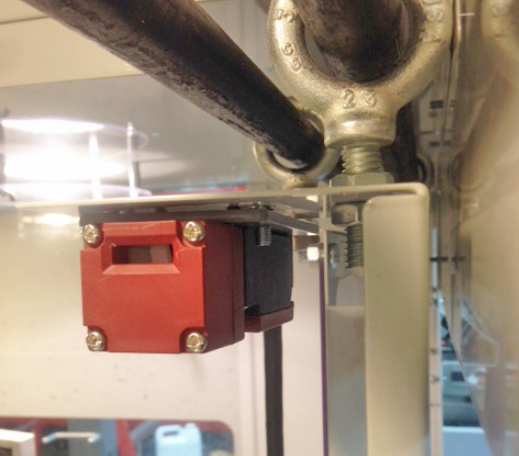
Figure 2
Route the 2-Conductor Wire from the Door Switch loosely over the back of the electrical cabinet.
Select a suitable entry location for the 2-Conductor Wire into the electrical cabinet.
Use a hole saw or Unibit to drill a 7/8” entry hole in the electrical cabinet.
IMPORTANT! Use caution when selecting entry hole location to avoid damaging electrical components/wiring inside cabinet. Make sure to keep debris and metal chips away from all electrical components.
Insert the Cord Grip from outside of the electrical cabinet and into the newly-drilled hole.
From inside the electrical cabinet, loosely attach with the Cord Grip Nut.
Route the 2-Conductor Wire through the Cord Grip assembly and pull enough wire through to reach electrical cabinet’s terminal block.
NOTE: The terminal block has multiple wire connections, some of which are not shown in the illustrations. To make accurate connections, you must note the slot number that is detailed in each step.
From the terminal block, in slot 4, remove wire J2-4.
NOTE: To make a terminal block connection, slowly insert the end of small, flat-head screwdriver straight into the slot above the wire and pry the terminal clip open carefully. Insert the wire into the terminal block, and then slowly remove the screwdriver.
Put the provided Wire Cap on wire J2-4 (see Figure 3).
Wire J2-4 is no longer used. Use a cable tie (provided) to secure the wire to the limit switch cable (see Figure 3).
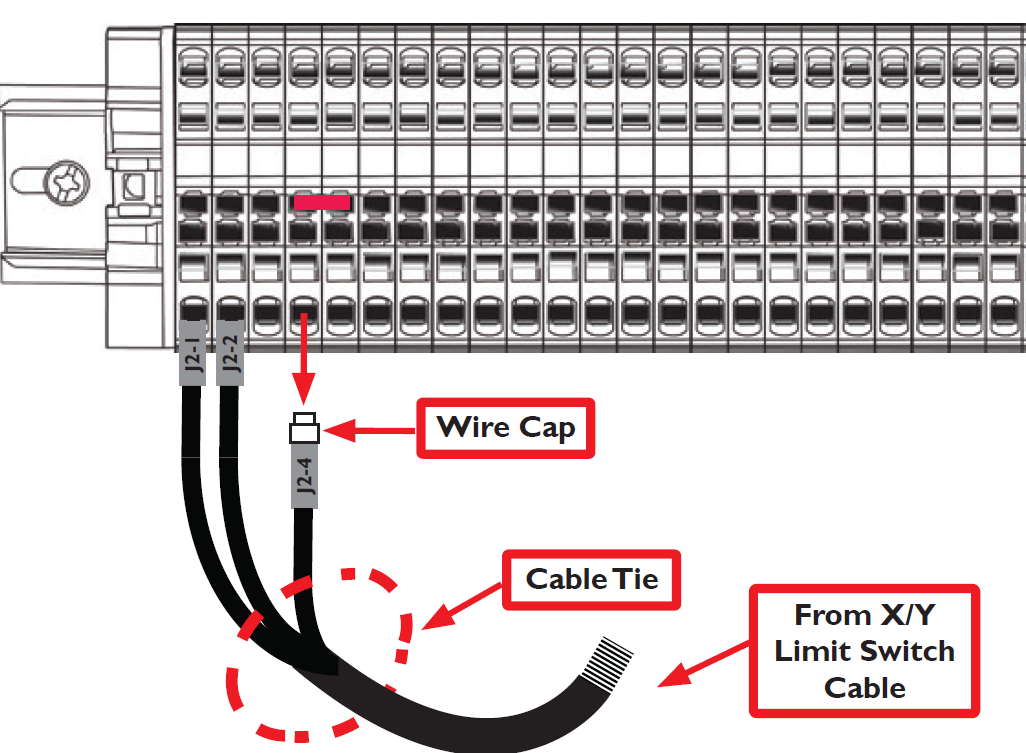
Figure 3
From slot 1, remove wire J2-1.
Move wire J2-1 to slot 4 (to the right) as shown in Figure 4.
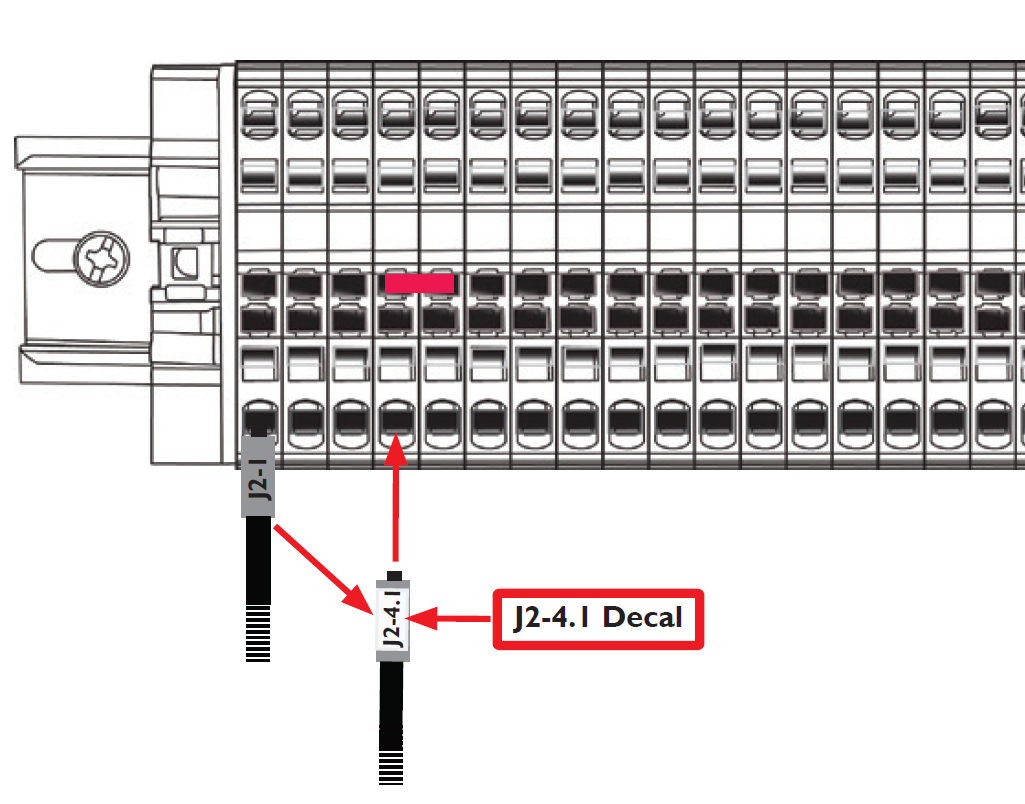
Figure 4
Put the provided J2-4.1 decal on wire J2-1.
In slot 5, on wire J2-4, put the provided JL-1 decal (see Figure 5).
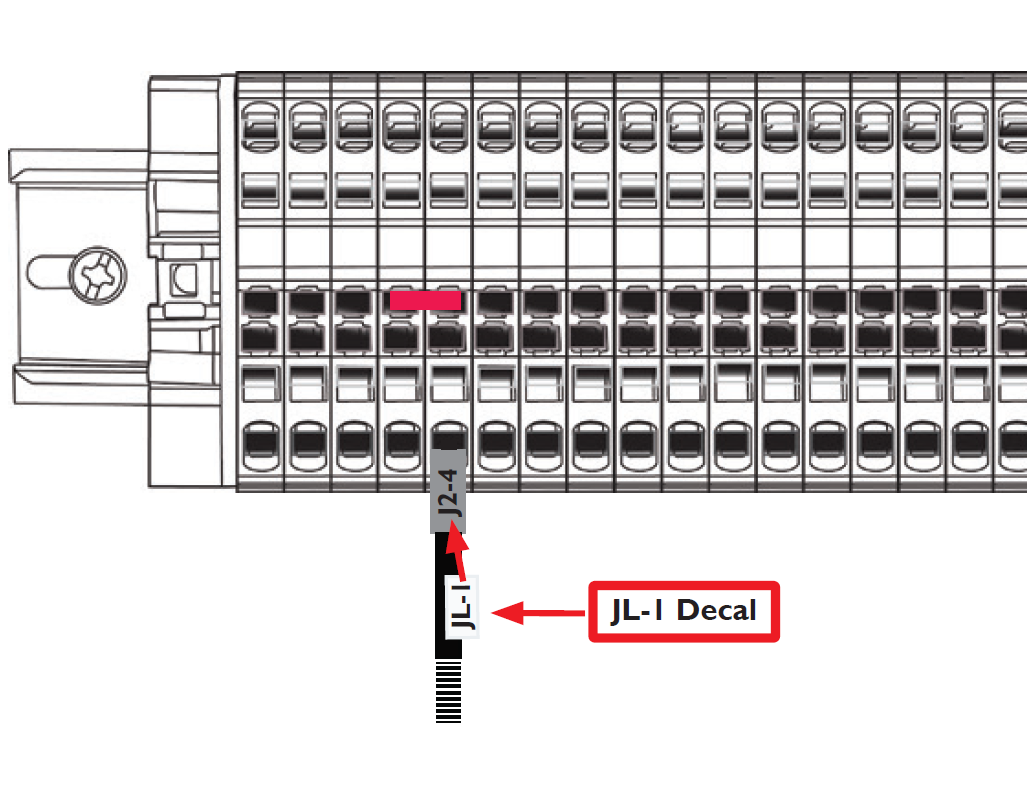
Figure 5
From the door switch, connect the black and white wires to the terminal block as shown in Figure 6.
When properly connected, wire J2-4 and wire J2-4.2 are linked by an existing red jumper, as shown in Figure 6.
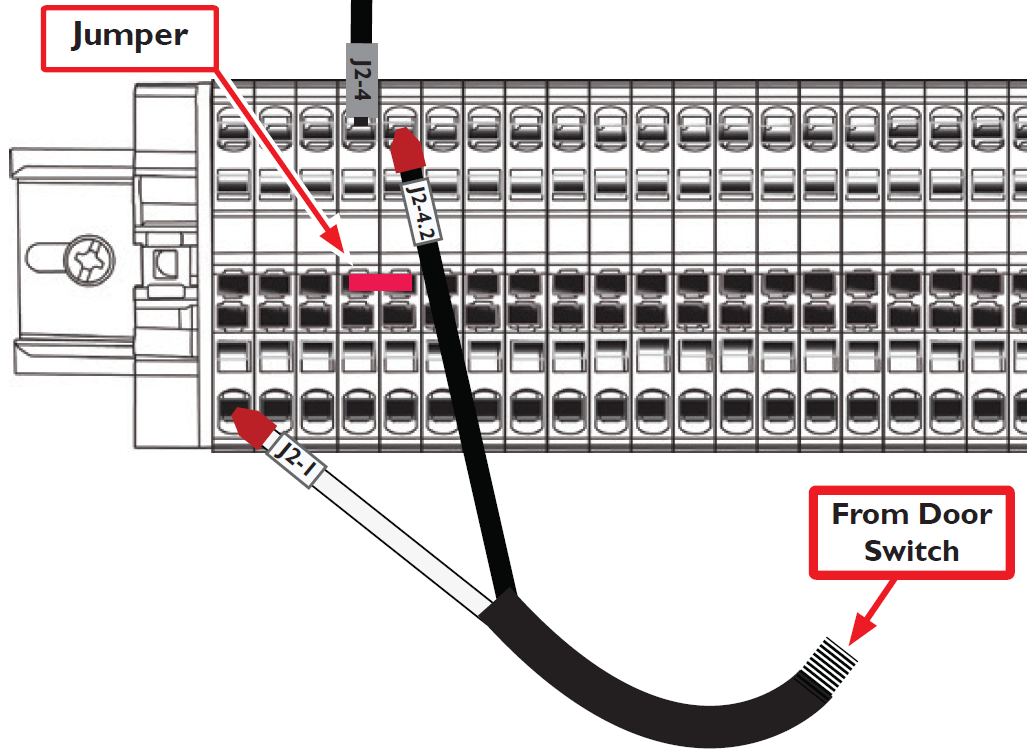
Figure 6
Use five 10-32 Hex Nuts to attach the Mounting Tabs to five preinstalled screws in the enclosure ceiling (see Figure 7 and inset).
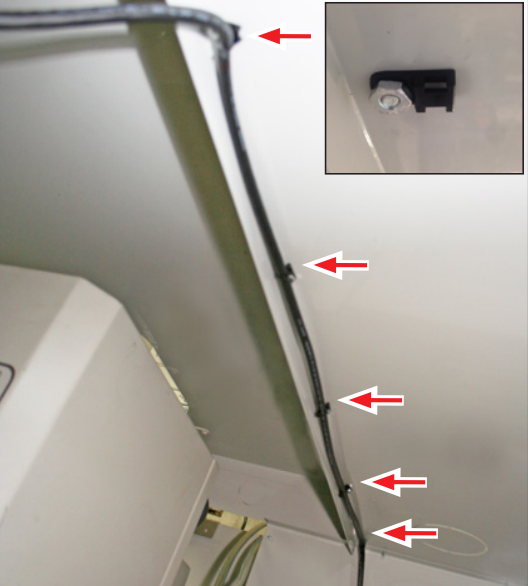
Figure 7
Insert the Cable Ties into the the Mounting Tabs.
Attach the loose 2-Conductor Wire to the enclosure ceiling with the Cable Ties, removing any slack from the Door Switch to the back wall of enclosure, and then tighten Cable Ties snugly.
Operation
From the PathPilot interface, on the Settings tab, select the Enable Enclosure Door SW checkbox to activate Door Switch (see Figure 8).
When the doors are open, all axis motion is stopped and the spindle speed is reduced to 1000 RPM. If the spindle speed is set below 1000 RPM when the door is opened, the spindle speed does not change.
NOTE: If, during a program, the doors are opened and then closed, the spindle RPM resumes. To resume axis motion, you must click Cycle Start (see Figure 8).
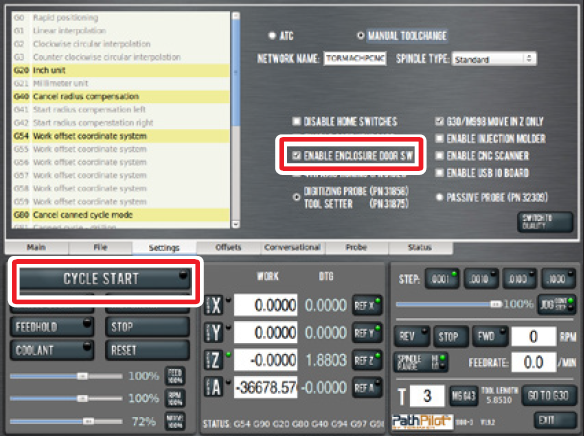
Figure 8
After selecting this setting, you must reference the X- and Y-axis independently — reference one axis before referencing the other.
1000 RPM is the pre-set spindle speed with the door open, but this may be changed.
To cap the spindle speed at 500 RPM with the door open, type ADMIN OPENDOORMAXRPM 500 in the MDI line on the Main tab.
To stop the spindle when the door opens, type ADMIN OPENDOORMAXRPM 0 in the MDI line.
NOTE: The Door Switch LED light on the Status tab is on when the doors are open, as shown in Figure 9.
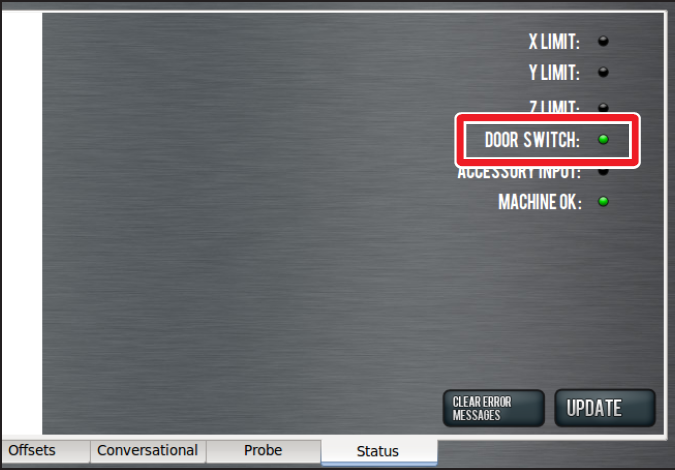
Figure 9
Electrical Schematic
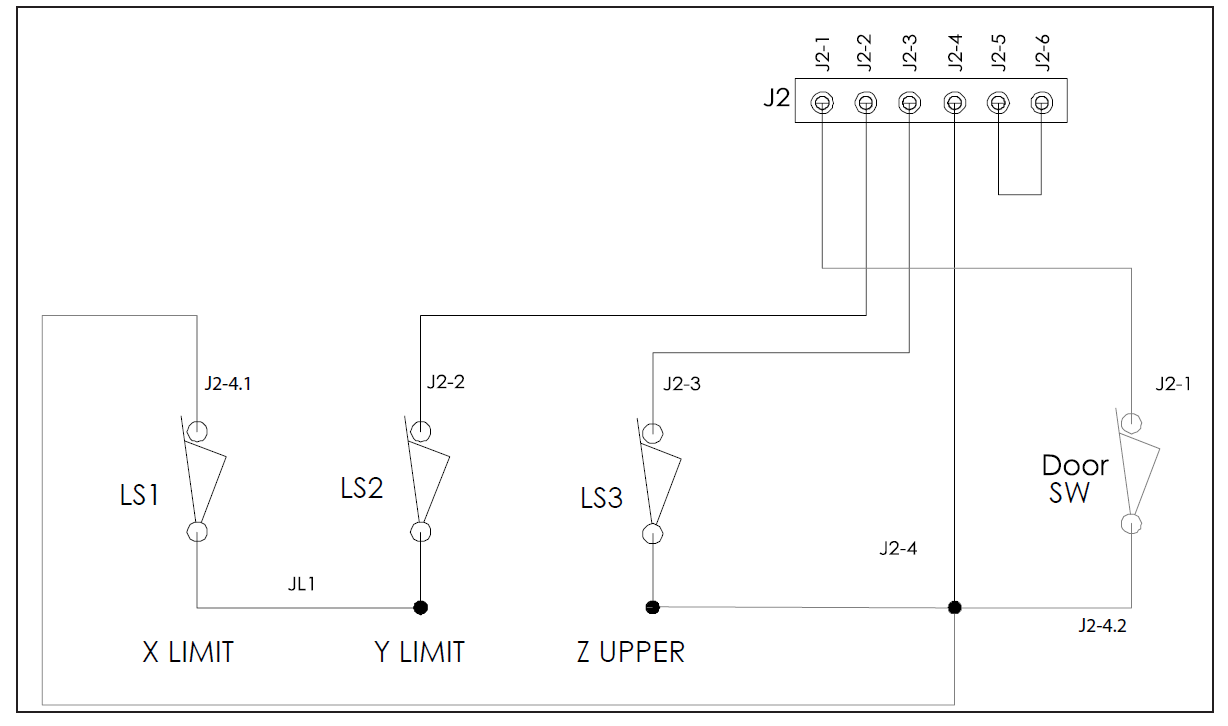
To view a PDF version of your manual, go to Tormach document TD10396.
If you have additional questions, we can help. Create a support ticket with Tormach Technical Support at tormach.com/how-to-submit-a-support-ticket for guidance on how to proceed.
