Background
To get the most out of your machine, the first thing that you need to do is reference the axes. This process causes the machine to move to the end of its axes and triggers a limit switch (for example, a momentary switch, a proximity sensor, hard stop to indexing, etc.). Until power is lost or there is a crash, the machine stores this location allowing full travel within the its envelope.
Referencing is not the same as setting your work coordinate offset (origin). After referencing the machine, you still need to set or reset your origin.
|
Machine |
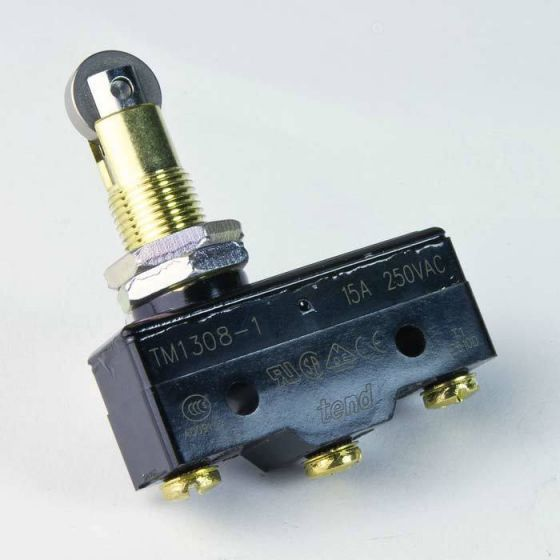
Reference Type |
Image |
|---|---|---|
|
1100M, 770M, 15L, 8L, xsTECH, PCNC 1100, PCNC 770, PCNC 440 |
Momentary switch |
|
Tools
-
Flat-bladed screwdriver
-
Small flat-bladed screwdriver
-
Metric hex wench set
-
Needle-nose pliers
-
Phillips screwdriver
-
Channel Locks
-
Digital multimeter
Reset the Machine in PathPilot
Reason: The machine software must be reset.
-
From the PathPilot interface, on the Main tab, select Reset.
-
Reference your machine: select Ref Z, Ref Y, and Ref X
Inspect the Limit Switches and their Connections
Reason: A limit switch is defective or disconnected.
-
From the PathPilot interface, on the Status tab, examine the axes' Limits LEDs.
-
If one or more of the status lights are illuminated, try Disable the Limit Switches (Stuck on a Limit Switch) first.
-
If all of the status lights are off, continue to the next step.
-
-
Locate the physical switches on the machine and manually activate them while watching the LEDs in PathPilot.
-
If the switches illuminate their respective status light, they are working; inspect the limit switch flags.
-
If a switch doesn’t illuminate its status light, continue to the next step.
-
If a switch illuminates multiple status lights, continue to the next step.
-
If a status light stays on even when the switch isn’t depressed, continue to the next step.
-
-
On the machine control board, located the J2 connecter and use a small piece or wire to jump the 414 wire to the 409 (X-axis), 410 (Y-axis), 411 (Z-axis) while watching the LEDs in PathPilot.
-
If one of the status lights doesn’t illuminate, replace the machine control board.
-
If the status lights illuminate correctly, continue to the next step.
-
-
Locate the malfunctioning limit switch, take a picture for future reference, and then remove the wires with a screwdriver.
-
With the switch in its normal state (not depressed), measure the resistance across the switches NC (normally closed) and C (common) terminals with digital multimeter set to resistance.
-
If the digital multimeter reads OL, shows a resistance in the MΩ, and/or doesn’t produce continuity tone, replace the switch.
-
If the switch measure 0-5 Ω, continue to the next step.
-
-
With the switch depressed, measure the resistance across the switches NC (normally closed) and C (common) terminals with digital multimeter set to resistance.
-
If the switch measure 0-5 Ω, replace the switch.
-
If the digital multimeter reads OL, shows a resistance in the MΩ, and/or doesn’t produce continuity tone, reinstall the switch.
-
-
Inspect the wiring on the malfunctioning switch for loose ferrules, terminal connections, fraying, or broken line.
Disable the Limit Switches (Stuck on a Limit Switch)
Reason: The machine is stuck on a limit switch.
-
From the PathPilot interface, on the Status tab, examine the axes' Limits LEDs.
-
Identify which axis is ‘stuck’ on a limit switch, indicated by a green light next to the axis letter.
-
On the Settings tab, clear the Limit Switches checkbox. Then, on the dialog box, select OK.
-
From the PathPilot interface, select Reset.
-
Jog the axis away from the limit switch that it's on.
-
From the PathPilot interface, on the Settings tab, select the Limit Switches checkbox to re-enable the limit switches.
-
Reference the machines axes to prevent the machine from getting stuck again.
Adjust the Limit Switch Flag
Reason: The machine crashed into the end of travel before referencing, the limit switch flag is improperly adjusted.
-
Jog the machine to its reference position.
-
From the PathPilot interface, on the Settings tab, clear the Limit Switches checkbox. Then, on the dialog box, select OK.
-
Push in the Emergency Stop button on the operator box.
-
Adjust the limit switch flag so you just hear the limit switch click.
-
Take the machine our of Emergency Stop, press the Reset button, and from the PathPilot interface, select Reset. Then jog the machine off of the limit switch.
-
From the PathPilot interface, on the Settings tab, select the Limit Switches checkbox to re-enable the limit switches and then reference the axes.
If the machine crashes again before triggering the limit switch, repeat Steps 2 through 6.