Lost Motion Testing and Gib/ACB Adjustment - PCNC 440
Background
Over the ownership lifetime of your machine, you may need to perform advanced maintenance adjustments to maintain the original factory precision. Before you do, read and understand the following sections:
Gib adjustment
Angular contact bearing preload adjustment
Geometry adjustment (tram)
While the adjustments are generally used to address component wear-in over time, you can also use them to correct misalignment from misuse, a hard crash of the system, or component replacement. The frequency of these procedures depends on both how the machine is used and how often.
Making the wrong adjustment could adversely affect mill precision. Before you making any advanced maintenance adjustment, make sure that you consider the following:
Why am I making this adjustment?
How will I measure the effect of this adjustment?
What unintended consequences may result from this adjustment?
If you decide to make an adjustment, be careful to avoid assuming the error. It could be attributed to a specific problem, or from the combined effect of several problems.
Example
The Z-axis gib is too loose, which causes the spindle head to tilt slightly downward toward the column. It's easy to assume that the issue is with the column and base connection (often referred to as tram), and make an adjustment by inserting shims between the column and base. Instead of correcting the real issue, though, this adjustment causes the column to slant back to correct for the head leaning down. Now, the machine is running in a slight parallelogram — and it still has a loose spindle head.
Definitions
The following definitions are important to the advanced maintenance discussion.
Lost Motion
The difference between commanded motion and observed motion, sometimes referred to as apparent backlash. There are a many components of lost motion, like:
Bearing compressibility
Conventional backlash
Sliding friction
Thermal expansion
Backlash
The major component of lost motion in a machine tool axis, which results from the clearance between moving mechanisms, sometimes referred to as play. There are two sources of conventional backlash that can be adjusted on the PCNC:
The space between the gib and the way needed to support an oil film, which is tuned by tightening the gib.
The space between the ball bearings and the races in the angular contact bearing pair that supports the ball screw, which is tuned by increasing the angular contact bearing pair preload.
How to Measure Lost Motion
Correctly measuring lost motion is critical to successfully making any advanced maintenance adjustments. Machine setup and tuning is done under no-load conditions; the precision measurements recorded in the Certificate of Inspection are taken under no-load conditions.
NOTE: The accuracy of a machined feature isn't an indicator of machine precision. Many factors contribute to the overall machined-part accuracy, such as tool flex, workpiece flex, fixture flex, thermal expansion.
Required Tools
Dial indicator (with increments less than 0.001 inches)
Dial test indicator
Magnetic dial stand
To Measure X-Axis Backlash
An analogous procedure is used to measure Y- and Z-axis backlash.
Mount a dial indicator on the machine table along the X-axis to the left of the spindle. Make sure that the tip points at the spindle.
Jog the Y- and Z-axis to position the spindle head so the indictor tip contacts the outer diameter of the spindle cartridge, as shown in the following image. Make sure that you're using the flat tip on the indicator, because it's contacting a curved surface.
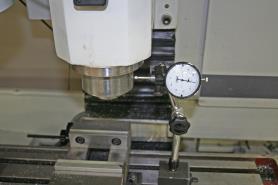
Figure 1: Dial indicator positioning.
Slowly jog the X-axis in the positive direction until the indictor contacts the spindle.
Continue jogging the X-axis in the positive direction so that the dial makes at least one complete revolution. Stop jogging when the dial reads 0.
From the PathPilot interface, select Zero X.
In the MDI Line DRO field, type G01 X.01 F5 to program a positive X move of 0.01 inches at a feed rate of 5 IPM.
The spindle head moves slightly in the +X direction. When finished, the indictor should read 0.010 inches.In the MDI Line DRO field, type G01 X0 F5 to program an X move back to 0.
The spindle head moves slightly in the -X direction. When finished, the X DRO should display 0, and the dial indicator should read a number very close to 0. This value is the measured lost motion.
Adjust the Gibs
We recommend making a gib adjustment by measuring the axis lost motion while incrementally tightening the gibs to arrive at the correct setting. For information, see "About Gibs".
IMPORTANT! It's difficult to assess the correct clearance for the gib. A very small adjustment can create a dramatic change in sliding friction.
The gib tightening adjustment procedure for each linear axis is detailed in the following table.
NOTICE! Before making any adjustments to the Z-axis, you must make sure that you support the spindle head with a wooden block on the machine table.
Gib Plate | Tighten | Notes |
X-Axis | Left screw clockwise/right screw counterclockwise | No cover removal required |
Y-Axis | Front screw clockwise/rear screw counterclockwise | Remove front and rear way covers to access gib screws |
Z-Axis | Upper screw clockwise/lower screw counterclockwise |
|
To loosen, reverse the rotation direction indicated in this table. | ||
To adjust the Z-axis gib:
NOTE: You can use a similar procure to adjust the X-axis and Y-axis gibs. You must not make adjustments to the X- and Y-axis gib adjustments isolation — tightening or loosening a gib on either axis also has an affect on the opposing axis.
Make sure that the gib clearance is loose: loosen the upper gib screw eight rotations and tighten the lower gib screw eight rotations.
If you haven't yet done so, measure lost motion in the Z-axis (For information, see, go to "How to Measure Lost Motion").
With a very loose gib, the majority of the measured lost motion is attributable to the backlash in the angular contact bearing pair. On a new machine, this value should be less than 0.002 inches on the Z-axis, and less than .0018 inches on both the X- and Y-axis.
Tighten the gib by one turn by loosening the lower screw first, then tightening the upper screw.
Re-measure the backlash.
Repeat Steps 1 through 4 until the measured backlash begins to increase. When finished, the gib setting should be slightly too tight.
Back the adjustment off to the point just before you saw the increased backlash.
This is the ideal setting for the axis.
NOTE: After any gib adjustment, make sure that both adjustment screws are tight to avoid moving the gib out of adjustment.
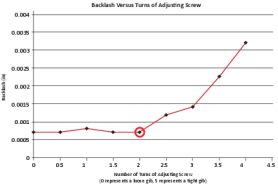
Figure 2: Backlash versus turns of adjusting screw graph.
About Gibs
The machine uses dovetail-gibbed ways to guide the X-, Y-, and Z-axis motion. Over time, the dovetail ways and gibs wear from sliding friction, and it may become necessary to tighten the gib to reduce axis backlash. To compensate for wear, the design of a dovetail-gibbed way allows for adjustment to the position of the gib in order to maintain an appropriate sliding clearance.
A properly adjusted gib minimizes lost motion by balancing conventional backlash and sliding friction:
If a Gib is Too Loose It can result in excessive conventional backlash.
If a Gib is Too Tight It can't adequately support an oil film, which can result in excessive sliding friction.
The position of the tapered gib plate is controlled by two screws on either end of the gib that capture the position of the gib with respect to the saddle. You can adjust these screws as a pair to tune the tightness and sliding friction of the dovetail way for each axis. For reference, see the Y-axis gib mechanical detail in the following image.
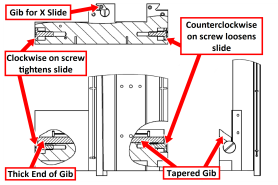
Figure 3: Y-axis gib mechanical detail.
NOTE: The X- and Z-axis have similar detail.
Adjust the Angular Contact Bearing Pre-Load
For information, see "About Angular Contact Bearing Pre-Load".
Required Tools
To Adjust the Angular Contact Bearing Pre-Load
Locate the adjustment nut on the back of each stepper motor.
Mark the current position of the adjustment nut on the back of the stepper motor.
Measure the lost motion in the axis. For information, see "How to Measure Lost Motion".
Use a Pin Spanner Wrench to turn the adjustment nut clockwise 10 degrees.
Re-measure the lost motion in the axis.
Repeat Steps 4 to 5 until the lost motion value does not decrease from turning the adjustment nut.
NOTICE! Don't over-tighten the adjustment nut, which could cause the stepper motors to stall, or cause damage to the bearings and the motor.
About Angular Contact Bearing Pre-Load
Each axis uses a double-nut, pre-loaded ball screw. The pre-load in the ball nut is set at the factory by placing a precision ground spacer between the two ball nuts. Lost motion attributable to the ball screw assembly is 0.00 inches. Ball nut pre-load is not operator-adjustable.
The ball screw mount bearings are located in the stepper motor for each ball screw. These are a pre-loaded angular contact bearing pair, and they are operator-adjustable. Under typical use, the bearings should be adjusted so that observable lost motion is between 0.0012 inches and 0.0018 inches.
For reference, the following image shows a cross section of the stepper motor. There are two angular contact ball bearings, forming a pre-loaded pair. The adjustment nut and stepper motor frame hold the two outer races together.
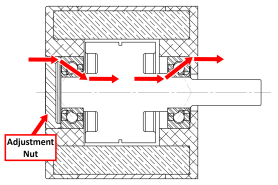
Figure 4: Stepper motor cross section.
The inner races are held between the sleeve (left side) and the shoulder cut into the ball screw shaft (right side). The sleeve is held against the left inner bearing race by the adjustment nut and a lock nut. When the adjustment nut is tightened toward the bearing pair, the pre-load increases.
Over time, it may become necessary to adjust the ball screw bearing pre-load to account for bearing wear. Improper ball screw bearing pre-load results in the following issues:
If the Ball Screw Bearing Pre-Load is Too Loose Excessive backlash in the machine
If the Ball Screw Bearing Pre-Load is Too Tight Rapid wear and excessive friction
If your ball screw, ball nut, or angular contact bearings are worn, or if your gibs are adjusted too tight, you won't achieve appropriate lost motion values.
Adjust the Geometry of Precision Mating Surfaces
All precision mating surfaces are pinned together with tapered dowels during assembly at the factory. The pinned connection ensures that factory alignment is maintained in the event of a tool crash. Each dowel pin has a small metric threaded hole in the center that can be used to extract the dowel should it be required for disassembly.
Under typical use, no adjustment of pinned connections should be necessary. In the event of a hard crash, you can use shims to make minor alignment adjustments between pinned components. Small adjustments (less than 0.010 inches) will generally not require a full disassembly of the pinned connection. In these cases, the alignment dowels can be left in place, and the shims can be inserted into a small opening created by loosening the bolted connections.
Backlash Compensation
Backlash compensation is only available on Pathpilot version 2.2 and above for all machines
Backlash compensation is used after the gib and angular contact bearings have been adjusted to less than .001” of lost motion.
Use the “ADMIN SET_AXIS_BACKLASH” command in the MDI line to apply backlash compensation. Use X/Y/Z following the command to indicate the axis to apply backlash compensation to and a number following the axis to indicate the amount of compensation to apply. Compensation is limited to .005” per axis.
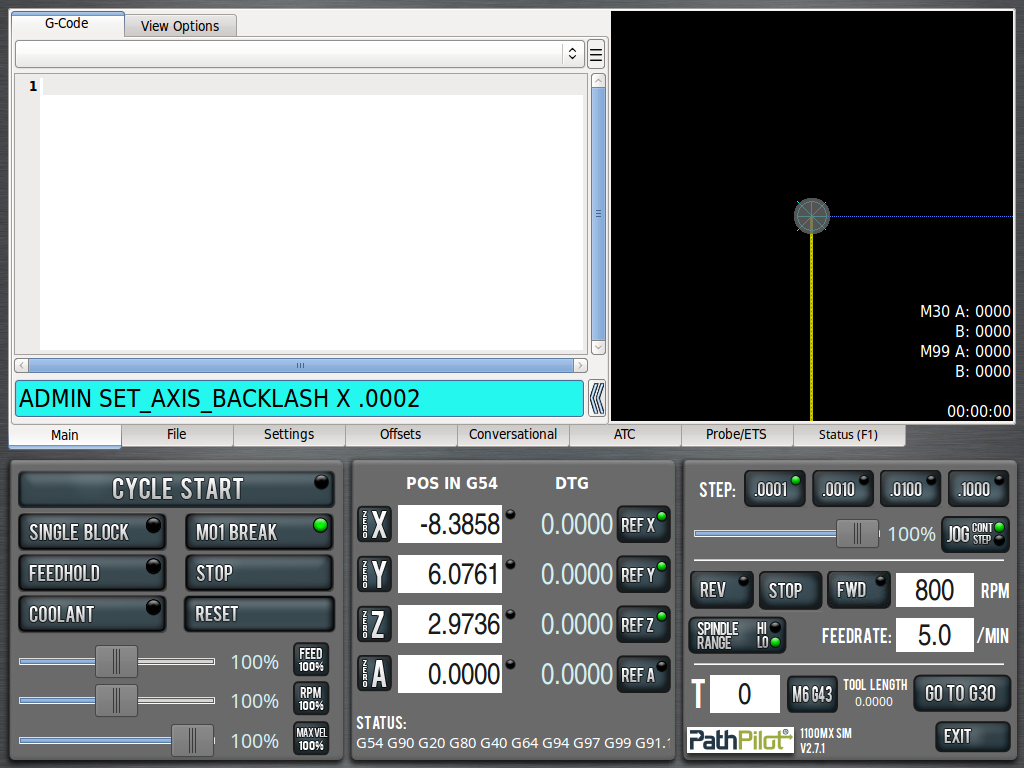
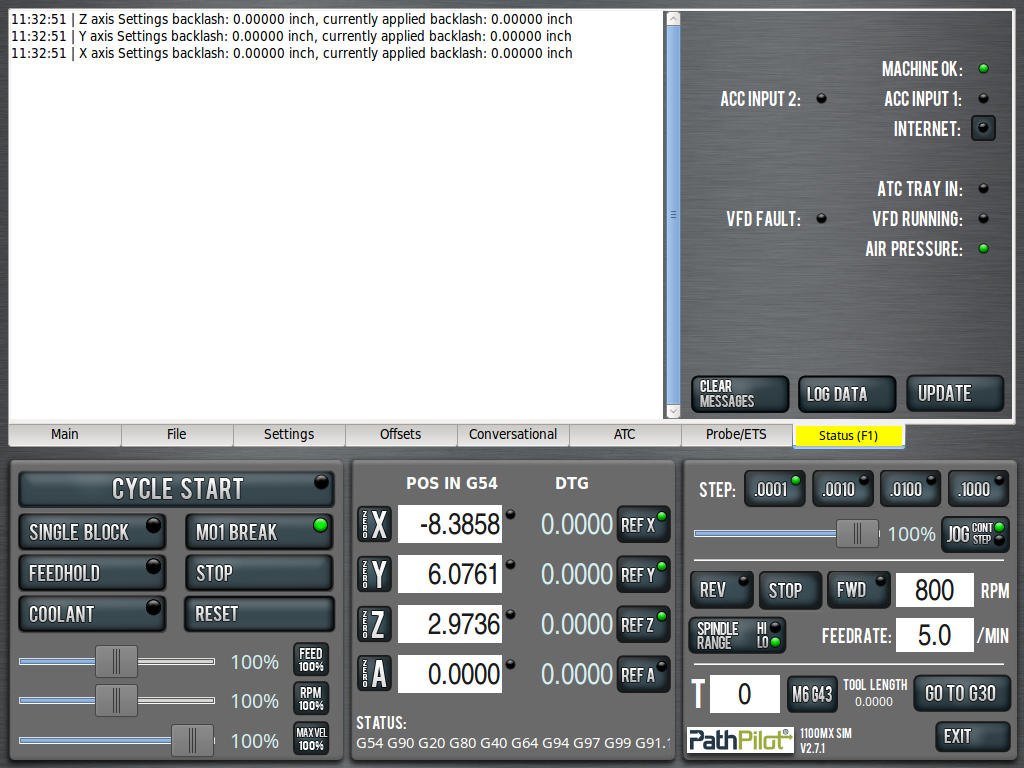
The “ADMIN GET_AXIS_BACKLASH” command will display the current amount of backlash for each axis. The “ADMIN RESET_AXIS_BACKLASH” command will reset the backlash values of all axes to 0.
![]() Note: There is no backlash compensation for the A axis.
Note: There is no backlash compensation for the A axis.
