Maintenance Safety
Read and understand the following safety messages before beginning any maintenance procedures.
All Maintenance Procedures
-
Understand that the machine is automatically controlled and can start at any time.
-
Power off the machine and disconnect the pneumatic supply before doing any maintenance procedures.
-
When appropriate, lockout/tagout the Main Disconnect switch and the pneumatic supply line before doing any maintenance procedures.
-
Wear safety eye protection rated for ANSI Z87+.
Swarf Maintenance Procedures
-
Wear work gloves.
Coolant Maintenance Procedures
-
Wear rubber gloves.
Maintenance Schedules
To keep your machine running as smoothly as possible, you must regularly do the following maintenance procedures.
NOTE: Before you begin any maintenance procedures, read and understand "Maintenance Safety".
If you disassemble any components, refer to the machine's reference drawings when you've completed the maintenance procedure. For information, see Diagrams and Parts Lists. For any additional support, we can help. Create a support ticket with Tormach Technical Support at tormach.com/how-to-submit-a-support-ticket for guidance on how to proceed.
Daily
-
Clean the ways and carriage of chips and other swarf with a chip brush.
-
Clean the chip basket on the coolant tank.
-
Examine the coolant level and condition and refill as necessary.
-
Examine the way oil level and refill as necessary.
-
Retract the plunger on the manual oiler, hold it in the retracted position for two seconds, and then release it.
NOTE: The plunger should move slowly from the retracted position. If it doesn't, it could indicate a malfunctioning oiler.
-
Use a rust inhibitor on all exposed, non-lubricated, non-painted metal surfaces.
NOTE: Don't use rust inhibitor on the ball screws or the slideways.
-
If you have any accessories that require compressed air, verify that the FRL Filter-Regulator-Lubricator has at least 90 psi compressed air, and that the lubricator has air tool oil above the bottom of the plastic tube.
Weekly
-
Clean all exterior surfaces with a clean rag.
-
Verify that the machine's lubrication points (sliding surfaces and ball screw nuts) are receiving way oil.
-
Examine the enclosure and other guards for damage.
-
Examine and, if necessary, adjust the draw tube tension when using the 5C automatic collet closer.
Monthly
-
Clean the electrical cabinet vents of dust with a clean cloth or compressed air.
-
Remove the coolant tank pump to remove any sediment buildup in the coolant tank.
-
Dispose of oil in the drain bucket.
Semi-Annually
-
Examine the way covers for wear.
-
Examine the oil system for blockages.
-
Examine lubrication hoses for wear.
Annually
-
Verify that the limit switches are properly functioning.
Clean the Coolant System
To extend the service life of the coolant and the coolant pump, you must make sure that both are free of contaminants.
Regularly do the following:
-
Use a chip brush to clean the machine, chip trays, and enclosure of chips and other swarf.
-
Empty the chip strainer on the coolant tank.
-
Measure the coolant concentration, pH, and volume, and then compare your findings to the material's safety data sheet (SDS).
-
Coolant Level Too Low Fill the coolant tank with fresh coolant, making sure that it is the appropriate concentration.
-
Coolant pH Outside of Manufacturer's Recommended Coolant Limits Adjust the pH according to the manufacturer's recommendation.
-
NOTE: You must only use coolant that is recommended for machining. See "Cutting Fluid Reference".
-
Examine the coolant pump's impeller for blockages.
-
To remove tramp way oil from the coolant tank, use one of the following:
Periodically do the following:
-
Remove the coolant tank covers and the chip strainer, and then clean the fine swarf from the coolant tank.
-
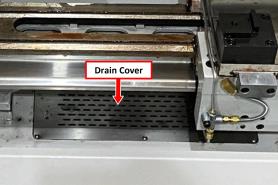
If you're using the machine with a desktop coolant system, remove the rectangular drain cover on the base of the machine, and inspect the inside of the drip tray for accumulation of chips or other debris. This helps prevent clogs of the drain line, which can result in coolant backing up into the enclosure.
NOTE: If the coolant flow is too high, it's possible it could overwhelm the drain. Use the valve on the side of the magnetic coolant base to adjust the coolant as necessary.
-
If you're using a filter to prevent small particles from entering the coolant tank, replace it when it's saturated with chips, swarf, or tramp oil.
-
Examine the coolant for contamination, and determine if the coolant's oil-water emulsion has broken.
-
Drain and thoroughly clean the coolant tank, and then replace with fresh coolant.
NOTICE! Hazardous Waste: Only dispose of coolant as advised by local environmental protection authorities. You must not dispose of coolant in a septic system or a sewer.
About Cutting Fluid
Clean and well maintained coolant has increased performance, prevents rust, and smells better than contaminated coolant.
Coolant becomes contaminated when:
-
Swarf accumulates in the chip pans, the chip strainer, or the coolant tank.
-
Tramp oil isn't regularly removed from the coolant tank.
-
The concentration or pH aren't maintained to the manufacture’s specifications.
Cutting Fluid Reference
Using flood coolant provides the following benefits:
-
Cools the cutting zone
-
Flushes away swarf
-
Lubricates the cutting tool
-
Provides some degree of rust inhibition
You must only use flood coolant that is recommended for CNC machining applications, like:
-
Soluble oils
-
Semi-synthetic coolants
-
Synthetic coolants
You must never use:
-
Coolant without rust inhibitors
-
Flammable coolants such as alcohols, diesel fuel, or kerosene
WARNING! Fire Hazard: The machine and its enclosure are not designed to contain fire or explosions. Only use materials and coolants that are intended for the specific machining operation. Never use flammable or explosive items.
-
Straight cutting oil
-
Water
If you use a coolant concentrate, you must mix it with water to the dilution ratio recommended by the coolant manufacturer. Use an optical refractometer to measure coolant concentration.
Examine the Enclosure Windows
Regularly examine the enclosure windows, and all other guarding, for signs of wear or damage.
When required, replace the windows with: Window, 8L, Enclosure Door (PN 50513)
Lubricate the Machine
To keep the machine operating properly, and to extend the service life of the machine, you must verify that the slideway surfaces and ball screws are receiving lubrication.
Regularly do the following:
Clean the oil reservoir's cover and all exposed surfaces surrounding the oil reservoir. Swarf or debris that enters the oil reservoir can plug the small, internal passages of the lubrication system.
NOTE: The strainer at the top of the oil reservoir isn't a filter, and can't remove all types of debris that may cause blockages.
Examine all axes' slideway surfaces and ball screws to determine if an oil film is present.
If there's not an oil film, examine the lubrication system for blockages, broken fittings, or pinched oil lines.
Examine the amount of available oil and, if necessary, refill with new, high-quality ISO VG 68 grade Machine Oil (PN 31386).
About the Manual Oiler
The manual oiler operates with a plunger:
-
On the Pull Stroke The oiler pulls machine oil from the oil reservoir.
-
On the Retract Stroke The oiler pushes machine oil through the lubrication system.
The plunger is spring-loaded, and creates a light hydraulic pressure sufficient to distribute the oil through the machine. Do not push the plunger after you retract it.
When the machine is first powered on (and then after every four hours of operation), retract the oiler's plunger and hold it in the retracted position for two seconds. Then, release the oiler's plunger.
NOTE: The plunger should move slowly from the retracted position. If it doesn't, it could indicate a malfunctioning oiler.
Lubrication System Reference
The machine's lubrication system distributes oil to the following 10 points:
-
Eight sliding surfaces
-
Four on the X-axis
-
Four on the Z-axis
-
-
Two ball nuts
Examine the Spindle Belt
To extend the service life of the spindle belt, you must regularly examine it for signs of damage or wear.
If the spindle belt is damaged, you must replace it with Spindle Belt, 8L (PN 37832).
Prevent Rust
Take proper care to protect all exposed iron and steel surfaces on your machine. To reduce the possibility of rust, you must regularly do the following:
-
Clean all exterior surfaces with a mild cleaner.
-
Only use flood coolant that is recommended for machining (see "Cutting Fluid Reference" (page 5)).
-
Periodically test the coolant concentration, and adjust (if necessary) to meet coolant manufacturer's recommended concentration.
-
Put LPS 3® (or similar rust inhibitor) on the machine before installing any workholding or accessories.
-
Only operate the machine in a temperature- and humidity-controlled environment. Extreme changes in temperature or humidity can create condensation on the machine.
-
Put LPS 3® (or similar rust inhibitor) on all exposed, non-painted metal surfaces before leaving the machine unused.
-
Remove all workholding and accessories, and then check for rust.
-
If needed, reapply rust inhibitor before reinstalling workholding or accessories.
Looking for more information?
This is a section of the 8L operator's manual. To view the whole manual, go to Tormach document UM10753.
If you have additional questions, we can help. Create a support ticket with Tormach Technical Support at tormach.com/how-to-submit-a-support-ticket for guidance on how to proceed.