Install the Chip Pans
It is recommended to install the ATC, if applicable, before finishing the enclosure installation.
CAUTION! Sharp Objects Hazard: Before opening the shipping crate, you must put on work gloves and safety eyewear that meets ANSI Z87+. If you don't, the shipping crate and steel straps could cut you, causing serious injury.
-
Put on work gloves and eye protection.
-
Cut and remove the steel straps on the shipping crate with snips.
-
Disassemble the shipping crate with a hammer and pry bar. Start with removing the top, followed by the four sides.
-
Clean the surfaces of the chip pans and the Machine Stand with a mild degreaser (like Simple Green®) to make sure that the butyl tape bonds to the chip pans.
-
Find the roll of butyl tape that you set aside while assembling the Machine Stand.
-
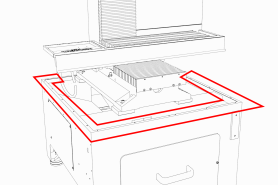
Remove the cover paper, and then put one strip of butyl tape along each edge on the top of the Machine Stand. Make sure that the butyl tape completely covers the space in the corners or between joints — the butyl tape should make a seal between the Machine Stand and the chip pans to help prevent leaks.
-
Break the butyl tape on each screw hole on the top edge of the Machine Stand with a small hex wrench (or similar).
-
Remove the remaining cover paper from the butyl tape strips.
-
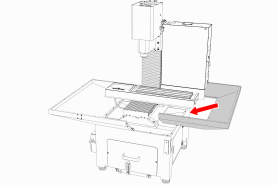
Align the right-hand chip pan with the Machine Stand.
-
Loosely attach the right-hand chip pan to the Machine Stand with a 4 mm hex wrench and seven M6 × 1.0 - 12 button head flange screws.
-
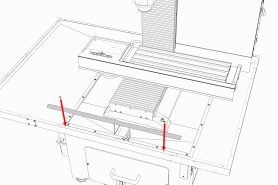
Put a strip of butyl tape along the center seam on the front of the right-hand chip pan to make a seal between the two chip pans.
-
Remove the remaining cover paper from the butyl tape strip.
-
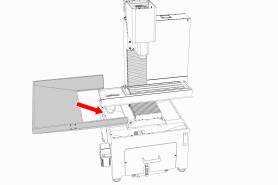
Align the left-hand chip pan with the Machine Stand.
-
Loosely attach the left-hand chip pan to the Machine Stand with a 4 mm hex wrench and 11 M6 × 1.0 - 12 button head flange screws.
-
Securely tighten all screws on the chip pans until they're snug.
-
Install the Emergency Stop box to the front of the chip pan with four M5 screws.
-
Depending on your machine setup, do one of the following:
-
Machine with Enclosure You've completed the installation of the chip pans.
-
Machine Without Enclosure Find the stainless steel wear guard that you set aside earlier, and attach it across the front of the chip pans with two M5 × 0.8 - 10 button head flange screws.
Looking for more information?
This is a section of the 1100MX operator's manual. To view the whole manual, go to Tormach document UM10586.
If you have additional questions, we can help. Create a support ticket with Tormach Technical Support at tormach.com/how-to-submit-a-support-ticket for guidance on how to proceed.