Purpose
This document gives instruction on diagnosing and resolving a battery failure on a PathPilot controller.
Confirm a Battery Failure
If the PathPilot controller powers on, loads the splash screen, and stops responding, it could indicate a battery failure.
To confirm a battery failure:
-
After the PathPilot controller has been unresponsive and displaying the splash screen for a minute or more, power it off and back on again.


-
If the splash screen loads and stops responding:
-
Select ESC on the keyboard
A diagnostic screen replaces the splash screen. -
Read the last line of text. If it displays “*Starting enable remaining boot-time encrypted block devices”, go to “Replace the Battery”.
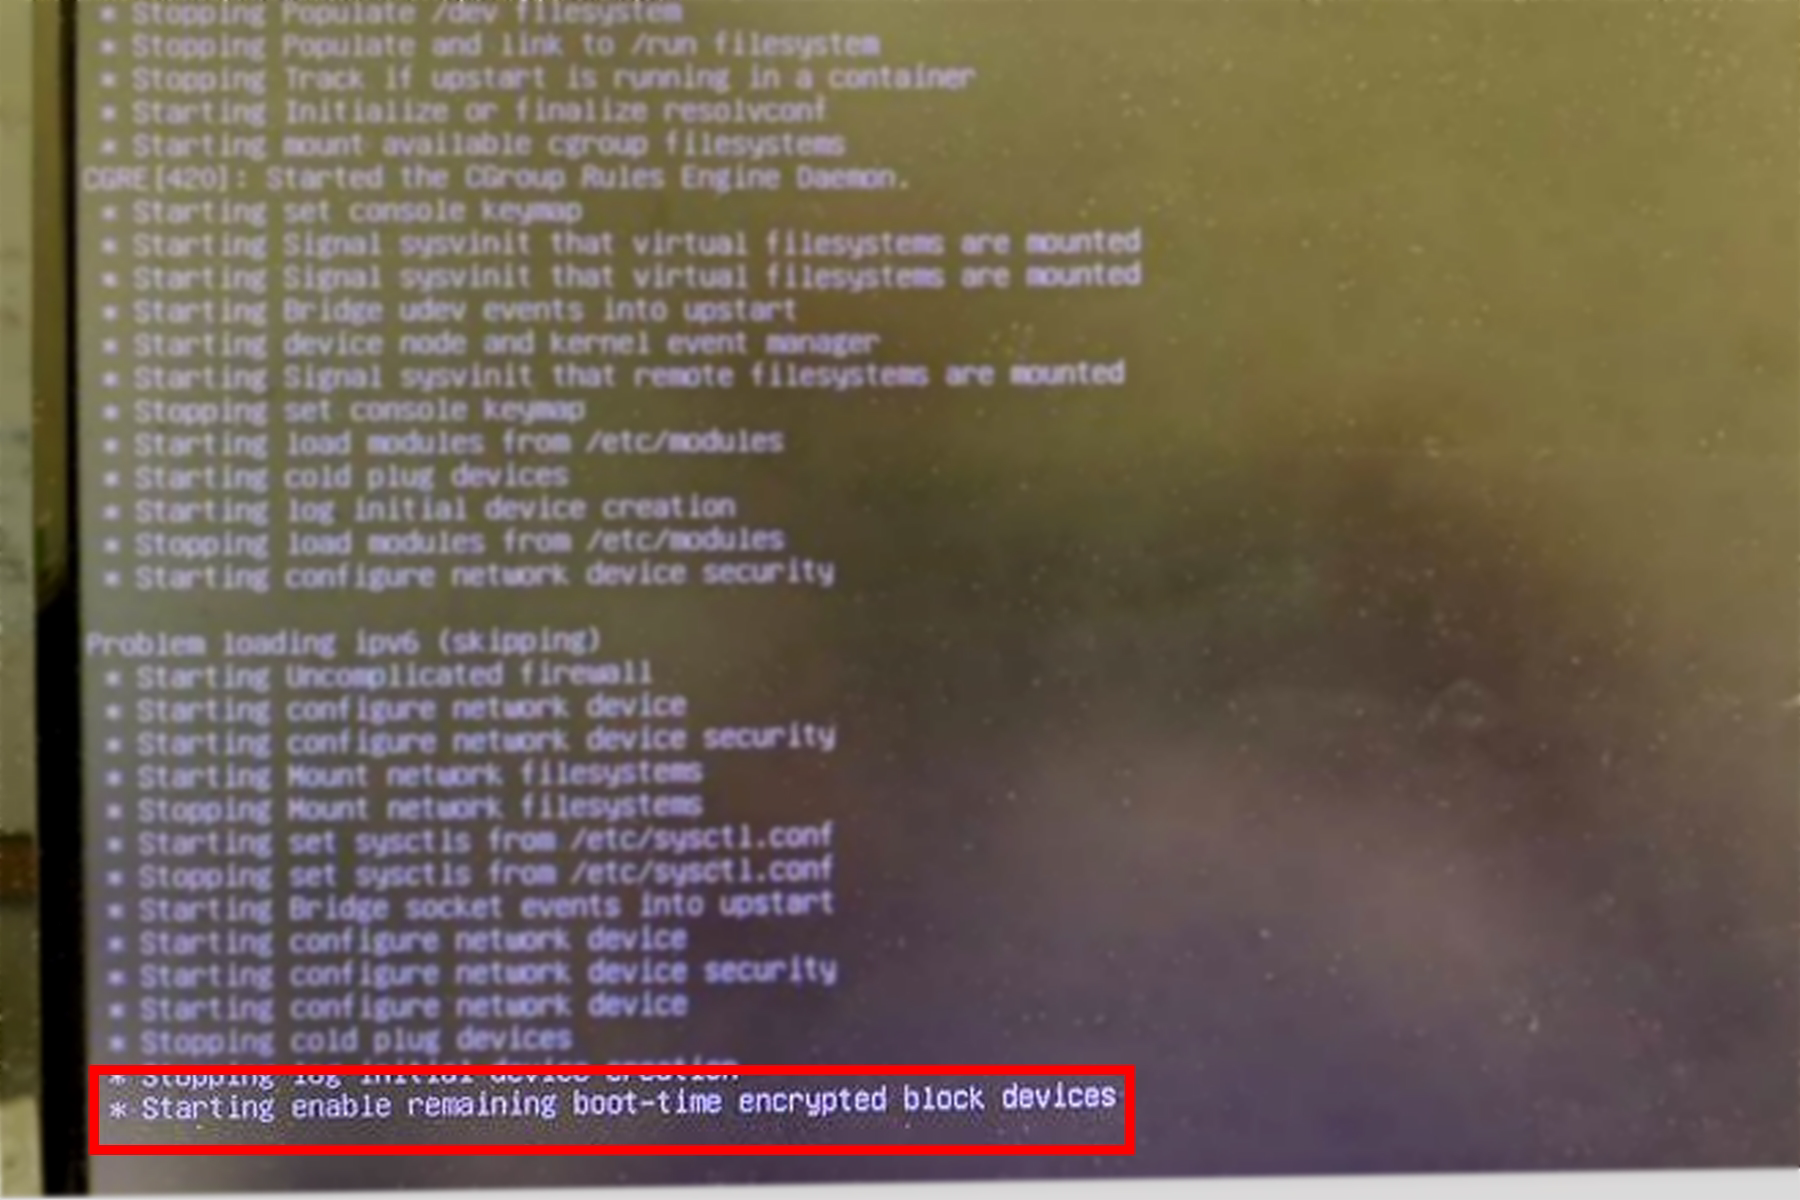
Figure 3: Diagnostic screen, which confirms a battery failure.
-
If it doesn't, we can help. Create a support ticket with Tormach Technical Support at
tormach.atlassian.net/servicedesk for guidance on how to proceed.
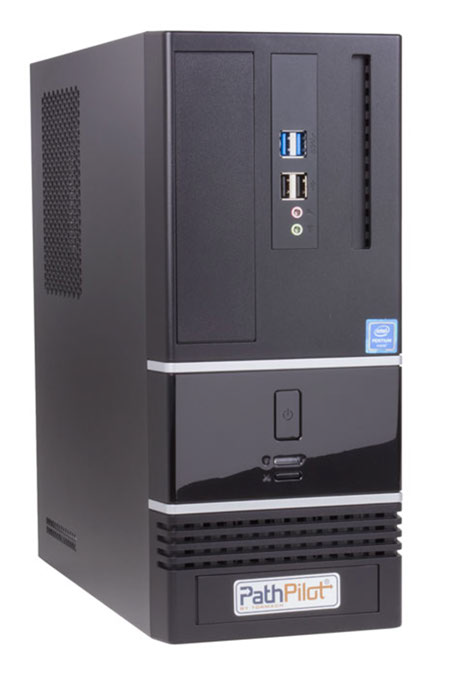
Identify Your PathPilot Controller
Depending on the controller that you’re using, the next steps vary. Refer to the table below to determine how to resolve the problem.
|
Controller Type |
Next Steps |
|---|---|
|
Go to “Replace the Battery on a Revision C or Revision D Controller” |

|
|
|
|
|
|
|
Create a support ticket with Tormach Technical Support at
|
Replace the Battery
Replace the Battery on a Revision C or Revision D Controller
Before You Being
-
Read through the procedure. A few Revision C controllers have a different battery style. If your controller has a battery without the connector shown in the following photos, follow the instructions in “Replace the Battery on a Brix Controller”.
-
New part required. If your controller has a battery with the connector shown in the following photos, you’ll need a new battery a connector (PN 51815). To order the part, email orders@tormach.com.
-
Disconnect the power cord from the controller.
-
Disconnect all remaining cabling from the controller, and then turn it over.
-
Remove the four screws. There’s one in each corner of the controller.
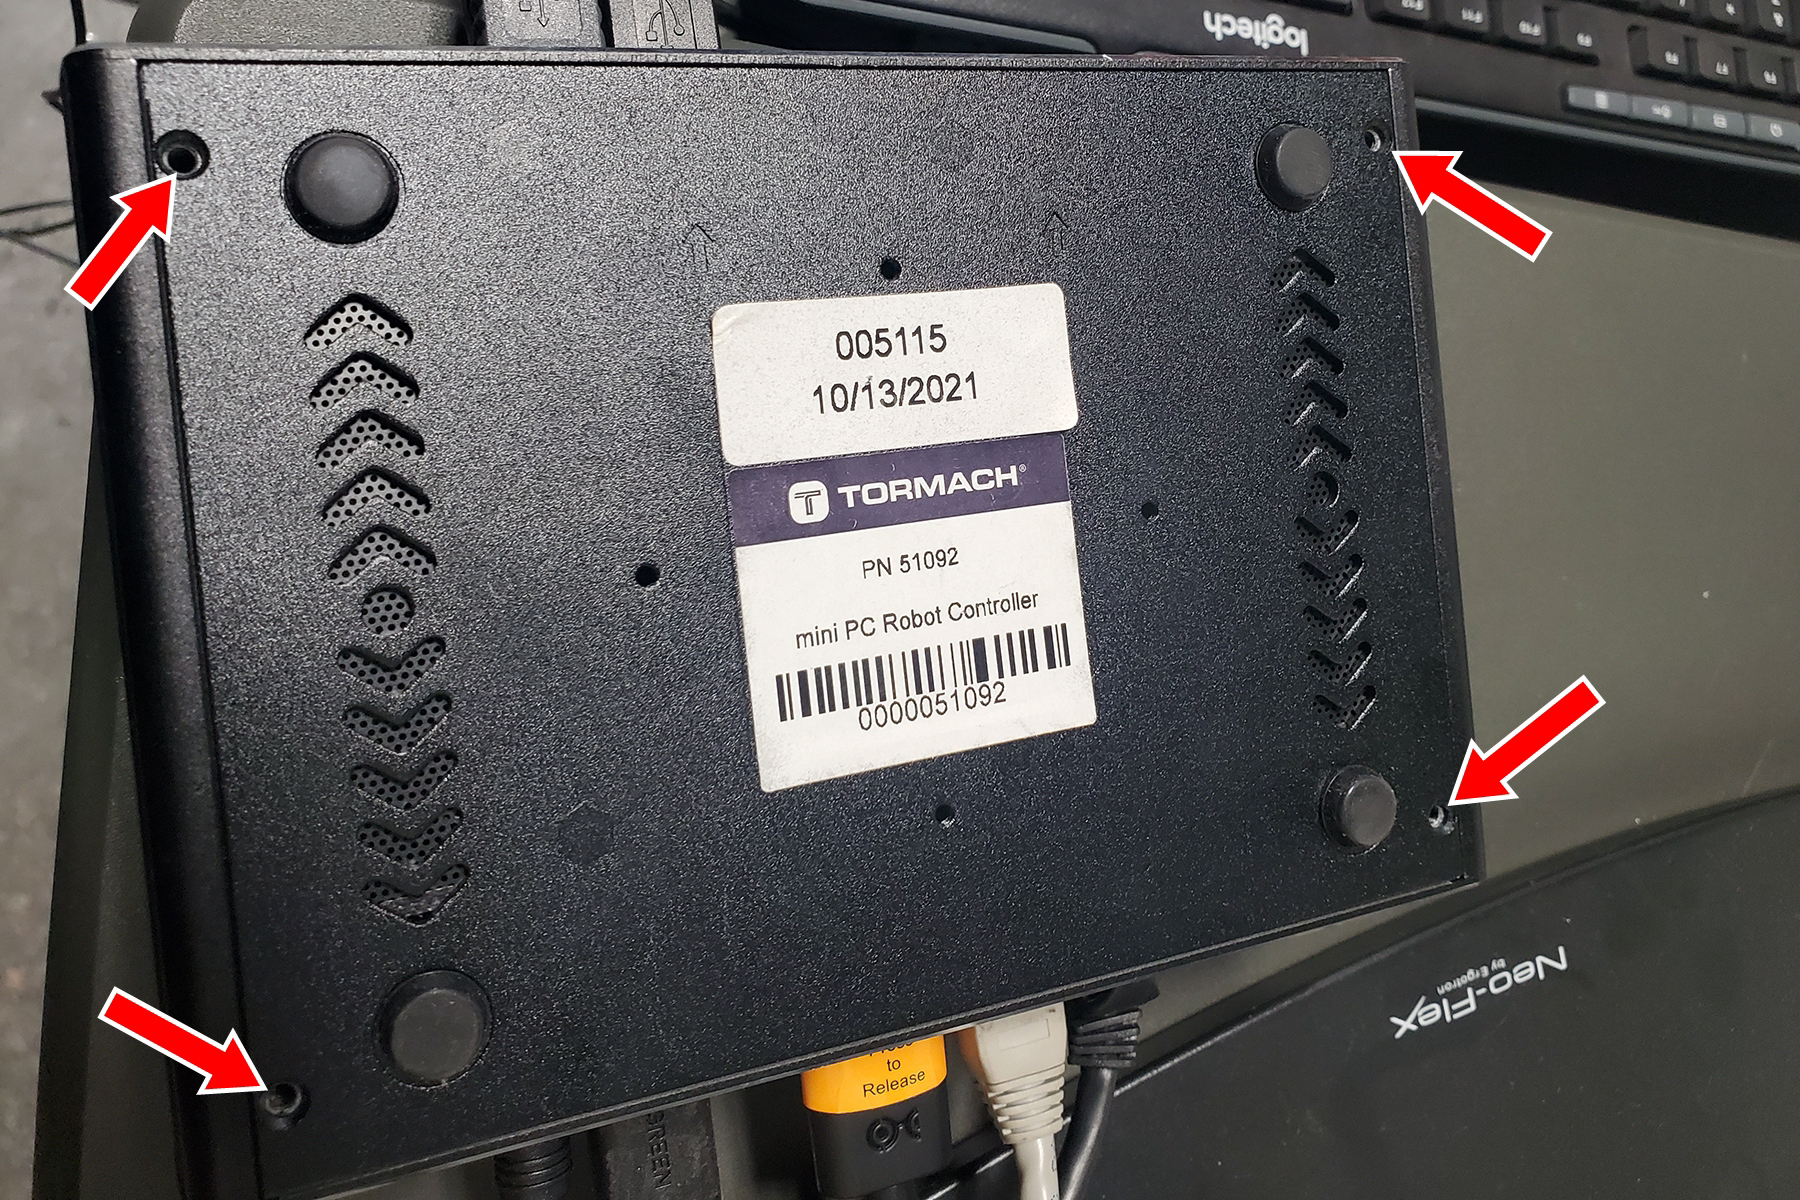
Figure 4: Screws on the bottom of the controller. -
Set the back panel to the side.
NOTICE! Remove the cover slowly. If you don’t there’s a risk that you could disconnect a cable that connects the panel to the main controller unit. -
Identify the CR2032 battery connector inside the controller. Then, disconnect it from the motherboard. Because it’s difficult to completely remove the original battery, we recommend leaving it in place.
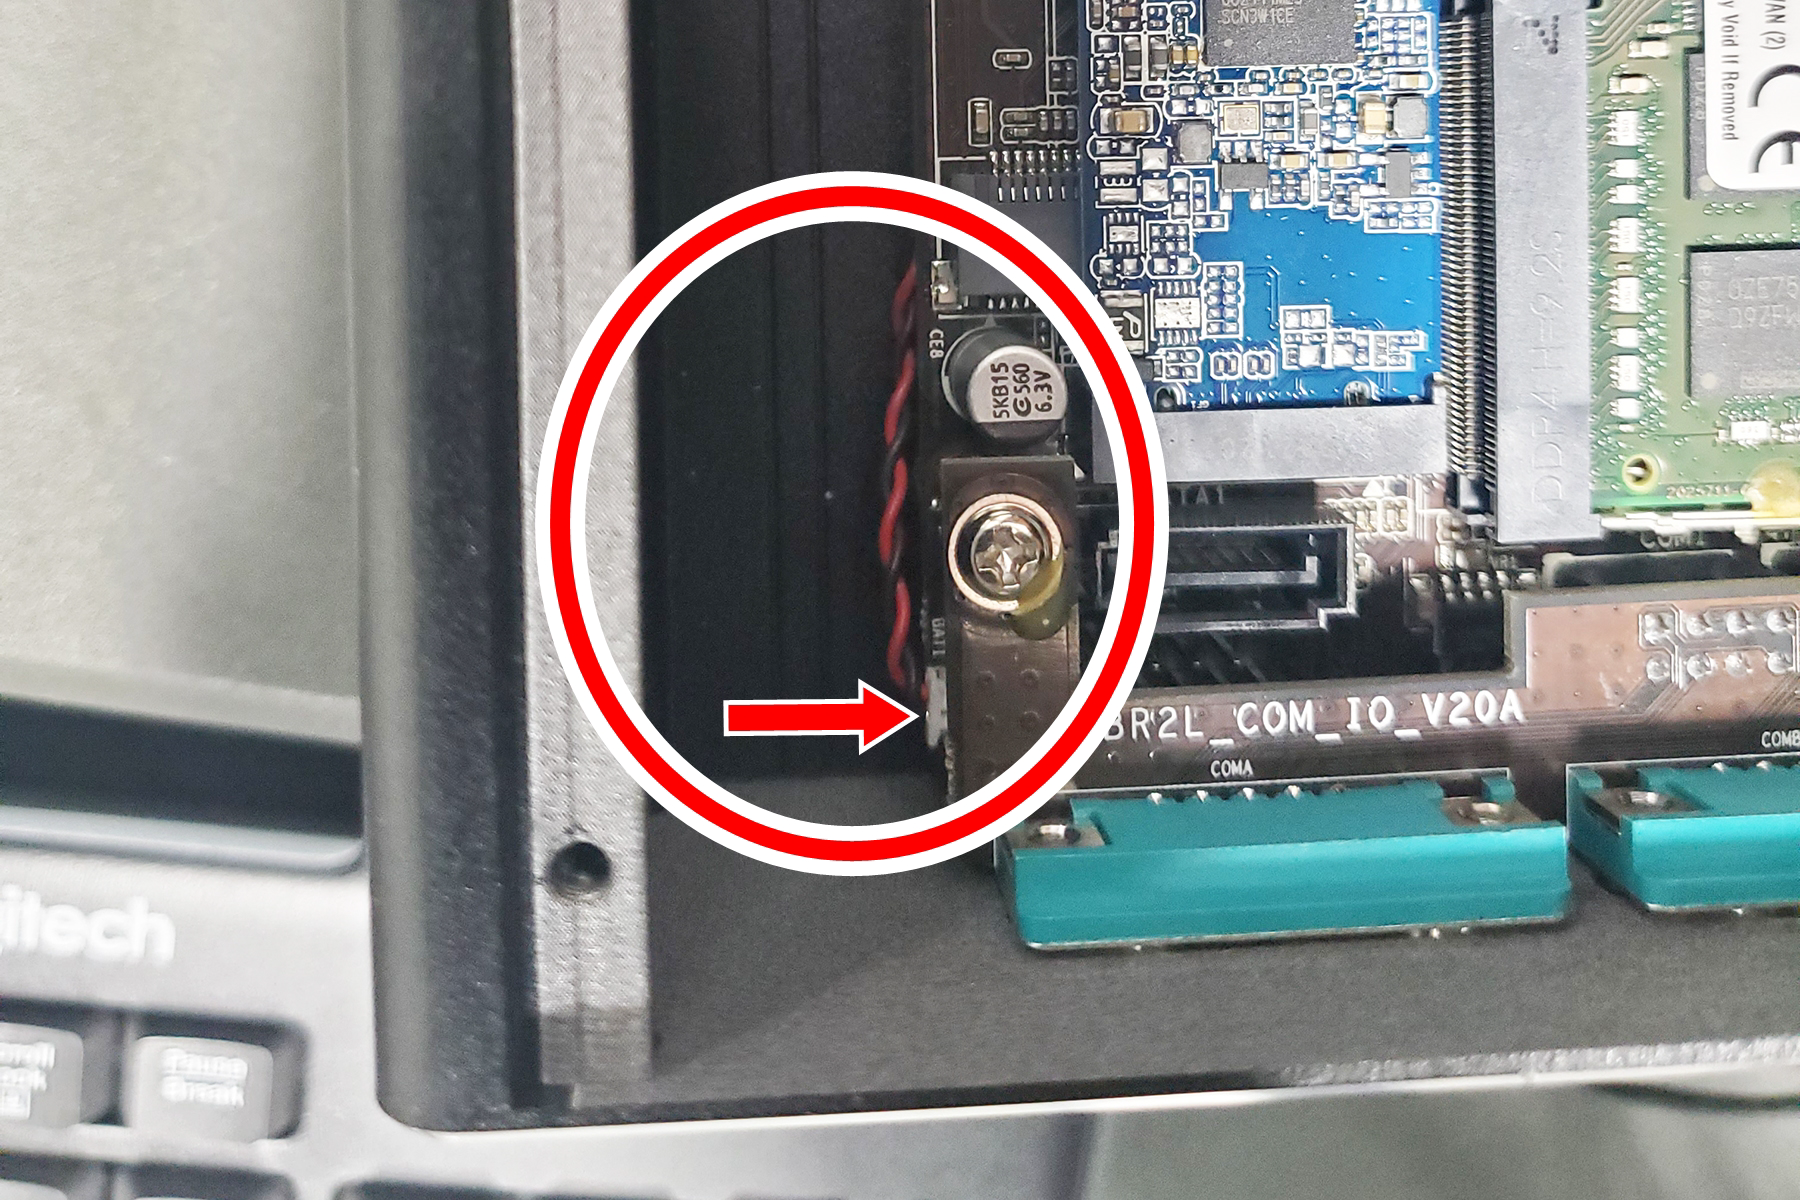
Figure 5: Location of the CR2032 battery inside the controller. -
Find the new battery (PN 51815) and connect it to the motherboard where you previously disconnected the original battery.
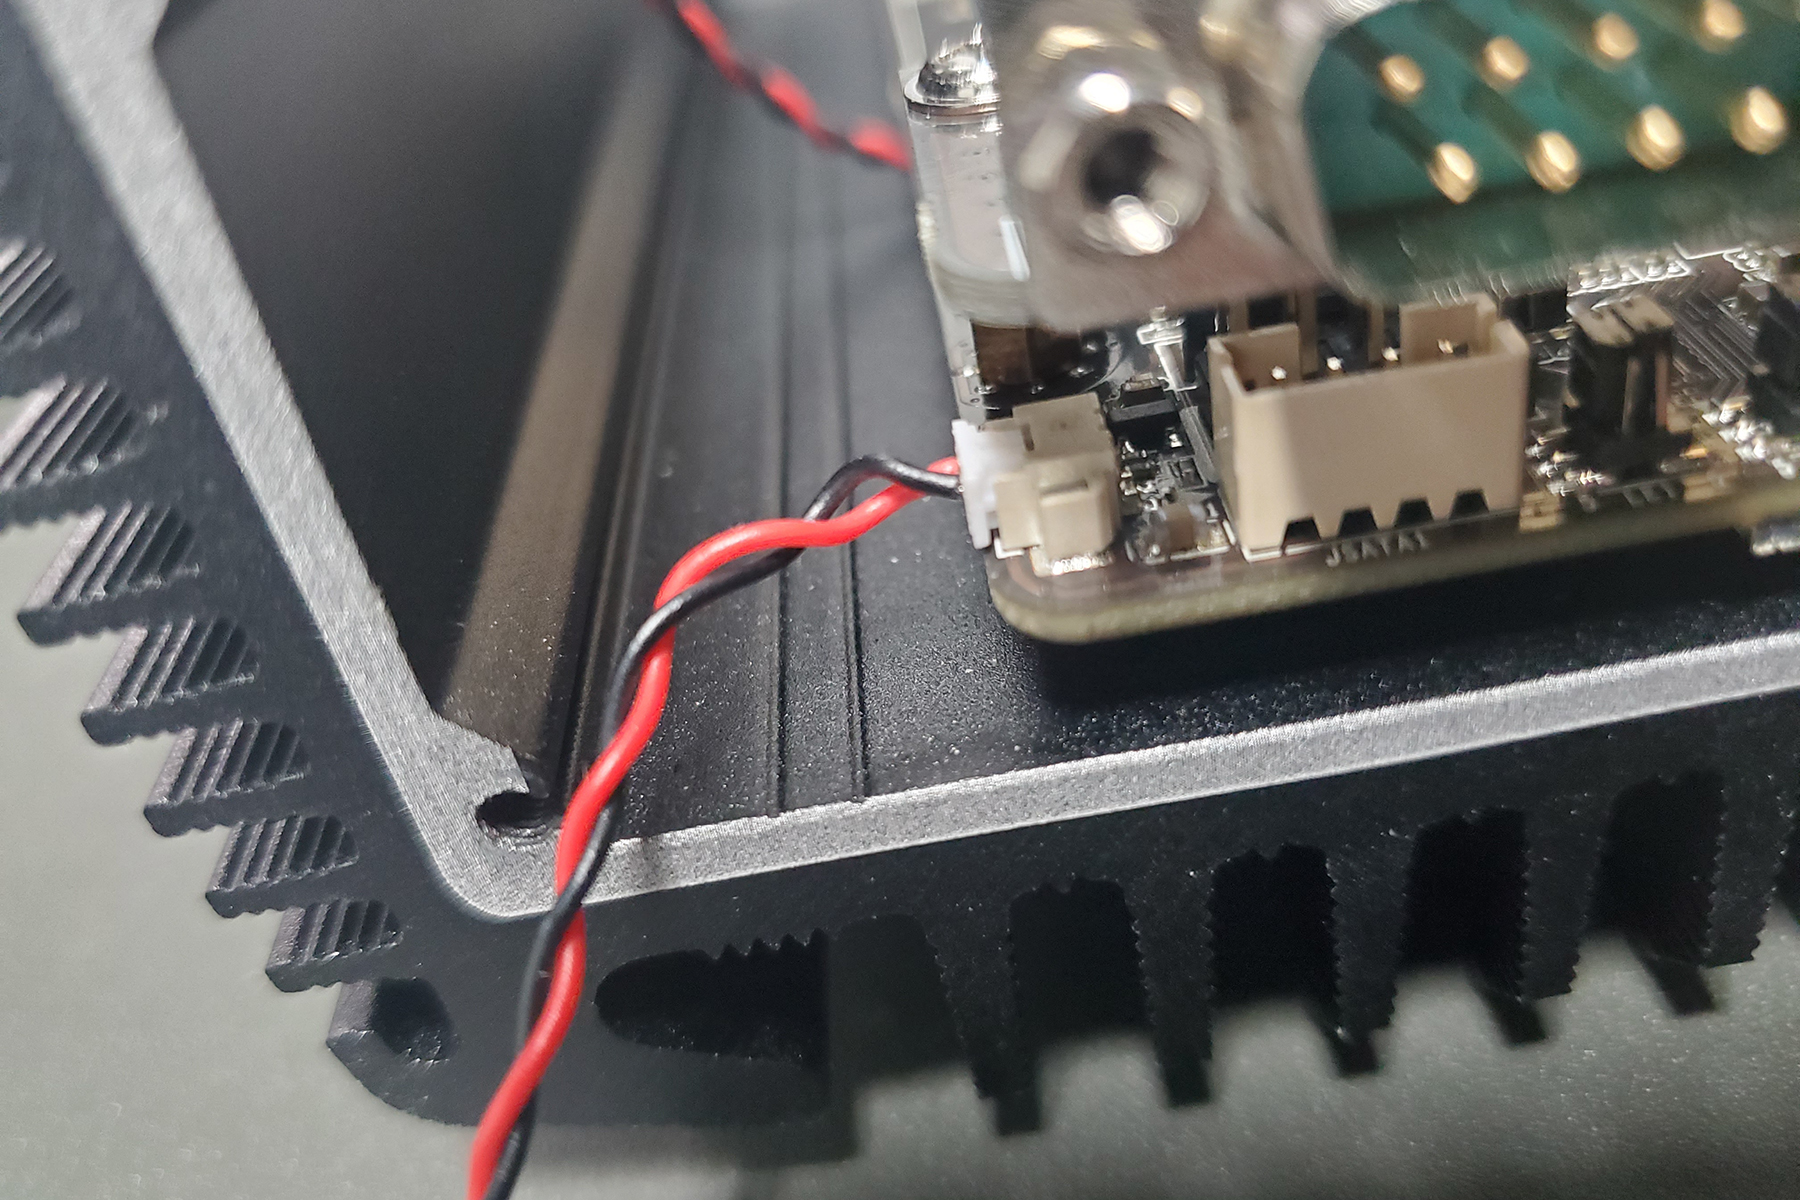
Figure 6: New battery connected to the motherboard.
NOTE: If you don’t yet have the battery, email orders@tormach.com to order PN 51815.
-
Put the battery itself into the controller next to the motherboard.
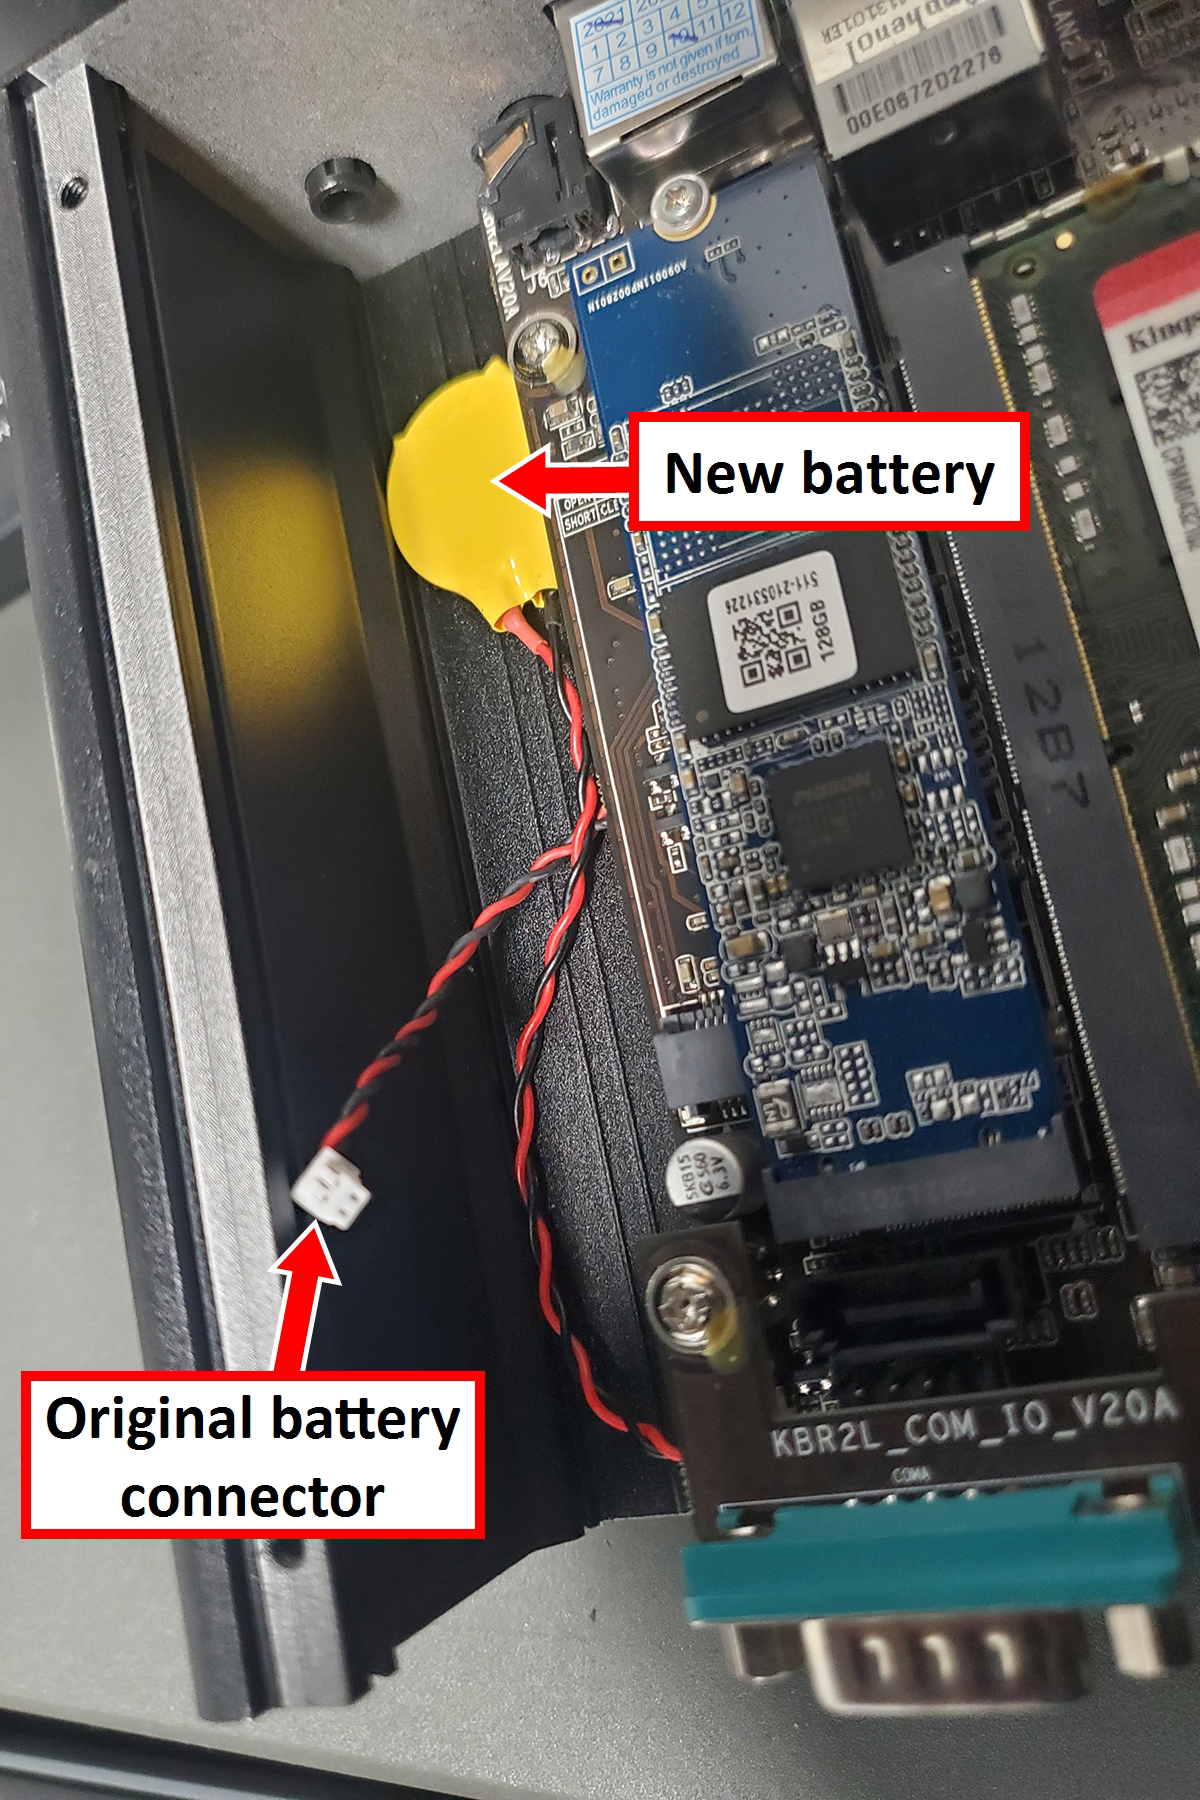
Figure 7: New Battery installed and original battery disconnected. -
Put the back panel on the controller, reinstall the four screws, and reconnect all cabling to the controller.
-
Go to “Restart the Controller and Set the Date and Time”.
IMPORTANT! After you replace the controller’s battery, you must set the correct date and time in the BIOS setting. If you don’t, PathPilot won’t boot properly.
Replace the Battery on a Brix Controller
-
Disconnect the power cord from the controller.
-
Disconnect all remaining cabling from the controller, and then turn it over.
-
Remove the four Phillips head screws. There’s one in each corner of the controller.
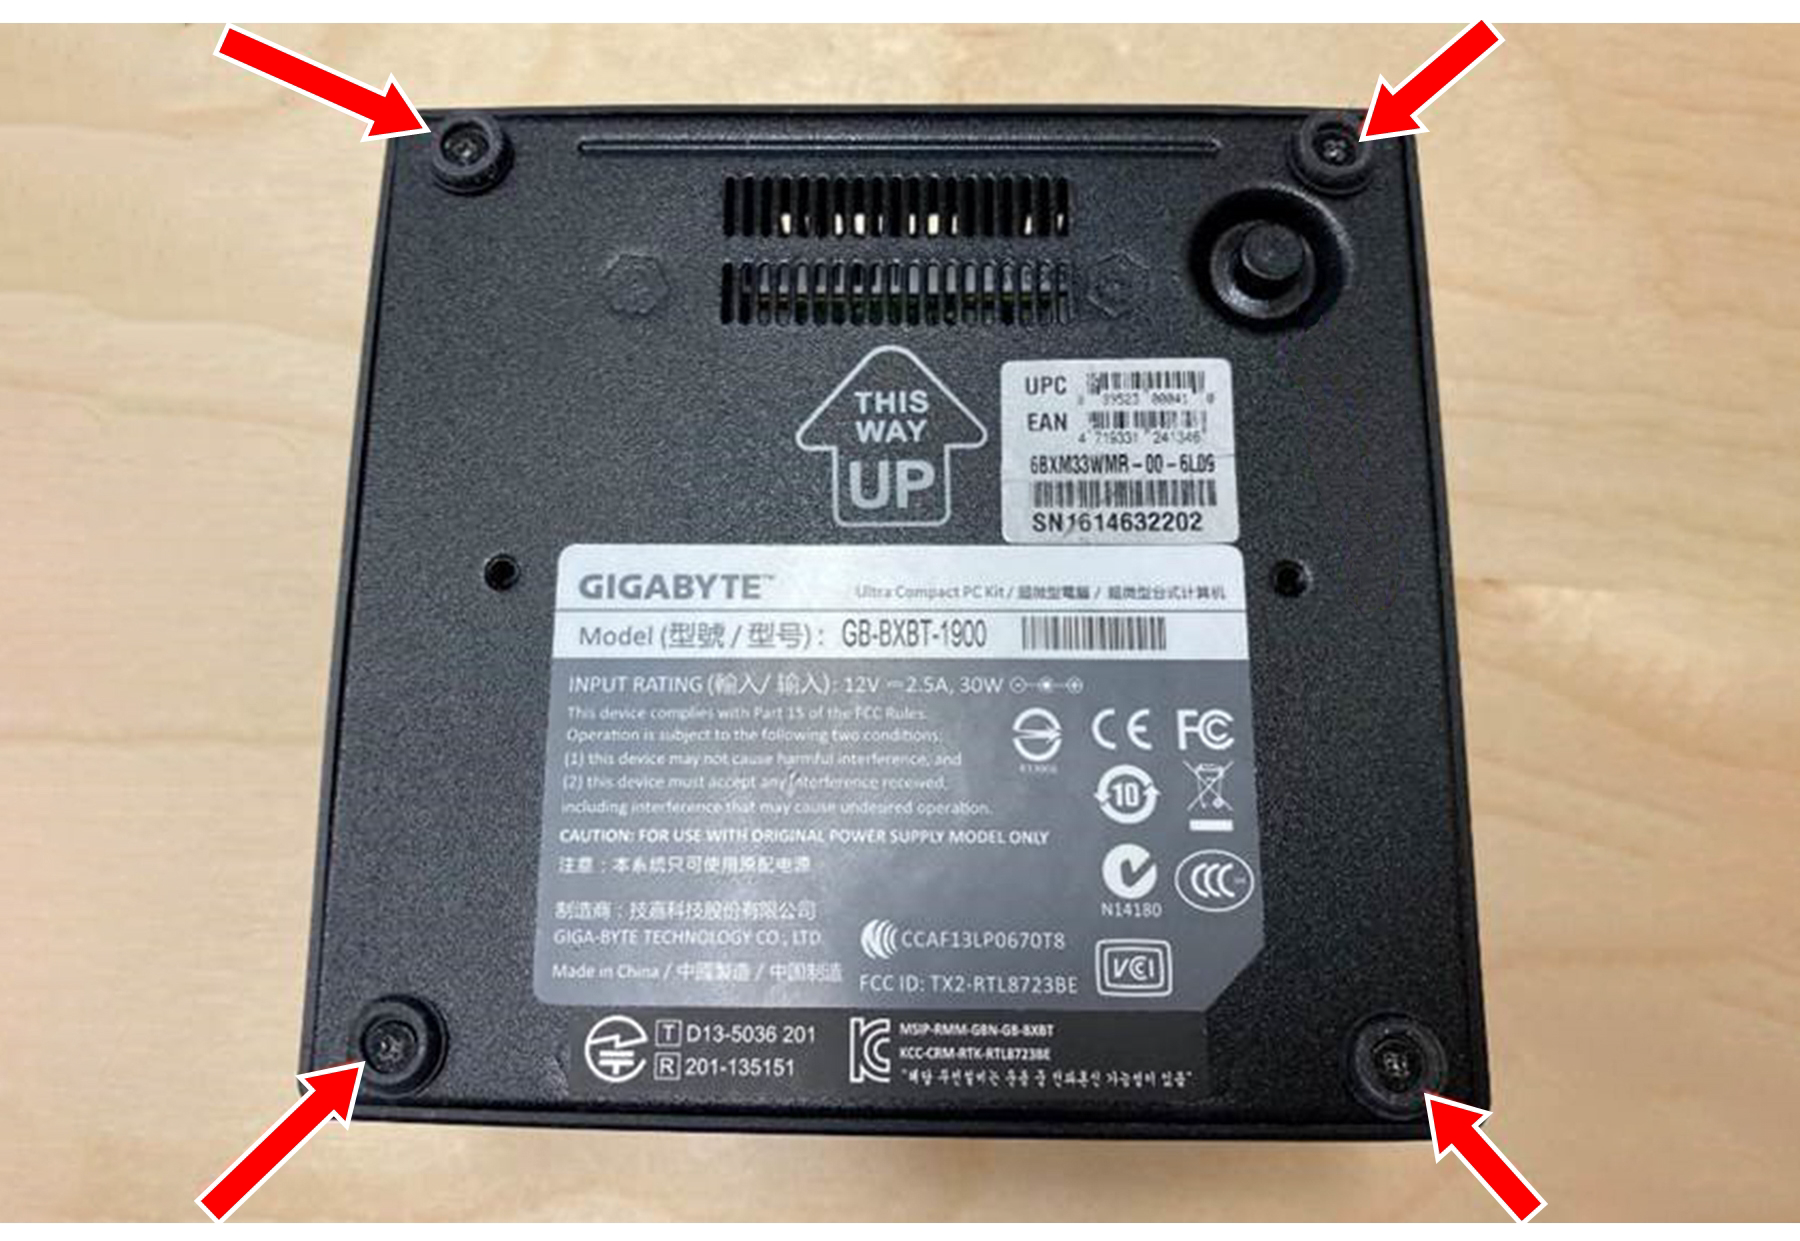
Figure 8: Phillips head screws on the bottom of the controller. -
Use the knob to move the cover up approximately 1/2 in.
NOTICE! Move the cover up slowly. If you don’t, there’s risk that you could disconnect a cable that connects the cover to the main controller unit.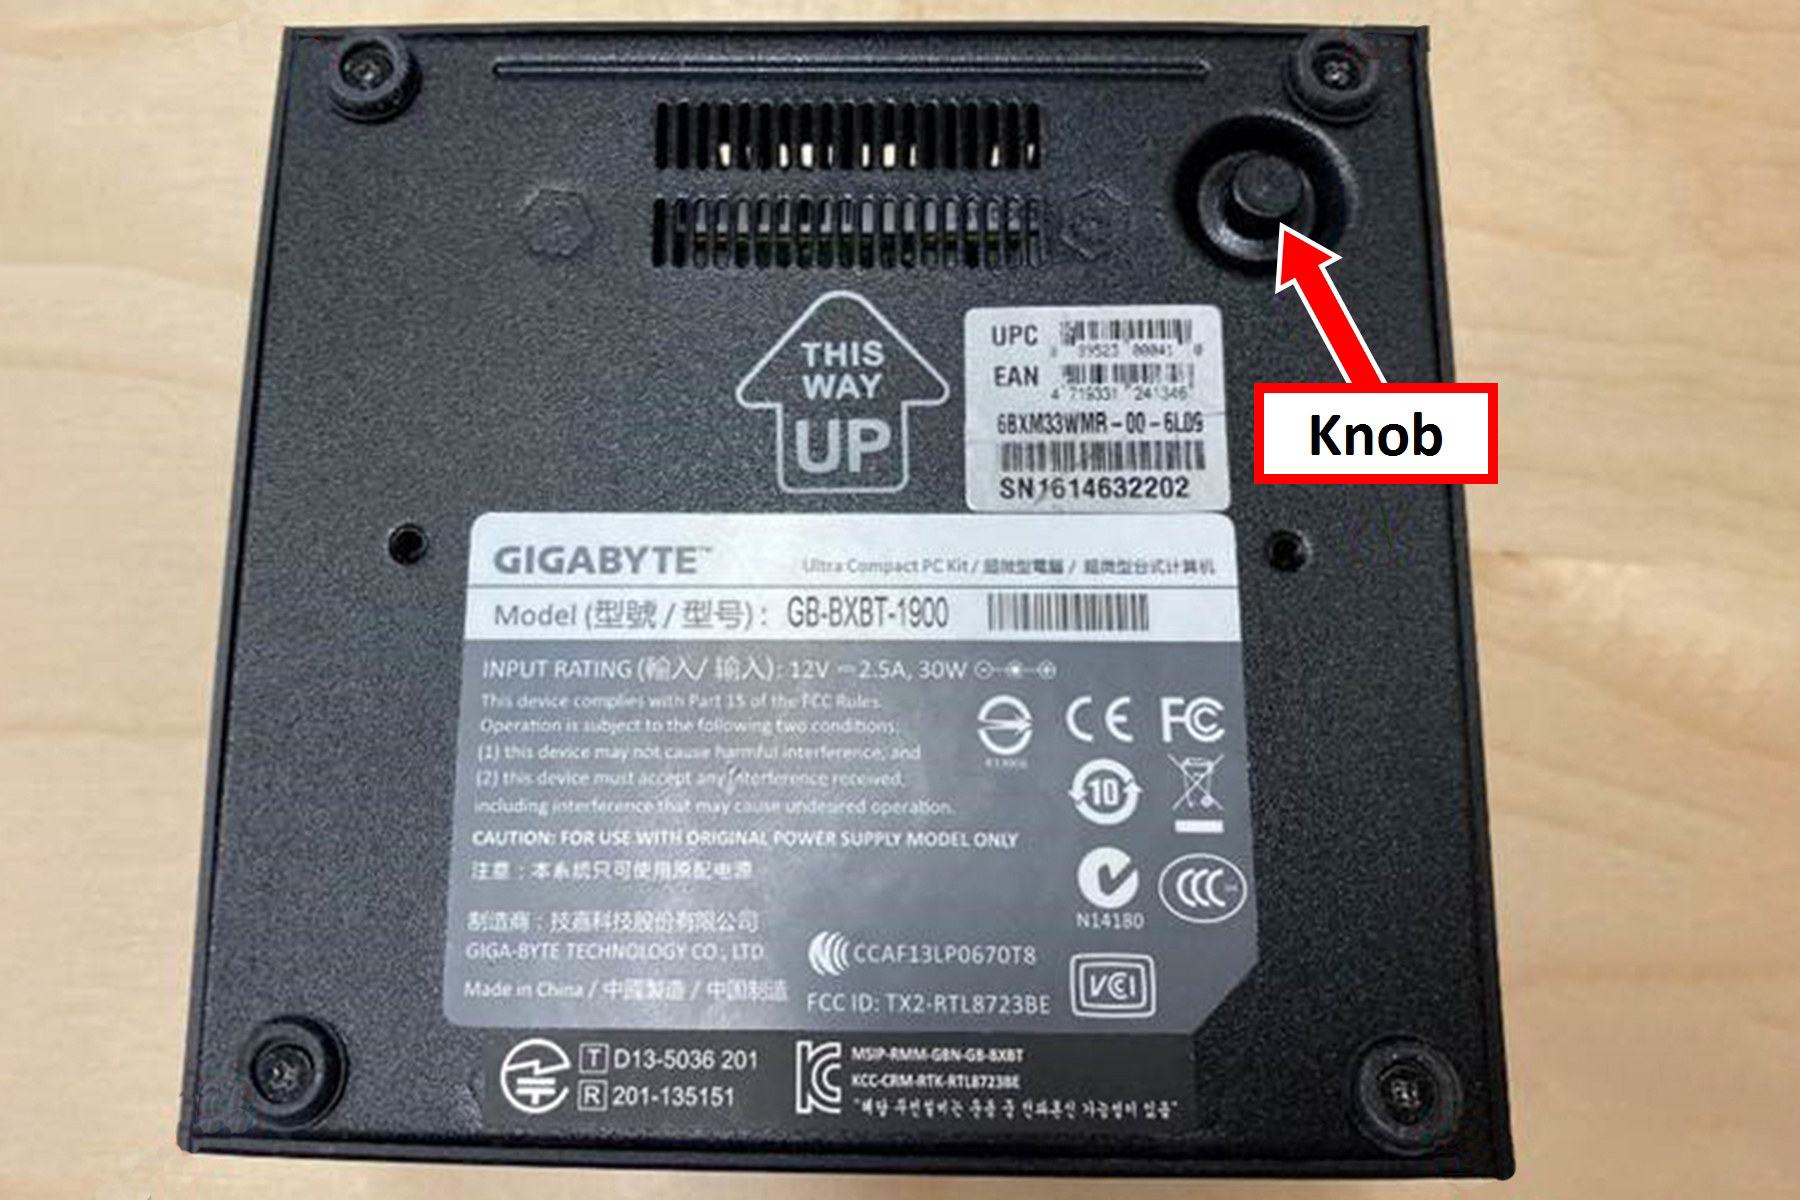
Figure 9: Knob on the bottom of the controller used to move the cover up. -
Identify the CR2032 battery inside the controller. Then, remove it and replace it with a new battery.
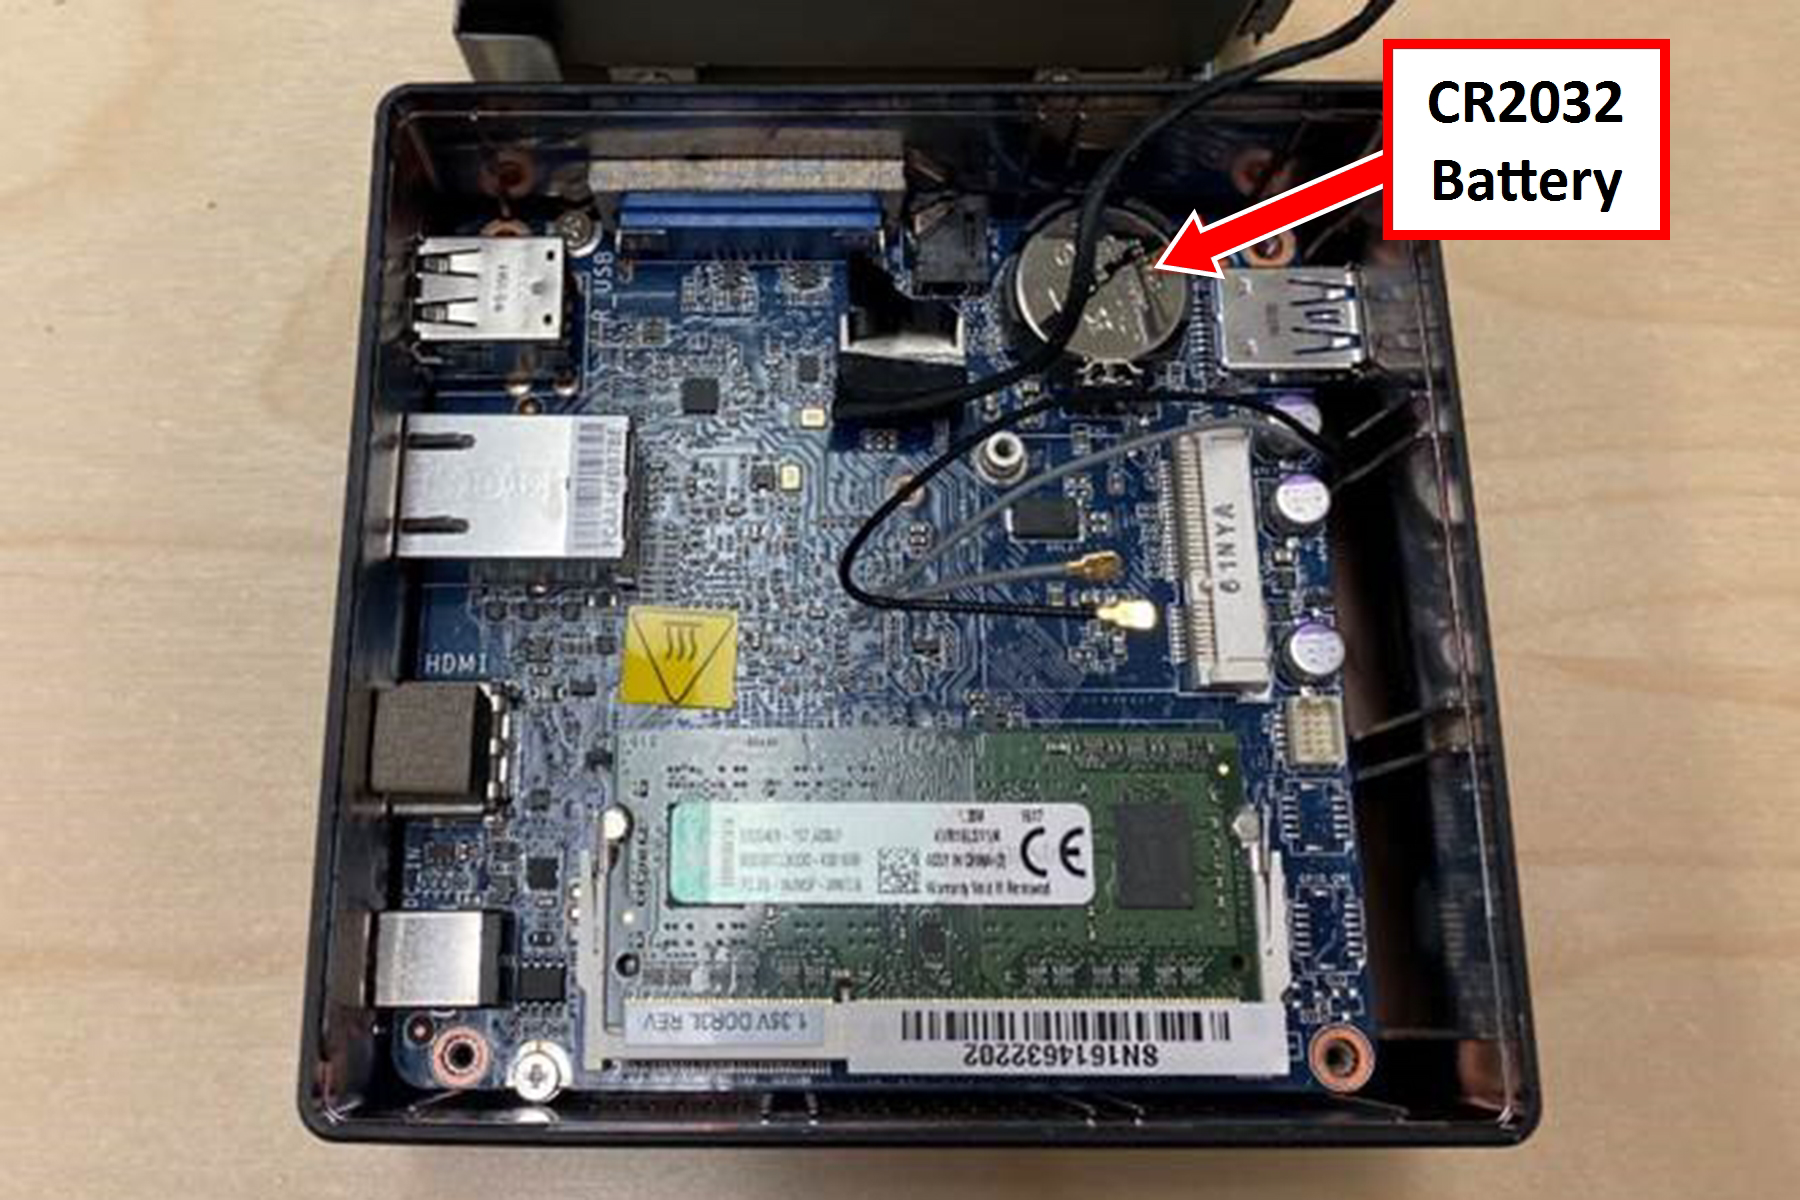
Figure 10: Location of the CR2032 battery inside the controller. -
Move the cover back in place, reinstall the four Phillips head screws, and reconnect all cabling to the controller.
-
Go to “Restart the Controller and Set the Date and Time”
IMPORTANT! After you replace the controller’s battery, you must set the correct date and time in the BIOS settings. If you don’t, PathPilot won’t boot properly.
Replace the Battery on a PathPilot Operator Console
-
Disconnect all cabling from the operator console. Then, remove the operator console from where it's mounted onto the machine.
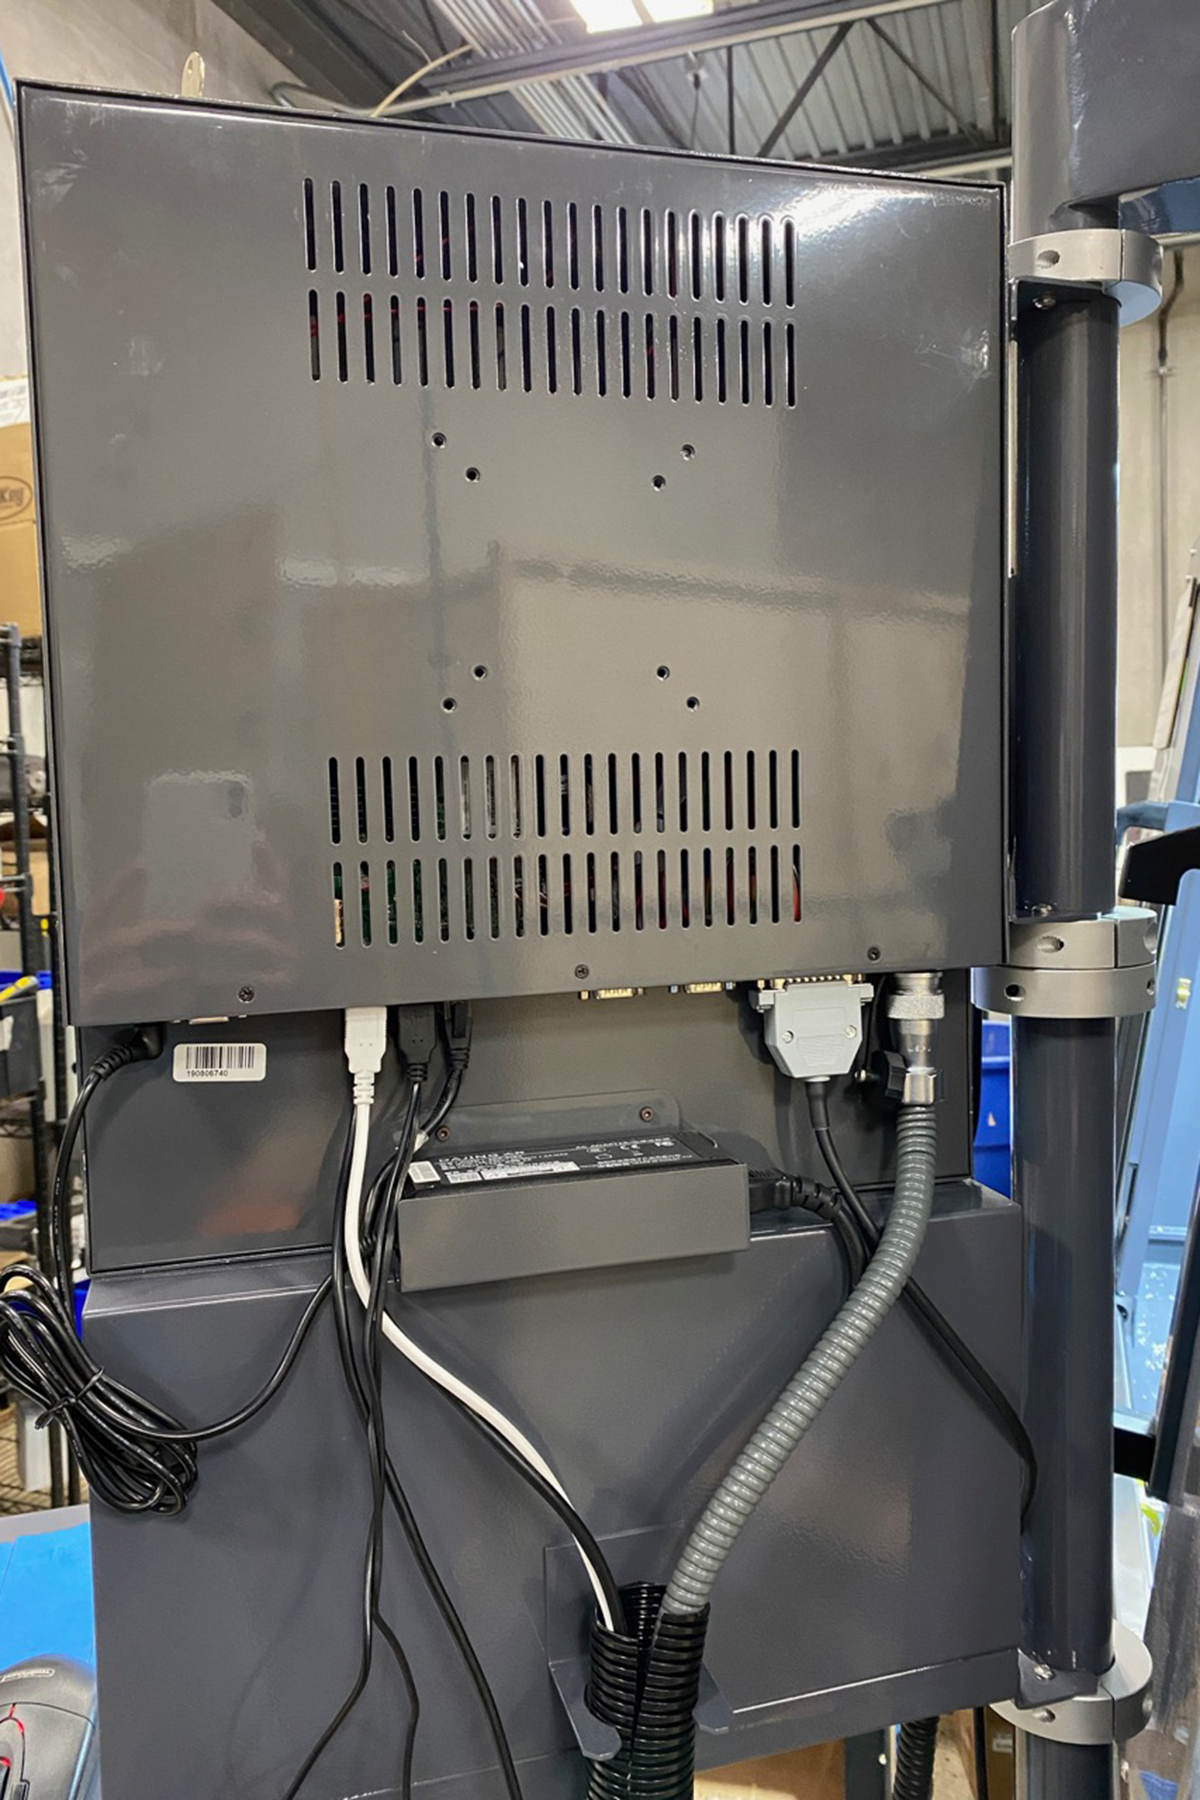
Figure 11: Operator console (and its cabling) mounted to the enclosure. -
Remove the Phillips head screws that secure the back panel to the operator console. Set the screws and the back panel aside.
-
Identify the CR2032 battery inside the controller. Then, remove it and replace it with a new battery.
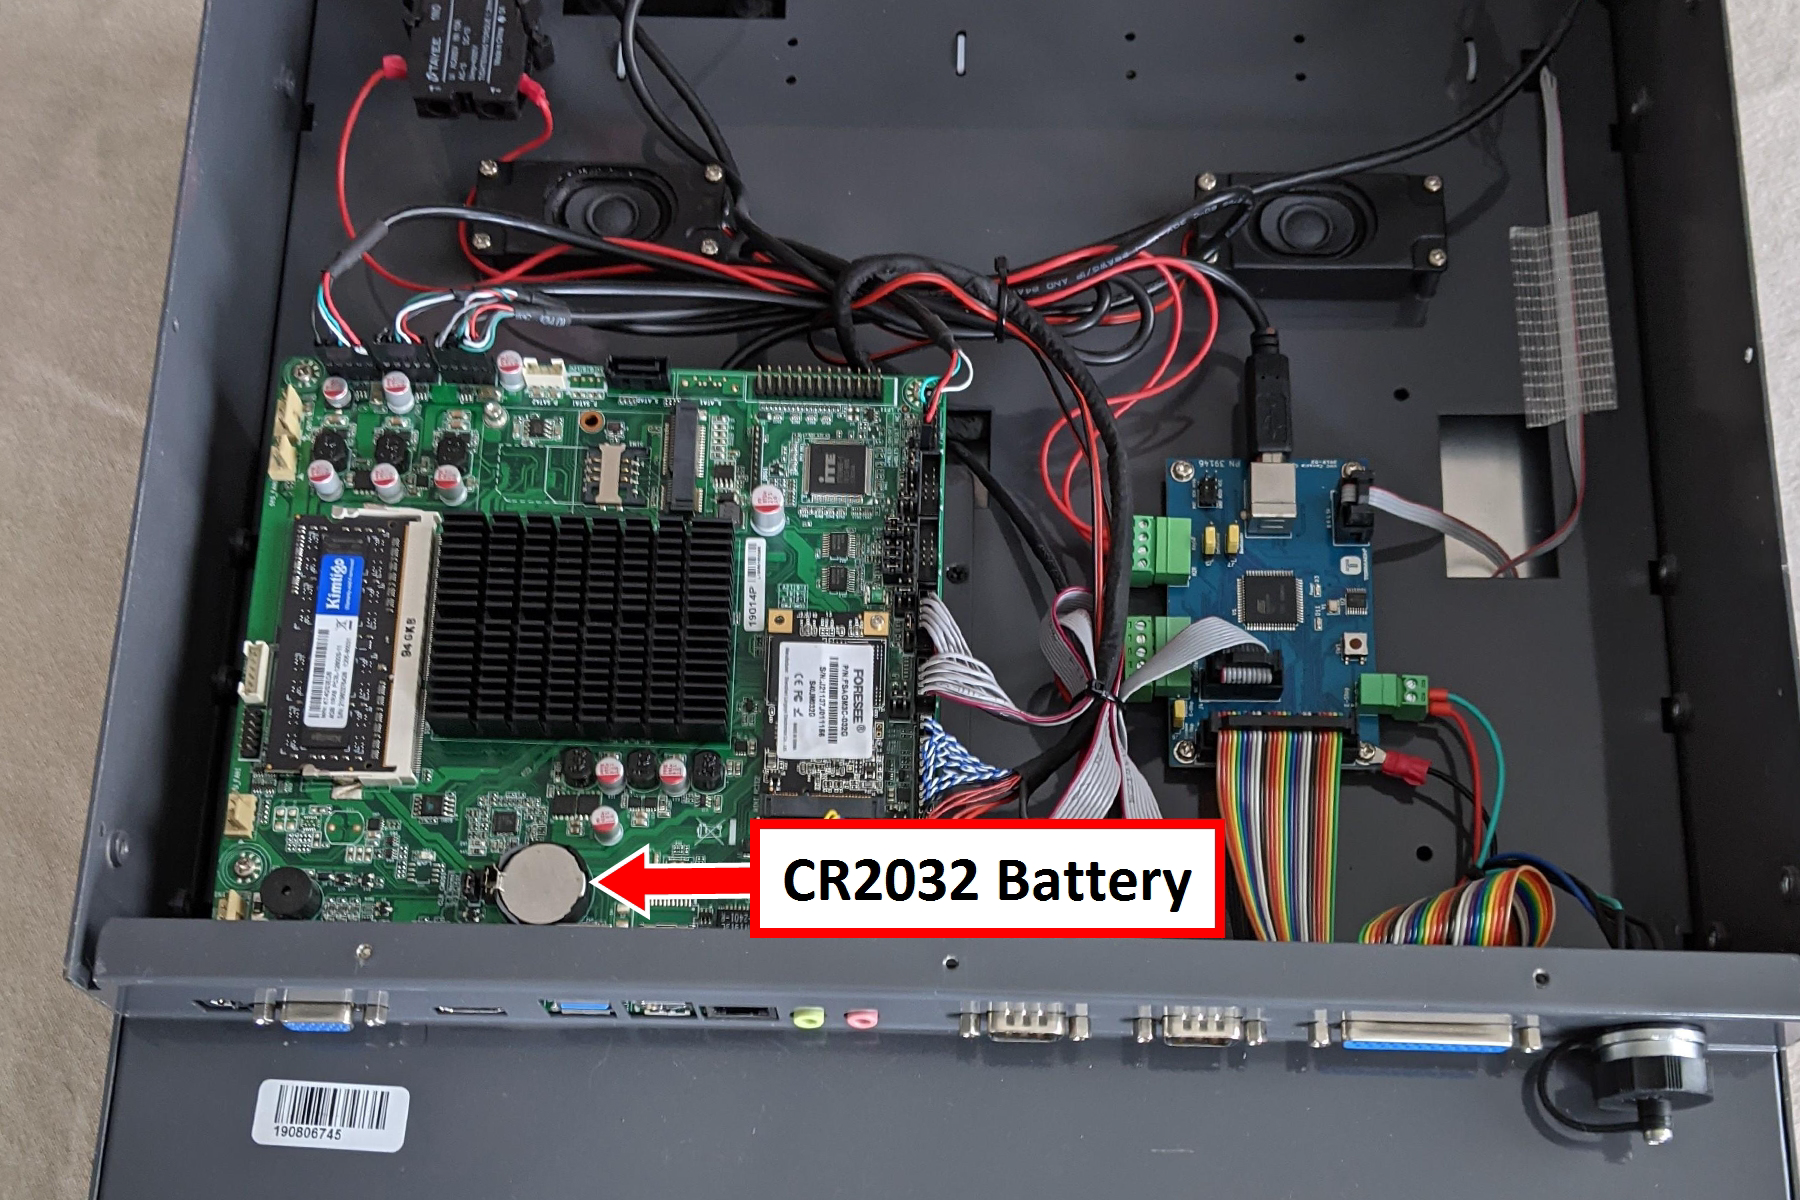
Figure 12: Location of the CR2032 battery inside the controller. -
Reinstall the back panel onto the operator console with the Phillips head screws that you set aside in step 2.
-
Re-mount the operator console onto the machine, and reconnect all cabling to the operator console.
-
Go to “Restart the Controller and Set the Date and Time”.
Important! After you replace the controller’s battery, you must set the correct date and time in the BIOS settings. If you don’t, PathPilot won’t boot properly.
Replace the Battery on an xsTech Controller
-
Disconnect all cabling from the controller, and then turn it over.
-
Remove the four screws that secure the stand to the controller. Set aside the screws and the stand.
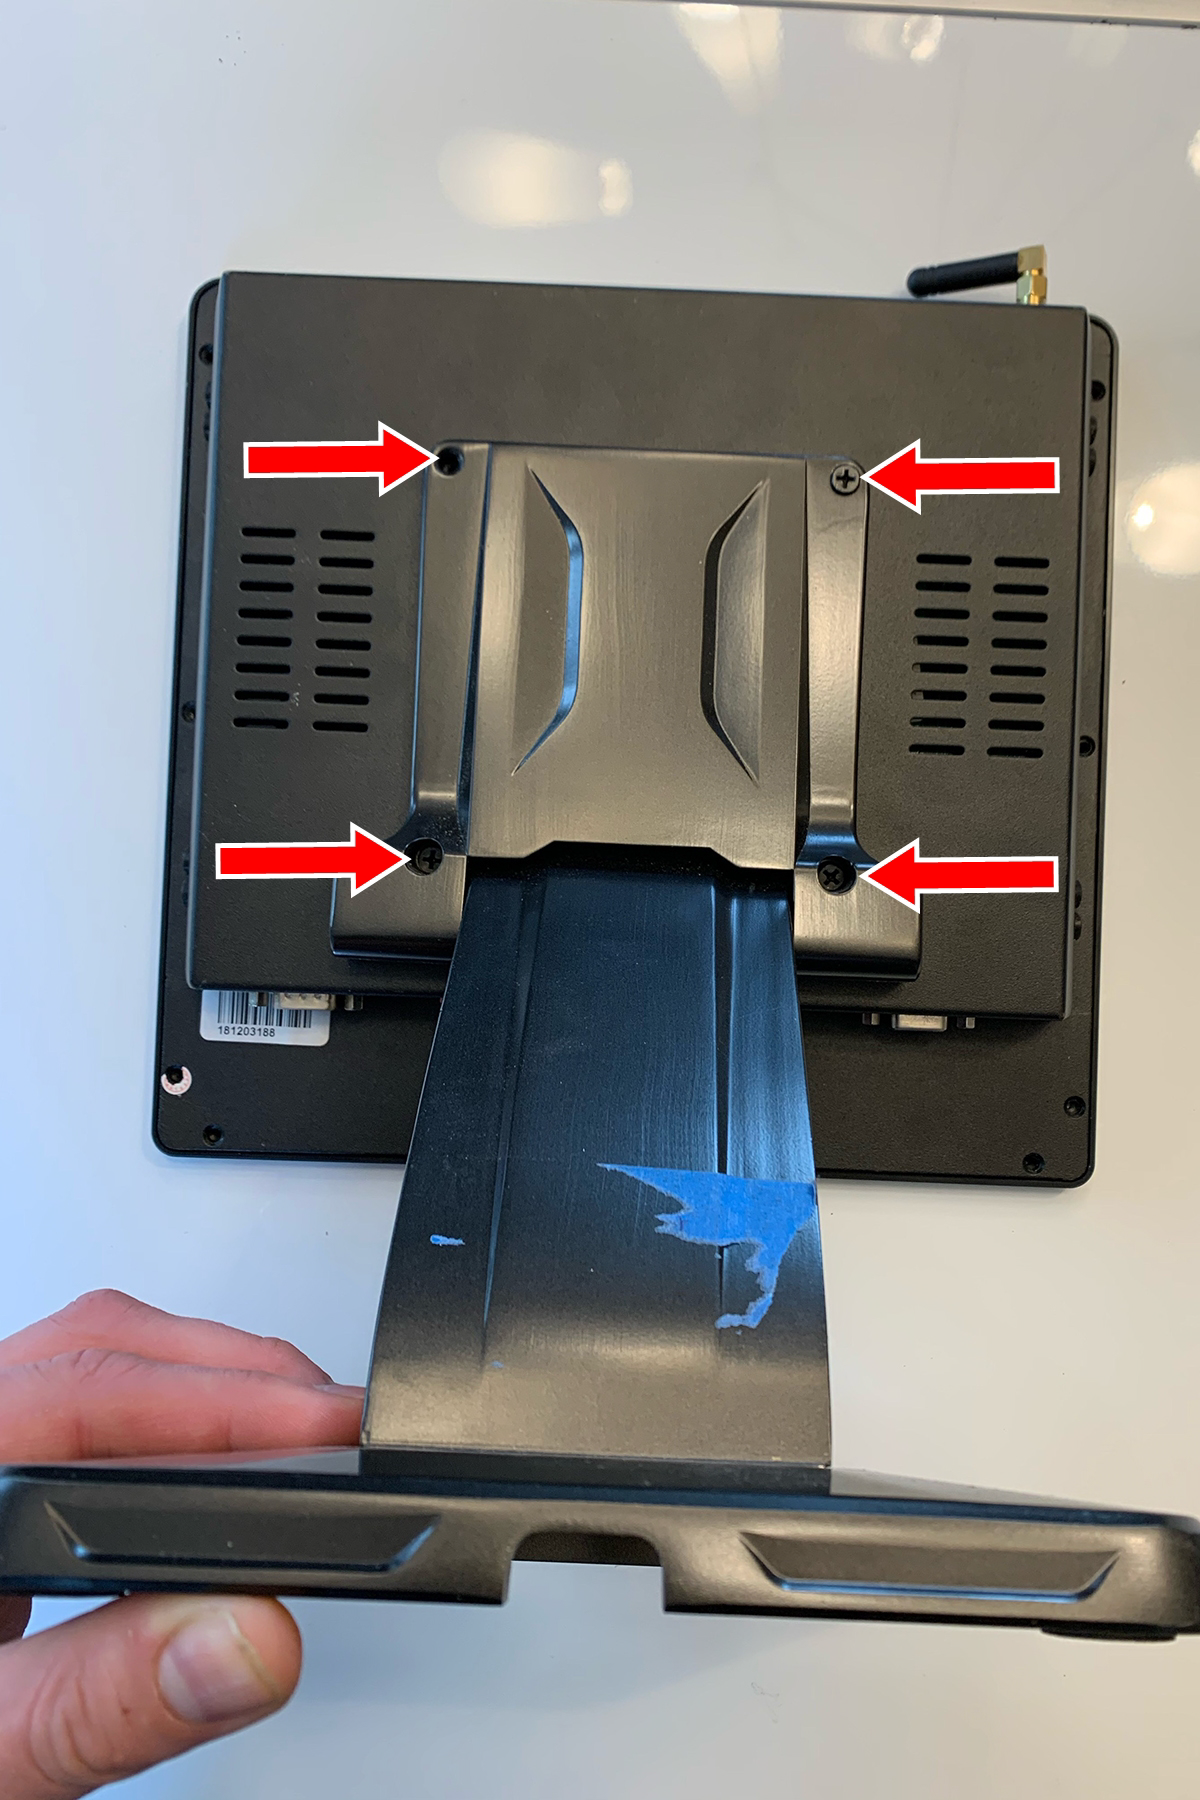
Figure 13: Phillips head screws securing the stand to the controller. -
Remove the 12 screws that secure the back chassis to the controller.
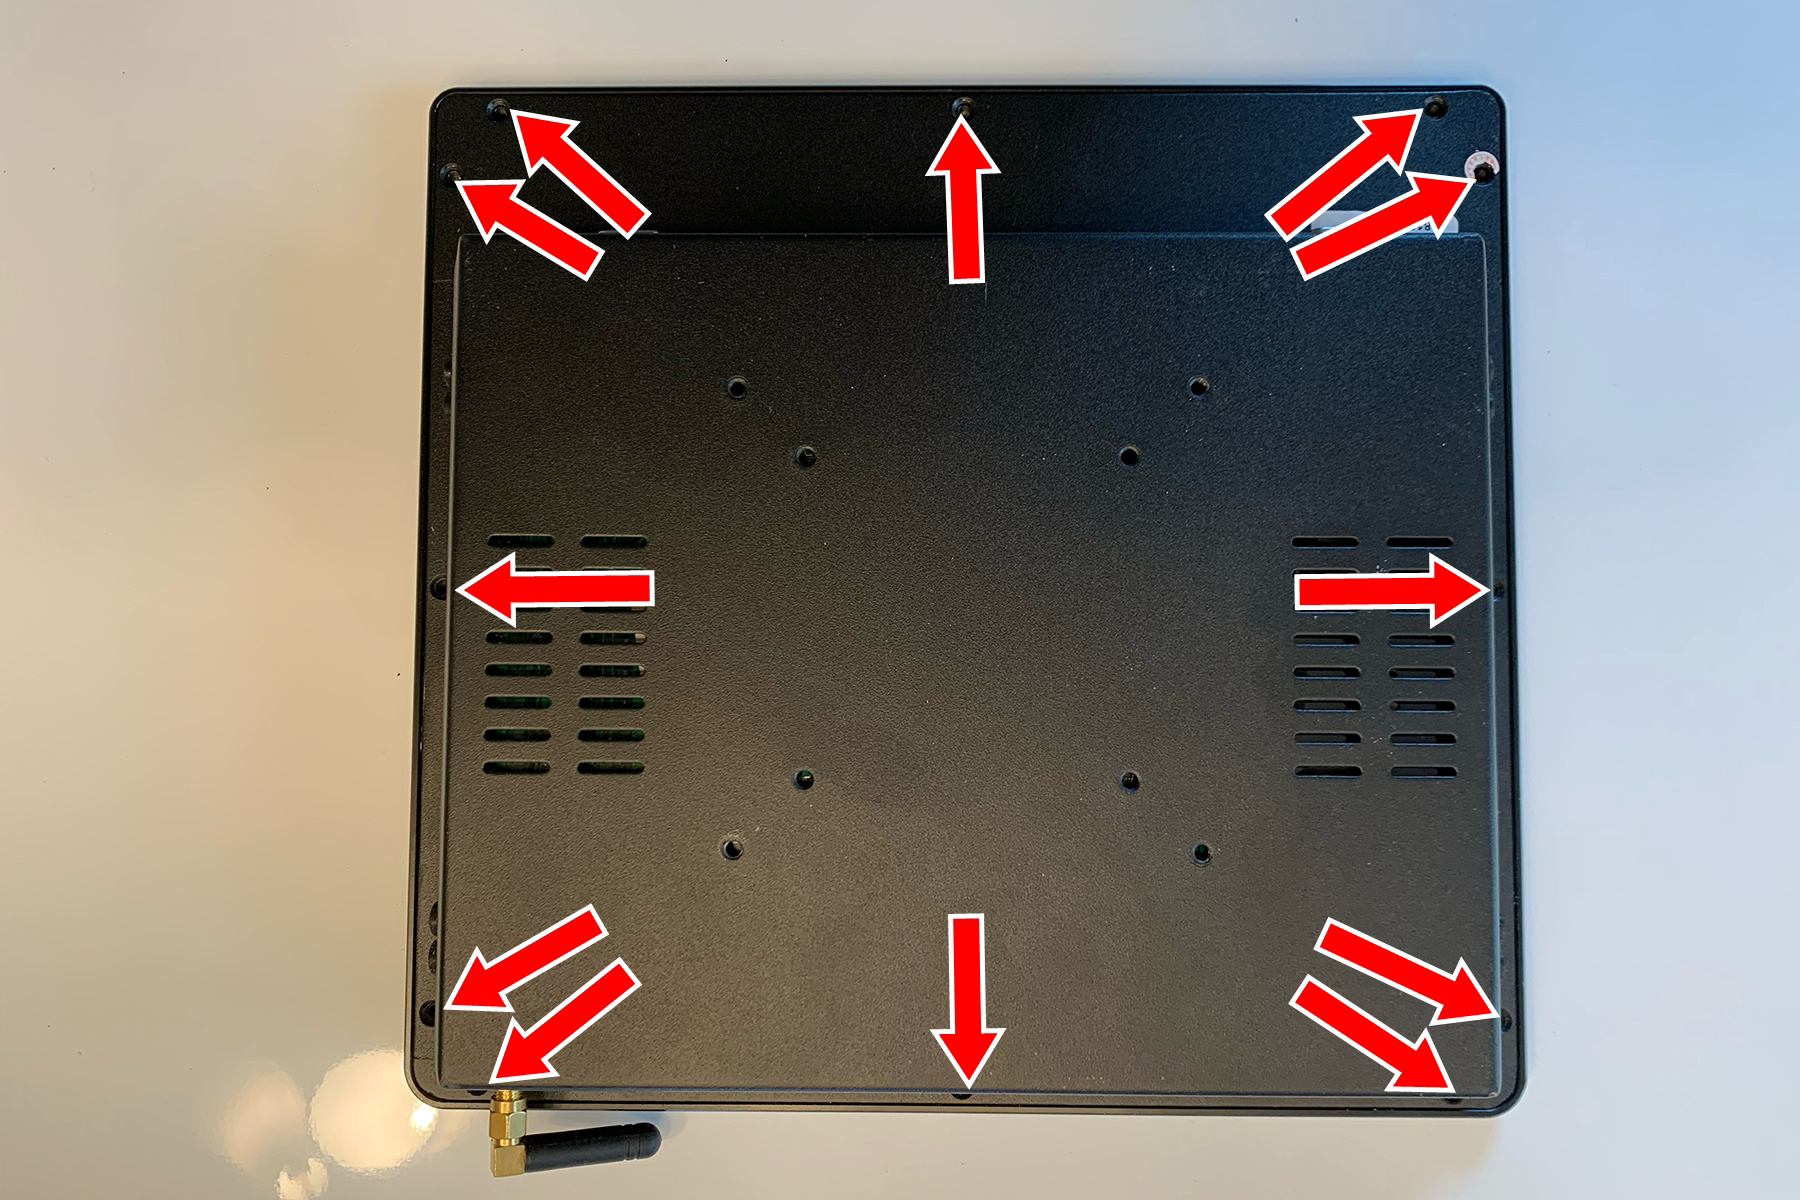
Figure 14: Screws securing the back chassis to the controller.
NOTE: One screw is below the QA sticker on the controller.
-
Turn the controller over, and carefully slide the glass screen to the side as shown in the following image.
NOTICE! Move the glass screen slowly. If you don’t, there’s a risk that you could disconnect a cable that connects the screen to the main controller unit.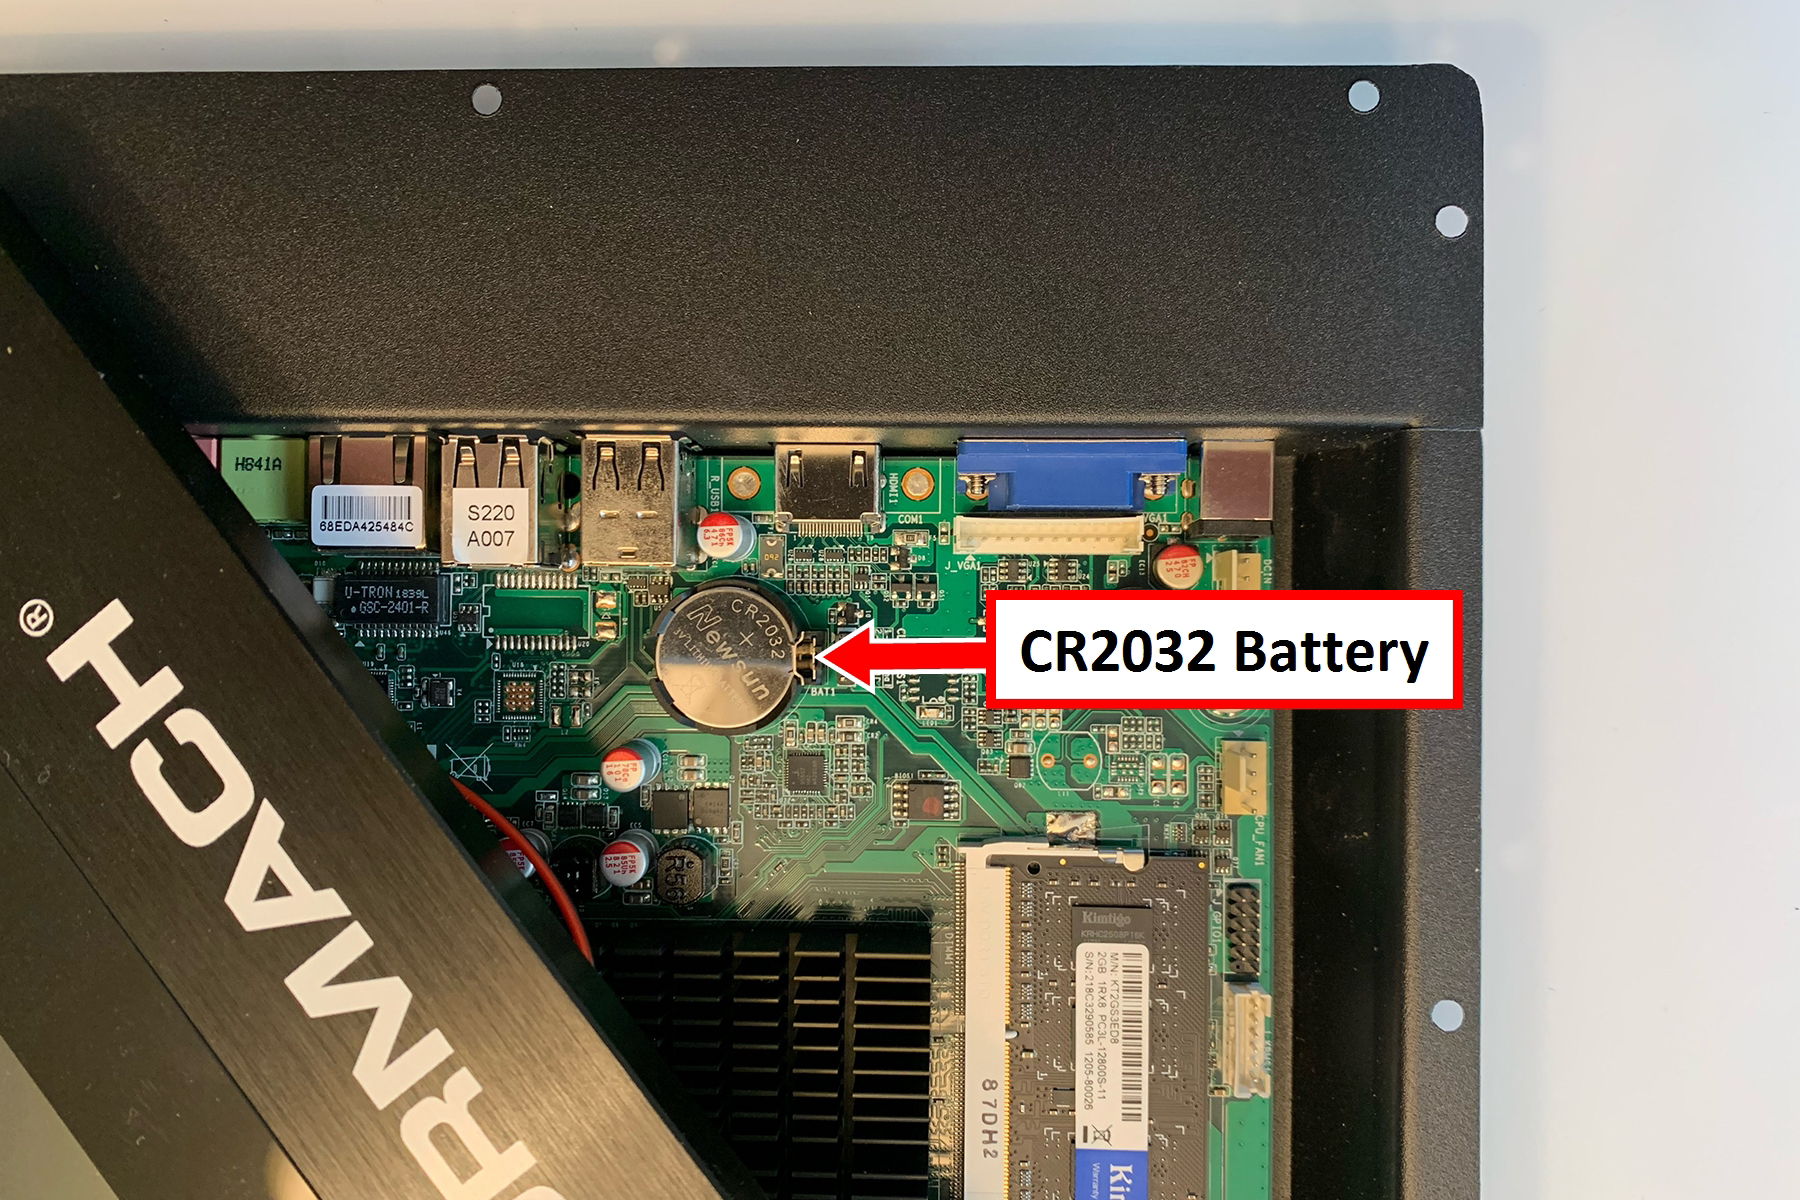
Figure 15: Glass screen moved on the controller to access the battery. -
Identify the CR2032 battery inside the controller. Then, remove it and replace it with a new battery.
-
Move the glass screen back in place. Turn the controller over, and reinstall the back chassis and the stand. Then, reconnect all cabling to the controller.
-
Go to “Restart the Controller and Set the Date and Time”.
IMPORTANT! After you replace the controller’s battery, you must set the correct date and time in the BIOS settings. If you don’t, PathPilot won’t boot properly.
Restart the Controller and Set the Date and Time
-
Power on the controller while repeatedly selecting DELETE on the keyboard.
-
If the BIOS Menu Displays Go to Step 2.
-
If the Splash Screen Displays You’ve missed the time window in which you can access the BIOS menu. Press the power button on the controller for 10 seconds, and repeat Step 1.
-
TIP! If you’re having trouble getting into the BIOS menu, we recommend plugging your keyboard directly into the controller (and not through an extension).
-
From the BIOS menu, go to Chipset, and change Restore AC Power Loss to Power On.
-
From the BIOS menu, set the correct date and time.
-
Power the controller off and back on again.
PathPilot loads as normal.
Troubleshooting
Problem: After replacing the battery and updating the date and time in the BIOS settings, the controller hangs on the splash screen.
Resolution:
-
From the splash screen, press the ESC key on the keyboard.
A diagnostic screen displays. -
Verify that the last line on the diagnostic screen is “Starting enable remaining boot-time encrypted block devices”. If it is, you can try the repair option.
-
Press the F key on the keyboard.
The controller acknowledges the key press.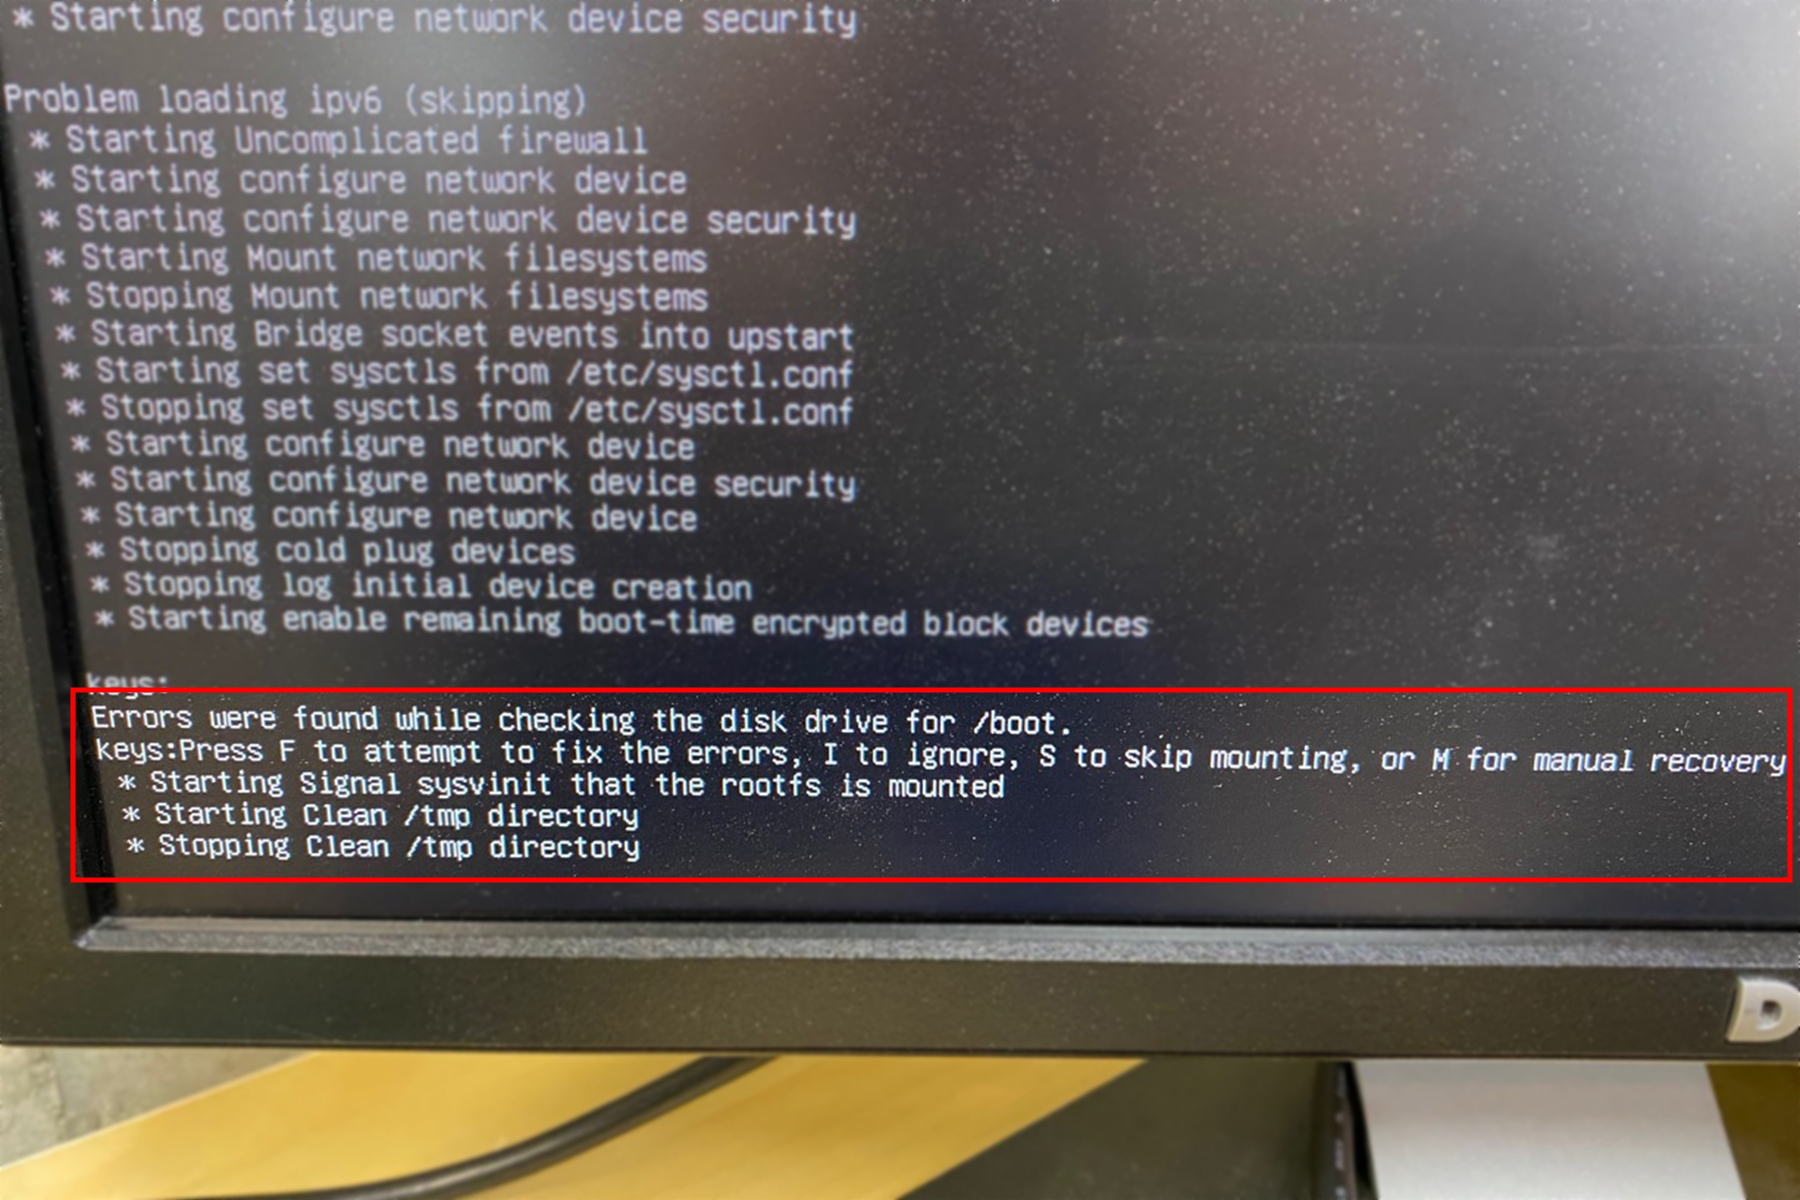
Figure 16: Diagnostic screen. -
Press the F key again to attempt to resolve any internal drive issues, and continue loading PathPilot.