Install the Oiler
-
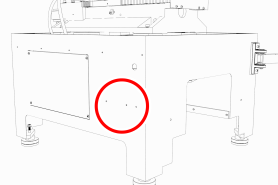
Find the hardware installed on the left side of the machine stand, as shown in the following image.
-
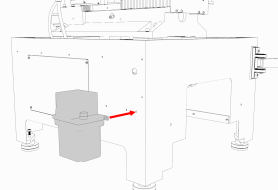
Using the hardware from Step 1, attach the oiler to the machine stand with a 5 mm hex wrench.
Make Automatic Oiler Connections
-
Connect the existing oil line on the mill to the oil line on the oiler.
-
Attach three mounting tabs to the machine stand with three M5 × 10 mm screws.
-
Route the power cord on the oiler to the back of the electrical cabinet, and connect it to any of the Accessory outlets.
-
Fill the oiler's sreservoir with machine oil to about 80% full.
Set Up the Automatic Oiler
If you installed an automatic oiler, you must now set it up. Complete the following steps in the order listed:
Look for Leaks and Clear the Lines
-
Power on the oiler.
-
On the oiler's control panel, push and hold the Feed button for two seconds.
The oiler pushes oil through the distribution system.
Examine the distribution system to make sure that oil doesn't leak while the system is operating.
Specify the Interval Time
The oiler distributes oil at the following times:
-
When the machine is powered on
-
After a specified interval
The interval time is the amount of time, in minutes, that the oiler waits between oil applications.
NOTE: If your machine will be unused for a long period of time (like overnight), we recommend powering off the machine to avoid over-lubricating the system.
-
On the oiler's control panel, push and hold either of the Minutes Adjustment buttons. It doesn't matter which button you push.

The oiler beeps.
-
While looking at the Minutes display, do one of the following:
-
To increase the interval time, push the Up Arrow. We recommend that you set it to 480 minutes (eight hours).
-
To decrease the interval time, push the Down Arrow.
-
NOTICE! Pressure Hazard: To avoid potential equipment damage, don't set the interval time to less than five minutes.
Specify the Actuation Time
The actuation time is the amount of time, in seconds, that the oiler distributes oil during an oil application.
-
On the oiler's control panel, push and hold either of the Seconds Adjustment buttons. It doesn't matter which button you push.
The oiler beeps.
-
While looking at the Seconds display, do one of the following:
-
To increase the interval time, push the Up Arrow. We recommend that you set it to 12 seconds.
-
To decrease the interval time, push the Down Arrow.
-
NOTICE! Pressure Hazard: To avoid potential equipment damage, don't set the actuation time to more than three minutes.
Looking for more information?
This is a section of the 770MX operator's manual. To view the whole manual, go to Tormach document UM10587.
If you have additional questions, we can help. Create a support ticket with Tormach Technical Support at tormach.com/how-to-submit-a-support-ticket for guidance on how to proceed.