In This Section, You'll Learn:
About the required maintenance procedures that you must do so that this machine operates as designed.
Maintenance Safety
Read and understand the following safety messages before beginning any maintenance procedures.
All Maintenance Procedures
-
Understand that the machine is automatically controlled and can start at any time.
-
Power off the machine and disconnect the pneumatic supply before doing any maintenance procedures.
-
When appropriate, lockout/tagout the Main Disconnect switch and the pneumatic supply line before doing any maintenance procedures.
-
Wear safety eye protection rated for ANSI Z87+.
Swarf Maintenance Procedures
-
Wear work gloves.
Maintenance Schedules
To keep your machine running as smoothly as possible, you must regularly do the following maintenance procedures.
NOTE: Before you begin any maintenance procedures, read and understand "Maintenance Safety".
If you disassemble any components, refer to the machine's reference drawings when you've completed the maintenance procedure. For information, see Diagrams and Parts Lists. For any additional support, we can help. Create a support ticket with Tormach Technical Support at tormach.com/how-to-submit-a-support-ticket for guidance on how to proceed.
Daily
-
Clean the machine of any dust or swarf buildup with a vacuum and brushes.
-
Wipe dust off of the linear rails and ball screws with a clean cloth.
-
Examine cutting tools for chips or dull cutting edges.
-
Inspect the spindle taper, collet nut, and collets for buildup and, if necessary, clean the components.
-
Use a rust inhibitor on all exposed, non-lubricated, non-painted metal surfaces.
NOTE: Don't use rust inhibitor on the ball screws or the linear rails.
Weekly
-
Clean all exterior surfaces with a clean rag.
-
Inspect the dust collection hose and dust collector for blockages (or any large debris that could cause a blockage).
-
Examine the chiller's water level and, if necessary, add distilled water.
-
Verify that the machine's lubrication points have been properly lubricated.
Monthly
-
Clean the electrical cabinet vents of dust with a clean cloth or compressed air.
-
Inspect the spindle's ER20 taper for wear, damage, or dust buildup.
Quarterly
-
Drain the water from the chiller and replace it with fresh, distilled water.
-
Examine the water chiller lines for flexibility and signs of wear (like cracking). Replace the lines if stiffness has increased or if they're damaged.
-
Lubricate the ball screws.
Semi-Annually
-
Lubricate the linear blocks.
-
Lubricate the axis motor couplers with synthetic silicone grease.
Regularly Maintaining the Machine
Clean the Linear Rails and Ball Screws
You must clean the linear rails and ball screws for the machine to operate properly and to extend its service life. Doing so helps to reduce the wear in the seals and increase the service life of the parts.
To clean the linear rails and ball screws:
-
Power off the machine and the PathPilot controller.
-
Push in the machine's red Emergency Stop button, which removes power to motion control.
-
From the PathPilot interface, select Exit.
-
Turn the Main Disconnect switch to OFF on the side of the electrical cabinet.
-
-
Wipe the linear rails (daily, or every 8 hours of operation) with a clean, non-linting towel or cloth.
-
Wipe the ball screws on the X and Z axes (daily, or every 8 hours of operation) with a clean, non-linting towel or cloth.
-
Inspect the Y-axis ball screw with a flashlight, and determine if it must be cleaned of dust and debris. If necessary, wipe the ball screw with a clean, non-linting towel or cloth.
NOTE: The Y-axis ball screw is protected from dust and debris by the router table. This means that you can clean it less frequently.
-
Power on the machine and the PathPilot controller.
-
Turn the Main Disconnect switch to ON on the side of the electrical cabinet.
-
Twist out the machine's red Emergency Stop button, which enables movement to the machine axes and the spindle.
-
Press the Reset button.
-
Bring the machine out of reset and reference it.
-
-
Jog the machine through its full length of travel.
As the machine moves, the bearing blocks apply a thin layer of grease to the linear rail, and the ball nuts apply a thin layer of grease to the ball screws.
Clean the Spindle Taper, Collet Nut, and Collet
While you use the machine, dust and resin can build up in the spindle taper, collet nut and the slots of the collets. Before each tool change, you must inspect and clean the spindle taper, collet nut, and collets (and, if necessary, replace the components).
WARNING! Tool Pullout Hazard: You must verify that the spindle taper, collet nut, and collet aren't worn and don't have dust buildup. If you don't, tool life and performance could decrease, and it could introduce the possibility for tool runout and reduced holding power on the tool.
Spindle Taper
-
Inspect and clean the spindle taper as necessary.
Collet Nut
-
Inspect the inside of the collet nut for dust and resin buildup before each tool change, and clean it if necessary.
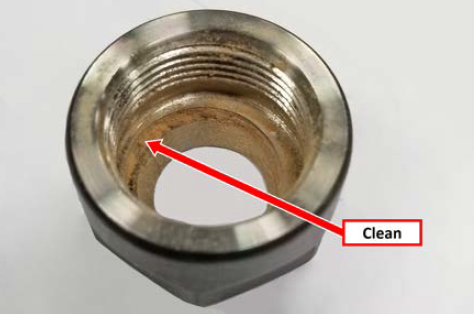
-
Inspect the collet nut for wear and damage every day, and replace it if necessary.
Collet
-
Inspect the slots of the collet for dust and resin buildup, and clean it if necessary.
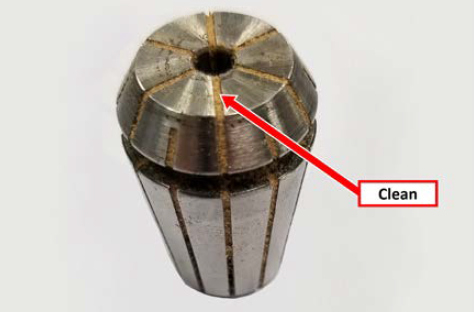
-
Inspect the collet for wear and damage before each tool change, and replace it if necessary.
Maintain the Chiller
The chiller circulates a continuous supply of cool water through the spindle, which regulates its temperature.
NOTICE! To keep the spindle's temperature regulated, you must verify that the chiller is always operating properly by maintaining it as detailed in this section. If you don't, there's a risk that the spindle could overheat, which could cause spindle bearing failure.
-
Only use distilled water in the chiller to avoid corrosion and/or bacterial buildup in the chiller, coolant lines, and spindle.
-
Examine the water level of the chiller weekly and, if necessary, refill it with distilled water.
-
Drain and replace the water in the chiller with fresh, distilled water every 3 months. Over time, buildup of corrosion and dirt in the chiller can reduce the performance of the chiller.
Lubricate the Machine
To keep the machine operating properly, and to extend the service life of the machine, you must verify that the linear rails and ball screws are properly lubricated.
Linear Rails
The linear bearing blocks are sealed and lubricated during machine assembly, which makes them relatively low maintenance components. The recommended service interval (from the linear bearing manufacturer) is between 500-1000 km, depending on load rating. We recommend lubricating the linear bearing blocks every 6 months, which assumes that you're using the machine at its maximum velocity for 8 hours every day, and that the lubrication interval is every 500 km.
-
Recommended Lubrication Quantity 0.3 cm3 grease per block
NOTICE! You must only use the amount of lubrication and at the pressure specified in this section. If you use excessively high quantities of lubricant, or excessively high lubricating pressure, it could cause machine damage.
-
Maximum Lubricating Pressure 30 bar
-
Recommended Grease Type Hiwin G05 General Type Grease (or greases that are in accordance with DIN 51825 of consistency class NLGI No. 2 as specified by DIN 51818)
NOTE: Don't use greases with solid particles, like graphite or MoS2.
To lubricate the linear rails:
-
Identify the machine's bearing blocks.
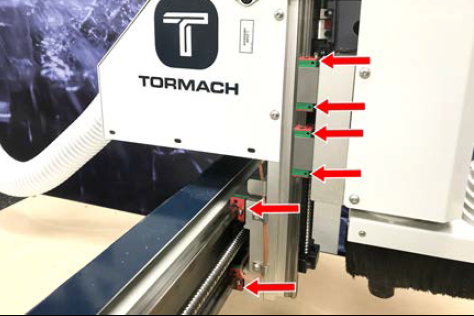
-
Identify the lubrication port on the bearing blocks.
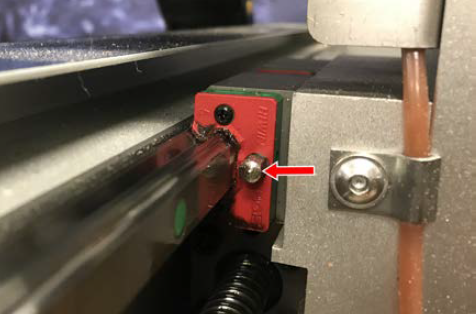
-
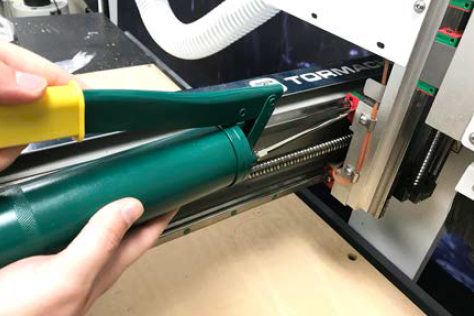
Find the Grease Gun (PN 50360) and the Grease Nozzle Kit (PN 50389) provided with the machine. From the Grease Nozzle Kit, identify the concave nozzle.
-
Assemble the Grease Gun with the concave nozzle, and lubricate the linear bearings with the recommended lubrication quantity once every 6 months.
Ball Screws
The recommended lubrication interval (from the ball screw manufacturer) is every 2-3 months or 100 km of travel. We recommend lubricating the ball screws every 2-3 months, which assumes that you're using the machine at its maximum velocity for 8 hours every day.
-
Maximum Lubricating Pressure 30 bar
NOTICE! You must only use the amount of lubrication and at the pressure specified in this section. If you use excessively high quantities of lubricant, or excessively high lubricating pressure, it could cause machine damage.
-
Recommended Grease Type Hiwin G05 General Type Grease (or greases that are in accordance with DIN 51825 of consistency class NLGI No. 2 as specified by DIN 51818)
NOTE: Don't use greases with solid particles, like graphite or MoS2.
-
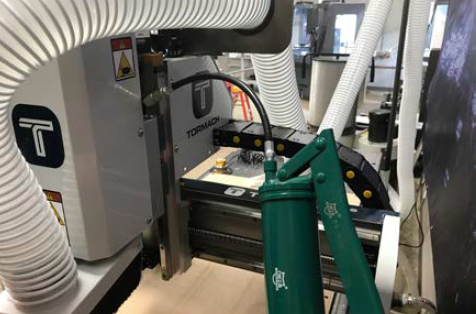
Identify the three remote-mounted lubrication ports.
-
Use the Grease Gun (PN 50360) provided with the machine (and its attachments) to lubricate the ball screws with the recommended lubrication quantity once every 2-3 months.
Lubricate the Axis Motor Couplers
The rubber bushing in the axis motor couplers may begin to squeak or make a ticking noise after time. A small amount of synthetic silicone grease on the mating surfaces of the red polyurethane bushing can prevent them from squeaking.
To lubricate the axis motor couplers:
-
Remove the axis motor.
-
Separate the two halves of the coupler, and put a small
amount of synthetic silicone grease on the rubber
bushing faces. -
Re-assemble the coupler, and re-install the motor.
Prevent Rust
Take proper care to protect all exposed iron and steel surfaces on your machine. To reduce the possibility of rust, you must regularly do the following:
-
Clean all exterior surfaces with a mild cleaner.
-
Only operate the machine in a temperature- and humidity-controlled environment. Extreme changes in temperature or humidity can create condensation on the machine.
-
Put LPS 3® (or similar rust inhibitor) on all exposed, non-painted metal surfaces before leaving the machine unused.
Looking for more information?
This is a section of the 24R operator's manual. To view the whole manual, go to Tormach document UM10564.
If you have additional questions, we can help. Create a support ticket with Tormach Technical Support at tormach.com/how-to-submit-a-support-ticket for guidance on how to proceed.