Purpose
This document gives instructions on installing the flood coolant kit on a PCNC 440.
Product Information
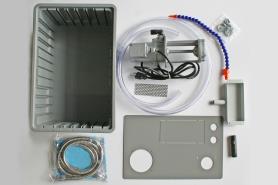
Product: PCNC 440 Flood Coolant Kit (PN 35719)
|
Quantity |
Description |
|
1 |
|
|
1 |
3/4 in. ID Clear Tubing (PN 37115) |
|
8 |
10-32 Nut (PN 34101) |
|
8 |
10-32 × 1/2 in. Screw (PN 34100) |
|
1 |
|
|
1 |
Chip Screen (PN 37112) |
|
1 |
|
|
1 |
Coolant Hose Adapter (PN 35989) |
|
1 |
Coolant Tank (PN 35711) |
|
1 |
Coolant Tank Cover (PN 35710) |
|
1 |
Funnel Tray (PN 37113) |
|
2 |
Hose Clamp (PN 37116) |
|
4 |
Rubber Washer (PN 37114) |
NOTE: If any items are missing, we can help. Create a support ticket with Tormach Technical Support at tormach.com/how-to-submit-a-support-ticket for guidance on how to proceed.
Required Tools
This procedure requires the following tools. Collect them before you begin.
-
Adjustable wrench
-
Center punch
-
Clean rag
-
Electric drill
-
Isopropyl alcohol
-
Marker
-
Phillips screwdriver
-
Silicone sealant
-
Thread seal tape
Set Up the Flood Coolant Kit
-
Put the coolant tank cover on top of the coolant tank.
-
Use four 10-32 ×1/2 in. screws and 10-32 nuts to mount the coolant pump to the coolant tank cover.
-
Put one end of the 3/4 in. ID clear tubing into the coolant tank cover. You can use a hose clamp on one end of the 3/4 in. ID clear tubing to prevent it from pulling out of the coolant tank.

-
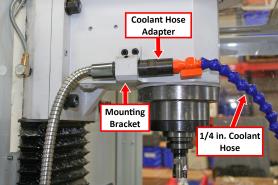
Wrap the threads of the coolant hose adapter with thread seal tape. Then, put it into the mounting bracket on the machine column.
-
Tighten the fixing screw to secure the adapter in its position.
-
Connect the 1/4 in. coolant hose to the coolant hose adapter.
-
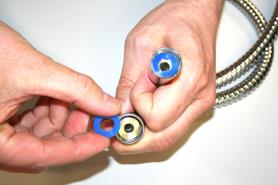
Put one provided silicone washer into each end of the chrome-armored hose.
-
Route the chrome-armored hose around the rear of the machine, and then connect it to the open end of the coolant hose adapter.
-
Wrap the threads of the elbow adapter on the coolant pump with thread seal tape.
-
Connect the loose end of the chrome-armored hose to the elbow adapter on the coolant pump.
-
Remove the access panel from the chip pan.

-
Put the provided chip screen in place of the chip pan's access panel.
-
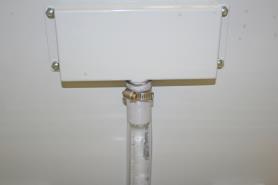
Put one hose clamp on the loose end of the 3/4 in. ID clear tubing, and then attach it to the funnel tray.
-
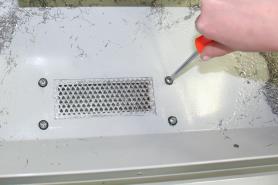
Use the funnel tray as a template: put it below the access panel on the chip pan, and then use a marker to mark its four holes.

-
Use a center punch (or similar) to mark the four locations that you marked in Step 14. Then, use a 7/32 in. drill bit to drill the holes.
-
Use four 10-32 × 1/2 in. screws, rubber washers, and 10-32 nuts to attach the funnel tray to the chip pan.
-
Use isopropyl alcohol and a rag to clean the perimeter of the funnel tray.
-
Apply a thin strip of silicone sealant around the perimeter of the funnel tray to seal against leaks.
-
Route the power cord on the coolant pump to the machine's power strip, and connect it to the power strip.
To view a PDF version of your manual, go to Tormach document TD10405.
If you have additional questions, we can help. Create a support ticket with Tormach Technical Support at tormach.com/how-to-submit-a-support-ticket for guidance on how to proceed.