Background
The idea of providing power to your machine seems simple: just plug it in. In reality, there are a number of other components used in order to provide power appropriately safety for you and the machine, including (but not limited to):
-
The main disconnect switch
-
Fuses and/or circuit breakers
-
Emergency stop switch/button
-
Separate latching circuits for the spindle and rest of the machine
-
Transformers, which change the electricity to the appropriate value
Even with all of these components, you can systematically locate nearly any problem with just a multimeter.
Tools
-
Digital multimeter
Twist Out the Emergency Stop Button
Reason: The Emergency Stop button is pushed in.
-
Twist out the Emergency Stop button and press the Reset button.
The Reset button doesn't illuminate until after you:
-
Twist out the Emergency Stop button.
-
Press the Reset button.
Reset the Building’s Mains Breaker
Reason: The shop or building’s mains breaker is turned off.
-
Examine the building’s breaker. If it's not already on, turn it on.
-
Using a digital multimeter, measure to inspect and verify that you have power at the outlet.
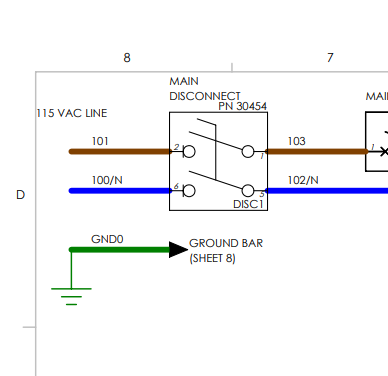
Inspect the Power Entering the Machine
Reason: The Main Disconnect switch is in the Off position.
-
Examine the Main Disconnect switch. If it’s not already in the On position, turn it on and try to take your machine out of reset.
-
Measure the voltage coming out of your Main Disconnect switch.
-
Identify the wires as indicated in the table.
-
If you measure the correct Vac, continue.
-
If you do not any Vac, you either have a loose wire or a faulty Main Disconnect switch.
-
|
Machine |
Wires |
Measure for… |
|---|---|---|
|
770M/MX |
101 and 100/N |
115 Vac nominal |
Reset the CB1 and/or CB2 Circuit Breaker
Reason: The CB1 and/or CB2 circuit breaker tripped.
-
Measure the wires as indicated below.
-
If required, power off the machine and reset the tripped breaker.
|
Machine |
Wires (CB1 and CB2) |
Measure for… |
|---|---|---|
|
770M/MX |
105 and 100/N and 107 and 100/N |
115 Vac nominal |
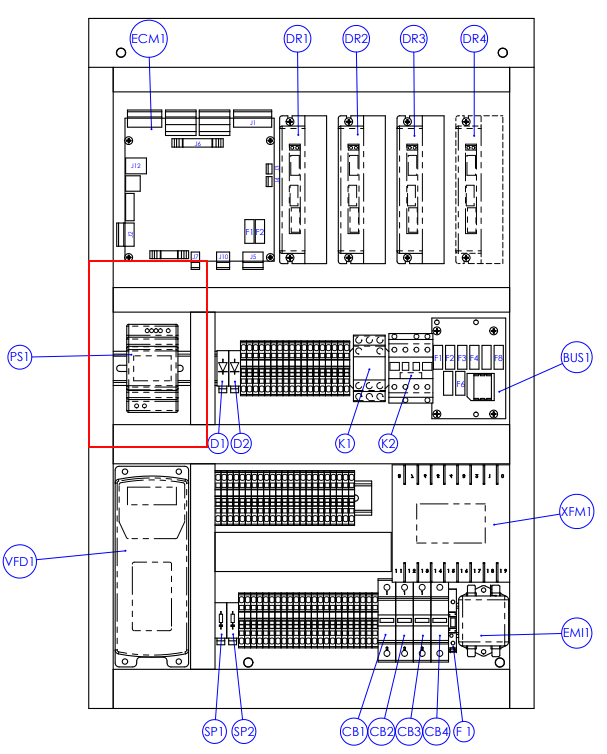
Inspect the DC Power Supply (PS1)
Reason: The DC power supply PS1 is defective.
-
With a multimeter measure the Vdc between 400 and 401.
-
If the digital multimeter reads below 22 Vdc, with a multimeter measure between 112/N and 113 for the input Vac.
If the input Vac is correct, replace the DC power supply.
|
Machine |
Wires |
Measure for… |
|---|---|---|
|
770M/MX |
400 and 401 |
24 Vdc nominal |
|
Machine |
Wires |
Measure for… |
|---|---|---|
|
770M/MX |
112/N and 113 |
115 Vac nominal |
Inspect the K1 Contactor
Reason: The contactor K1 is defective.
-
Examine the K1 contactor’s red LED light. Depending on the state, do one of the following:
-
Red LED is On. This indicates that the contactor is latched. Use a digital multimeter to examine the power at K1-1 and wire 115.
-
Red LED is Off. Press and hold the Reset button and observe the LED on K1:
-
If it's on, K1 has a latching circuit issue.
-
If it's not on, K1 may have a coil issue.
-
-
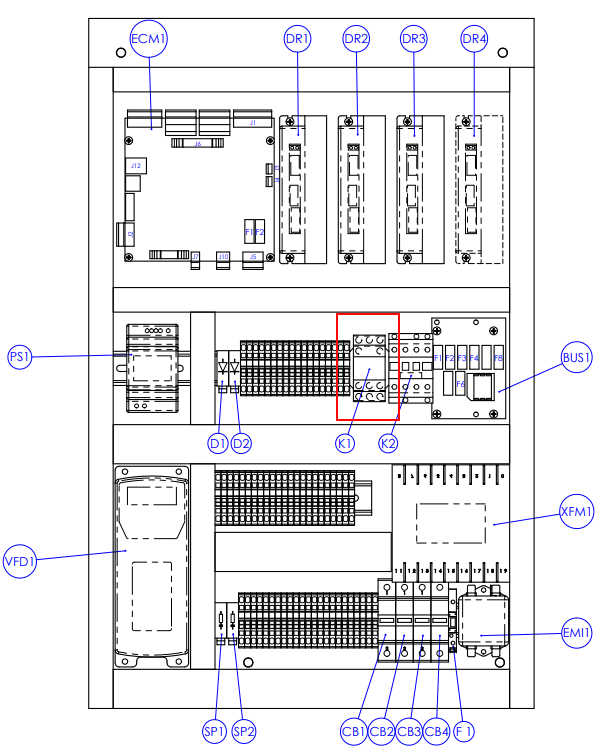
Contactor K1 energizes the DC-BUS board, which provides 65 Vdc to the machine. K1 can fail by not energizing the coil, or the contacts could fail.