Purpose
This document gives instructions on installing and calibrating the Touch Screen Kit.
Product Information
Product: Touch Screen Kit (PN 35575)
|
Quantity |
Description |
|
1 |
Monitor (PN 37761) |
|
1 |
USB Extension Cable, 10 ft (PN 30279) |
|
1 |
SVGA Video Extension Cable, 15 ft (PN 35705) |
|
1 |
HDMI Cable |
|
2 |
Screw, Pan Head, M4 × 10 mm (PN 30537) |
|
2 |
M4 x 10 mm Thread-Forming Screw (PN 34249) |
|
3 |
Cable Tie Holder (PN 33193) |
|
5 |
Cable Tie, 4 in., Nylon, Black (PN 31719) |
NOTE: If any items are missing, we can help. Create a support ticket with Tormach Technical Support at tormach.com/how-to-submit-a-support-ticket for guidance on how to proceed.
Install the Monitor
-
Align the monitor with the VESA mount plate.
-
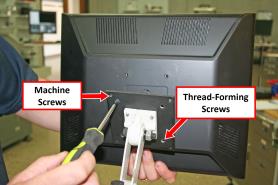
Attach the top of the monitor to the VESA mount plate with a Phillips screwdriver and two M4 × 10 mm machine screws.
-
Attach the bottom of the monitor to the VESA mount plate with a Phillips screwdriver and two M4 × 10 mm thread-forming screws.
Make Monitor Connections
-
Connect the following cables to the touch screen monitor:
-
Power cables
-
HDMI
-
USB
IMPORTANT! If your Touch Screen Kit includes a VGA cable, discard it. If connected, the VGA cable could cause PathPilot to freeze. You'll use an HDMI cable for the touch screen installation.
-
-
Connect the monitor's cables.
-
Route all of the cables' loose ends down the Controller Arm.
-
Secure the cables to the wire tie mounts that you installed on the round monitor post with four 4 in. cable ties.
-
Connect the power cable to the monitor’s power transformer.
-
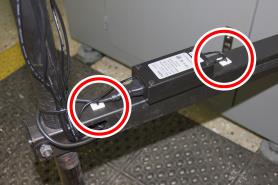
Secure the power transformer to the square tube arm with two cable tie holders and two 4 in. cable ties, as shown in the following image.
-
Route the loose ends of all the cables through the slots in the square tube arm.
-
Connect the USB cable to the USB extension cable. Then, route the loose end of the cable to the PathPilot controller, and connect it to the USB 2.0 port on the controller.
-
Route the loose end of the HDMI cable to the PathPilot controller and connect it.
-
Route the loose end of the power cable to the back of the electrical cabinet, and connect it to any of the Accessory power outlets on the side of the electrical cabinet.
Calibrate the Touch Screen
Before using a touch screen, you must make sure that it's configured and calibrated. To calibrate it:
-
From the PathPilot interface, on the Main tab, in the MDI Line DRO field, type Admin Touchscreen. Then select the Enter key.
-
Follow the on-screen instructions.
Troubleshooting
Problem
The touch screen does not respond to touch inputs on all or part of the screen's surface.
Cause
The sensitivity setting for the touch controller is too low.
Solutions
|
You Might Need To... |
Probability |
How-To Steps |
Need More? |
|
Adjust touchscreen sensitivity. |
High |
Verify that you have PathPilot v2.4.4 or higher installed on your controller. From the PathPilot interface, in the MDI Line DRO field, type ADMIN TOUCHSCREEN SENSITIVITY 1000 and press Enter. You can use a value between 1 and 2047, but 1000 is generally sufficient for most shop spaces. Verify that the touch screen responds to touch inputs. If it doesn't, go to the next step. From the PathPilot interface, on the File tab, find the pointercal.xinput file and delete it. Restart the PathPilot controller. The calibration utility displays. For now, skip this procedure. From the PathPilot interface, in the MDI Line DRO field, type ADMIN TOUCHSCREEN SENSITIVITY 1000 and press Enter. From the PathPilot interface, in the MDI Line DRO field, type ADMIN TOUCHSCREEN and press Enter. The calibration utility displays. Use your finger (not a mouse) to touch all four points that display on the screen. |
The touchscreen is a resistive type to prevent accidental triggering from drops of coolant on the screen. The resistive touchscreen may need its sensitivity adjusted when used in a shop space with very high or low humidity. |
To view a PDF version of your manual, go to Tormach document TD10383.
If you have additional questions, we can help. Create a support ticket with Tormach Technical Support at tormach.com/how-to-submit-a-support-ticket for guidance on how to proceed.