Before You Begin
Prerequisites
-
The enclosure must be installed.
-
The site must have 240 Vac, single phase-power available (20 A).
Required Tools
-
#2 Phillips screwdriver
-
Adjustable wrench
-
Flat-blade screwdriver
-
Lifting device suitable for lifting 198 lb (90 kg ) to a height of 101 in.(257 cm ). Use of a gantry crane or forklift is strongly recommended.
-
Punch
-
Ratchet strap
Mechanical Installation
The recommended location for the mist collector is mounted on top of the mill’s enclosure. This mist collector location requires a minimum ceiling height of 9 ft, 9 in. (297 cm) to allow clearance for the opened filter door. The mist collector’s filter housing weighs 92 lb (42 kg), and must be lifted with a suitable lifting device.
If your installation location does not have sufficient clearance, or does not have a suitable lifting device available, go to "Floor Installation (Alternate Location)" (page 3).
Top of Enclosure Installation (Recommended Location)
-
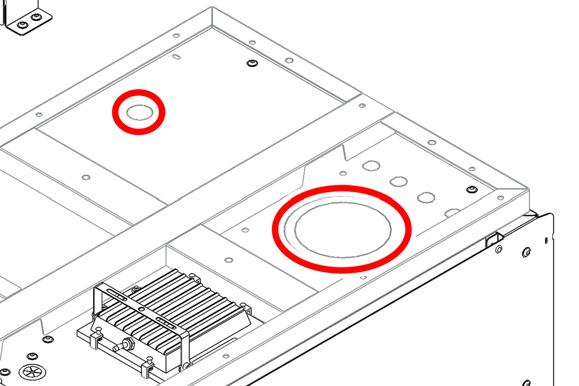
To prepare the enclosure for the mist collector installation, remove the 150 mm and 34 mm knockouts from the enclosure's top right panel using a punch to break the tabs. Discard the knockouts.
-
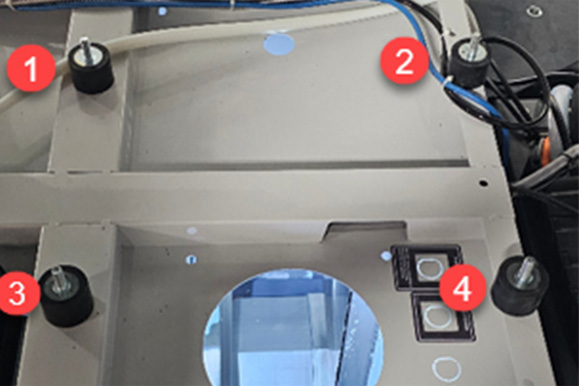
Identify the eight provided vibration isolation mounts: four are flat (for floor installation), and four have threaded rods on both ends (for enclosure installation). Remove and discard the nuts from the bottom threaded rod of the mounts.
-
Install the four vibration isolation mounts onto the enclosure’s top right panel. Remove and set aside the nuts and washers from the top threaded rod of the mounts.
-
Securely install the lifting eye into the center hole on the top of the mist collector.
-
Verify that all four of the mist collector filter housing’s latches are secured in the latched position.
-
Secure a lifting strap to the previously installed eyelet on the top of the mist collector.
WARNING! Lifting Hazard: Only use suitable lifting equipment, ensuring that it's on a stable, level surface. Never lift over people. Heavy loads could tip, fall, or shift unexpectedly, causing death or serious injury.
-
Using a gantry crane, forklift, or other suitable lifting device, place the mist collector filter housing on 4 × 4 blocks.
-
The mist collector's plenum inlet is installed facing the back of the mist collector for shipping. You must reorient it for installation on top of the enclosure. Remove the eight fasteners securing the cover with a #2 Phillips screwdriver. Set the cover and its screws aside.
-
Remove four fasteners securing the plenum inlet with a socket wrench. Reorient the plenum so that the circular opening is facing downwards, and reattach it using the four fasteners previously removed.
-
Reattach the cover to the mist collector using the eight fasteners previously removed.
-
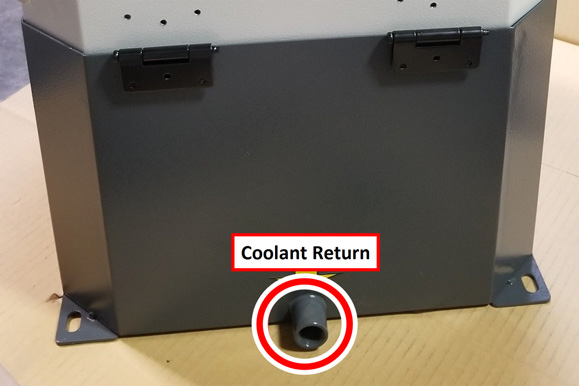
Attach the threaded-to-barbed adapter elbow to the mist collector’s coolant return. Tighten using an adjustable wrench until the fitting is snug and the barbed section is pointing downwards.
WARNING! Lifting Hazard: Only use suitable lifting equipment, ensuring that it's on a stable, level surface. Never lift over people. Heavy loads could tip, fall, or shift unexpectedly, causing death or serious injury.
-
Using a gantry crane, forklift, or other suitable lifting device, place the mist collector on the enclosure's top right panel. Align the slots in the mist collector’s foot flanges with the previously installed vibration isolation mounts.
-
Secure the mist collector to the vibration isolation mounts using the M8 washers and nuts that you previously removed and set aside.
-
Remove the lifting strap from the mist collector.
-
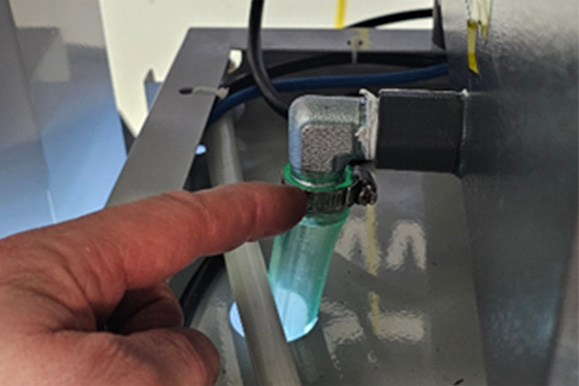
Secure the coolant drain hose to the mist collector’s drain using the provided hose clamp. Trim the excess coolant drain tubing inside the enclosure. The coolant drain tube should extend 1 in. (25 mm) into the enclosure.
Floor Installation (Alternate Location)
-
Identify a suitable mounting location for the mist collector’s filter housing using the following guidelines:
-
The mist collector filter housing should be located as close as possible to the machine to reduce the length of flexible ducting required.
-
If mounting to a worktable or wall bracket, the mounting location must be sufficiently sturdy to support it.
We recommend placing the mist collector housing on a suitable worktable or wall bracket with sufficient access to allow reclaimed coolant to be returned to the machines coolant tank using a drain hose or collected in a container.
-
Identify a suitable mounting location for mist collector’s intake flange. The mist collector’s intake flange should be mounted as close as possible to the area where mist is produced, but not so close as to ingest excessive amounts of chips/swarf.
-
Cut the necessary intake flange mounting holes.
-
Secure the intake flange and provided flange gasket to the enclosure.
-
Connect the flange-to-hose adapter to the intake flange.
-
Securely install the lifting eye into the center hole on the top of the mist collector.
-
Verify that all four of the mist collector filter housing’s latches are secured in the latched position
-
Secure a lifting strap to the previously installed eyelet on the top of the mist collector.
WARNING! Lifting Hazard: Only use suitable lifting equipment, ensuring that it's on a stable, level surface. Never lift over people. Heavy loads could tip, fall, or shift unexpectedly, causing death or serious injury.
-
Using a gantry crane, forklift, or other suitable lifting device. place the mist collector filter housing on in selected mounting location.
-
Mount the mist collector filter housing to the selected mounting location using the provided vibration-isolating mounts or feet.
-
Connect the mist collector hose to the flange-to-hose adapter. Secure using the provided spring clamp.
-
Route the mist collector hose from the flange-to-hose adapter to the mist collector filter housing. For best performance, the hose routing should be as direct as possible with as few bends as possible. Cut the hose to length, and secure it to the mist collector’s inlet plenum with the provided spring clamp.
-
Attach the threaded-to-barbed adapter elbow to the mist collector’s coolant return. Tighten using an adjustable wrench until the fitting is snug and the barbed section is pointing downwards.
-
Secure the coolant drain hose to the mist collector’s drain using the provided hose clamp. Tighten using a flat-blade screwdriver.
-
Route the coolant drain tube to the machine’s coolant tank or enclosure. Coolant flows by gravity down the drain tube. The return end of the coolant drain tube must be it’s lowest point to effectively drain. Trim excess coolant drain tubing.
NOTE: If a suitable coolant drain location is not available, a container can be placed below the coolant return elbow and emptied periodically.
Electrical Installation
-
Remove the two M6 panel fasteners and use them to secure the mist collector motor starter to the mill enclosure’s right side panel.
-
Route the motor starter’s cables along the enclosure’s top right panel towards the mist collector.
-
Connect the switched power cable connector to mist collector’s power connector.
-
Connect the mains power cable to the wall outlet.
-
Test the mist collector installation:
-
Press the Mist Collector Start Button to turn on the mist collector.
-
Press the Mist Collector Stop Button to turn off the mist collector.
-
Looking for more information?
This is a section of the 1500MX operator's manual. To view the whole manual, go to Tormach document UM10811.
If you have additional questions, we can help. Create a support ticket with Tormach Technical Support at tormach.com/how-to-submit-a-support-ticket for guidance on how to proceed.