In This Section, You'll Learn:
About the basic operations required for most projects, organized as a suggested project workflow.
Choose a Blade
Using the correct blade for the material is important to reduce cost and to operate the bandsaw efficiently. Because there's a wide variety of bandsaw blade types, you must first know the specifications of the material you want to cut.
Choosing a blade depends on a number of different factors. Use this section as a reference; for more information, see your blade manufacturer's reference materials.
NOTE: AF50 Autofeed Bandsaw blades are 93 in. × 3/4 in. × 0.35 in.
To choose a blade, determine the following:
-
Teeth Per Inch (TPI) Based on the size and shape of the material, select the TPI. A high TPI cuts slower and smoother, while a low TPI cuts faster and rougher. While cutting, you must always have three teeth engaged with the part.
|
Material Thickness Range |
TPI Range |
|
1/8 in. (6 mm) to 1/4 in. |
10 to 14 |
|
1/4 in. to 1/2 in. (12 mm) |
8 to 12 |
|
1/2 in. (12 mm) to 1 in. |
6 to 10 |
|
1 in. to 2 in. |
5 to 8 |
|
2 in. to 4 in. |
3 to 4 |
|
4 in. to 7 in. |
2 to 3 |
|
7 in. to 12 in. |
1-2/5 to 2-1/2 |
-
Tooth Form Select the tooth form (the shape of the cutting edge). The tooth form affects how the blade cuts through the material.
-
Tooth Set Based on the required chip clearance, select the tooth set (the angle at which the tooth is offset from the blade). The particular tooth set is what carries the chip away from the cut, and is important for surface finish.
Change a Blade
The bandsaw arrives with a blade installed. To change the blade, complete the following steps in the order listed:
NOTE: For simplicity, you must verify the blade installation before you set the saw head down.
Install a New Blade
WARNING! Crush Hazard: Moving parts can entangle, pinch, or cut you, causing death or serious injury. While operating the machine in vertical position, you must keep your hands away from the blade.
-
Put on work gloves, eye protection, and any other appropriate personal protective equipment. We recommend a long-sleeved shirt and long pants.
-
Power off the bandsaw and disconnect it from the main air supply.
-
Push the Emergency Stop button on the operator panel to lock it into the disabled position.
-
Turn the Main Disconnect switch to OFF.
Mains power is disconnected from the machine.
-
c. Disconnect the air line from your site from the input port on the FRL Filter-Regulator-Lubricator.
-
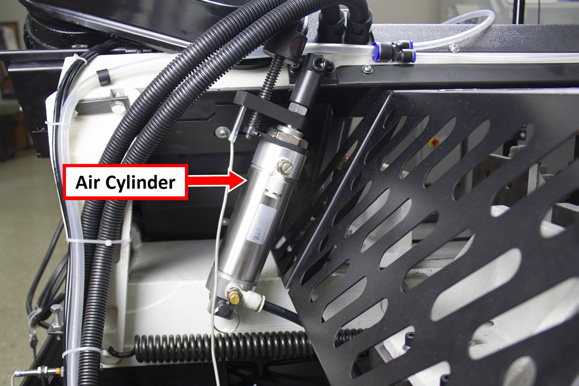
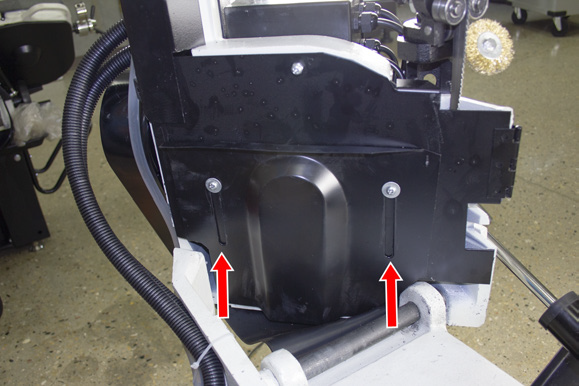
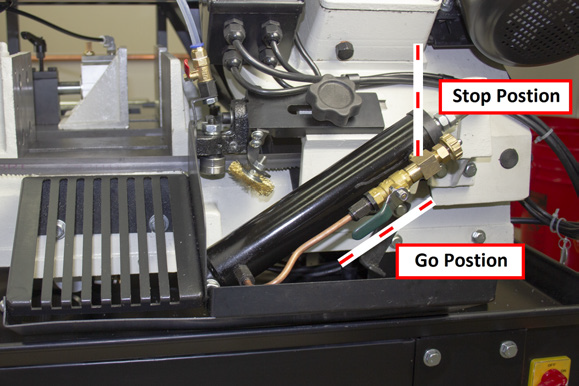
On the back of the machine, identify the air cylinder, as shown in the following image.
-
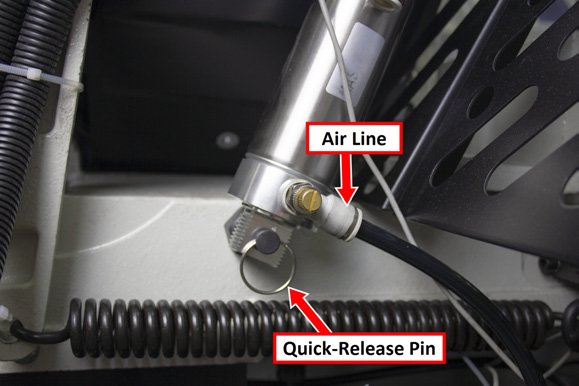
Turn the air line valve, which allows you to access the air cylinder's quick-release pin, as shown in the following image.
-
Pull the quick-release pin out of the air cylinder, and set it aside.
The air cylinder hangs from the saw head. -
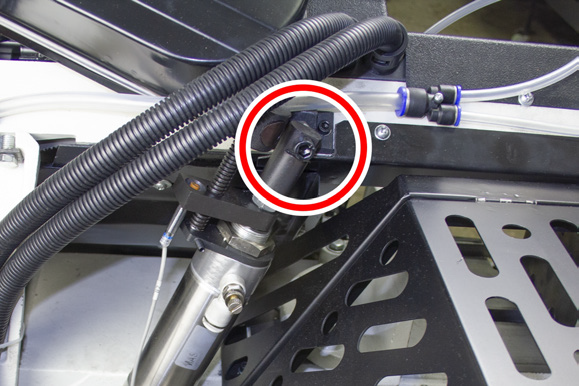
Remove the bolt securing the air cylinder to the bandsaw with an 8 mm hex wrench.
-
Set aside the bolt and the air cylinder.
-
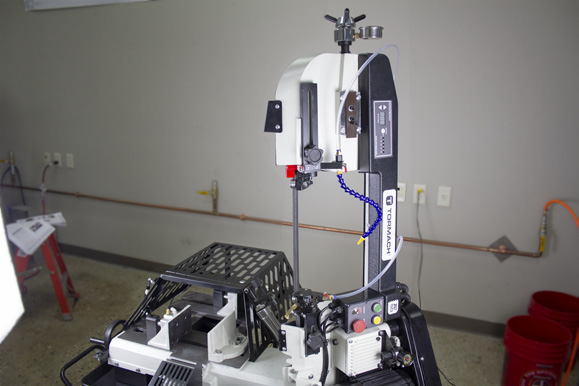
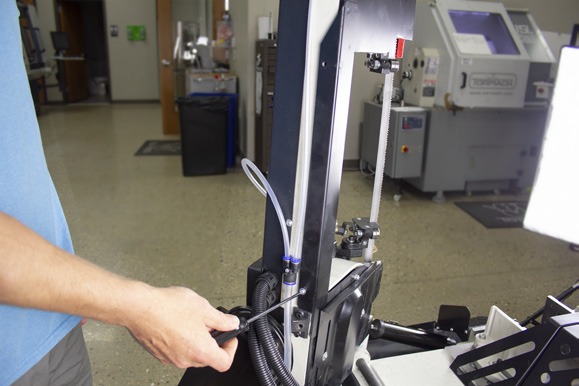
Lift the saw head to the upright position, as shown in the following image.
-
Loosen the two screws on the bottom of the blade cover with a Phillips screwdriver, and then slide the blade cover up until it clears the base casting.
-
Remove the two screws from the side of the blade cover, and then set aside the screws.
-
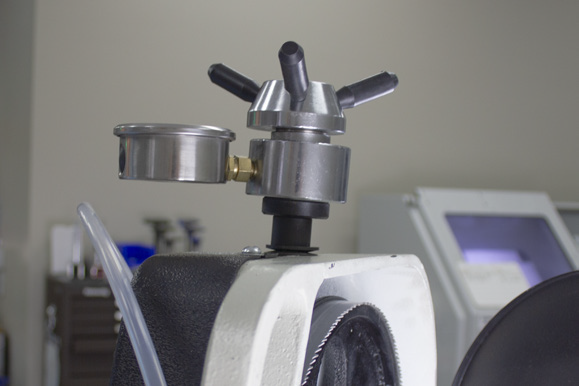
Open the blade cover, as shown in the following image.

-
Identify the tensioner on the top of the saw head.
-
Loosen the tensioner to remove the tension on the blade.
CAUTION! Cut Hazard: Bandsaw blades can cut you, causing serious injury. Before handling any bandsaw blades, you must put on work gloves, eye protection, and any other appropriate personal protective equipment (like a long-sleeved shirt and long pants). -
Carefully remove the blade from the wheels.
-
Put the new blade into the blade guides so that its teeth are pointing away from the blade guide's rollers, and so that its tooth direction is pointing toward the motor (from the blade guides).
-
Use one hand to hold the blade in between the blade guides, and use the other hand to put the blade around the wheels.
-
Keep one hand on the blade to hold it in between the blade guides, and use the other hand to tighten the tensioner. Continue tightening until the needle on the blade tensioning gauge is aligned with the tip of the arrow, as shown in the following image.
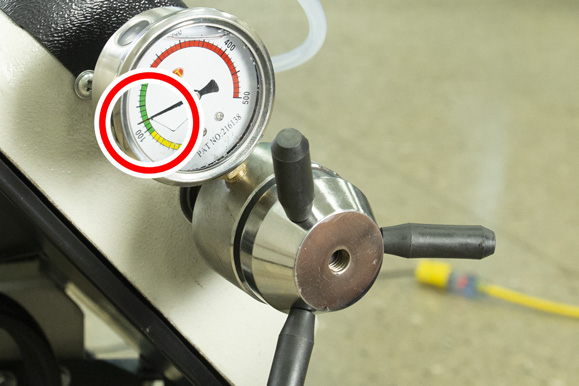
-
Close the blade cover, and then secure it using the two screws you set aside earlier.
-
Move the bottom of the blade cover down, and tighten its two screws.
Before you put the saw head down, you must verify that the blade is seated.
Verify the Blade Installation
-
Power on the bandsaw.
-
Rotate the Emergency Stop button on the operator panel one-quarter turn clockwise to release it.
-
Turn the Main Disconnect switch to ON.
Mains power is connected to the machine.
-
-
Set the bandsaw to manual mode: from the control panel, push the Down Arrow and Up Arrow buttons at the same time. The control board displays ---.
WARNING! Crush Hazard: Moving parts can entangle, pinch, or cut you, causing death or serious injury. While operating the machine in vertical position, you must keep your hands away from the blade.
-
From the operator panel, push the Cycle Start button.
The blade moves through the blade guides and around the blade wheels. -
Let the blade move for three seconds. Then, on the operator panel, press the Emergency Stop button.
-
Examine the position of the blade on the wheels, and do one of the following:
-
Blade Correctly Positioned on the Wheels Go to Step 6.
-
Blade Moved off the Wheels Power off the machine and disconnect it from the power supply. Then, adjust the blade until it's correctly positioned on the wheels, and repeat Steps 1 through 5.
-
-
Carefully set the saw head down.
-
Find the air cylinder and it's bolt that you set aside earlier. Then, attach the air cylinder back on the bandsaw.
-
Find the quick-release pin that you set aside earlier. Then, put it through the air cylinder and into the base casting.
Break in the Blade
All new bandsaw blades are manufactured with extremely sharp teeth, which need to be worn down slightly so that they don’t fracture under the high cutting pressure used in bandsawing. Your blade will cut more consistently and last much longer if you hone the teeth to create a small radius on the tip.
To break in a new blade:
-
Use the band speed recommended for the material you are cutting.
-
For Easy-To-Cut Materials (like carbon steel and aluminum) Reduce the feed rate to half the normal rate for 50-100 square inches.
-
For Hard-To-Cut Materials (like nickel-based alloys, hardened steels, tool steels and stainless steels) Reduce the feed rate to 3/4 the normal rate for 25-75 square inches.
-
Gradually increase to the normal cutting rate over the next few cuts, adjusting speed slightly if necessary to avoid vibration.
Change the Speed
NOTE: For information on selecting a blade cutting speed, see a machinist's handbook.
To change the blade cutting speed:
-
Power off the bandsaw and disconnect it from the main air supply.
-
Push the Emergency Stop button on the operator panel to lock it into the disabled position.
-
Turn the Main Disconnect switch to OFF.
Mains power is disconnected from the machine. -
Disconnect the air line from your site from the input port on the FRL Filter-Regulator-Lubricator.
-
-
Open the pulley cover.
-
Loosen the clamping bolt under the motor.
-
Turn the belt tensioning bolt counterclockwise to loosen the tension on the belt. Continue to turn the bolt until you can remove the belt from the pulleys.
-
Move the belt from one position on the pulleys to another.
The following speed ranges are available:
-
60 Hz: 135, 161, 226, 394 ft/min (41, 49, 69, 120 m/min)
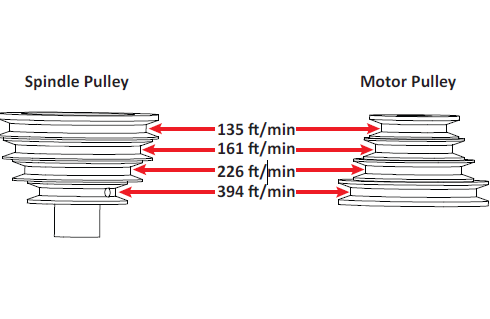
-
50 Hz: 112, 135, 194, 322 ft/min (34, 41, 59, 98 m/min)
-
Turn the belt tensioning bolt clockwise to increase the tension on the belt.
-
Firmly push the belt between the pulleys. If it's properly tensioned, the belt should move approximately 1/2 in. If it's not properly tensioned, repeat Steps 6 through 7.
-
Tighten the clamping bolt.
-
Close the pulley cover.
Change the Feed Rate
Determine the feed rate by observing how the bandsaw is operating and the chip formations that it's cuts are producing.
NOTICE! If the feed rate is too high, it could cause stalling or the blade to break. If the feed rate is too low, it could dull the blade too quickly.
To change the feed rate:
-
Open the hydraulic flow on the blade feed lever: turn the lever so that it's inline with the cylinder.
-
Adjust the feed rate:
-
To Increase the Feed Rate Turn the dial on the blade feed lever counterclockwise.
-
To Decrease the Feed Rate Turn the dial on the blade feed lever clockwise.
-
-
Close the hydraulic flow on the blade feed lever: turn the lever so that it's perpendicular with the cylinder.
Change the Clamping Pressure
NOTE: Choosing the clamping pressure — or the amount of force that the jaws exert onto the part — depends on the type of material you're cutting. For more information, see a machinist's handbook.
To change the clamping pressure:
-
Adjust the pneumatic regulator on the gearbox to increase or decrease the clamping pressure.
Set the Number of Cuts
Use the Up Arrow and Down Arrow buttons on the control panel to indicate the number of cuts.
To set the number of cuts:
-
Automatic Mode Select a number from 1 to 999.
-
Manual Mode Do one of the following:
-
Push the Down Arrow and Up Arrow buttons at the same time. The control panel displays ---.
-
Push the Down Arrow button until the control panel displays ---.
-
NOTE: A display of --- on the control panel indicates that the machine is in manual mode.
Set the Number of Cycles
NOTE: You'll only set the number of cycles in automatic mode. The Stroke button isn't used in manual mode.
If the required length is longer than a full stroke can move, use the stroke multiplier.
To set the number of cycles:
-
Use the Stroke button to indicate the number of cycles: select a number from 1 to 5.
Looking for more information?
This is a section of the AF50 Autofeed Bandsaw operator's manual. To view the whole manual, go to Tormach document UM10538.
If you have additional questions, we can help. Create a support ticket with Tormach Technical Support at tormach.com/how-to-submit-a-support-ticket for guidance on how to proceed.